XAUUSD — EMA Downtrend Holds, Sell Position Remains Active
Fundamental Analysis
Gold remains under pressure as price continues to trade below the main EMA structure. Traders are still watching USD strength, Treasury yields, and upcoming U.S. macro data.
For now, the technical structure still favours sellers while recovery attempts are rejected from the value sell zone.
Technical Analysis
On the 1H chart, XAUUSD is trading below EMA 34, EMA 89, and EMA 200. The EMA structure is still pointing lower, showing that the short-term trend remains bearish.
Price recently tested the value range around 4,210 - 4,225 but failed to break higher. This rejection shows that buyers are still weak, while sellers continue to defend the EMA downtrend.
The order sell zone around 4,185 - 4,204 has also reacted well. After touching this area, price rejected and moved lower again, confirming that the sell zone is still valid.
As long as gold stays below 4,204 - 4,225, the bearish continuation setup remains active. The main downside target is the Fibonacci and liquidity convergence zone around 4,066.
Important Key Levels
Current price area: 4,177
Order sell zone: 4,185 - 4,204
Value range resistance: 4,210 - 4,225
EMA resistance area: 4,234 - 4,270
Short-term support: 4,140 - 4,120
Fibonacci liquidity target: 4,066 - 4,064
Invalidation area: above 4,225
Trading Scenario
Main Sell Scenario
Entry: 4,185 - 4,204
Stop Loss: 4,225
Take Profit 1: 4,140
Take Profit 2: 4,100
Take Profit 3: 4,066 - 4,064
Sell Condition
The preferred setup is to continue focusing on sell positions while price stays below the value range and EMA resistance.
The sell zone has already reacted well, showing rejection from 4,185 - 4,204. If price retests this area and forms another bearish rejection, the sell continuation setup remains valid.
A break below 4,140 would strengthen bearish momentum and open the way toward 4,100, then the Fibonacci liquidity target around 4,066 - 4,064.
Entry Conditions
Wait for price to stay below 4,204.
Look for bearish rejection on any retest.
A break below 4,140 confirms stronger downside pressure.
If price breaks and holds above 4,225, the sell setup is invalid.
Overall, the main view remains bearish while XAUUSD trades below EMA 34, EMA 89, EMA 200, and the value range resistance. The sell zone has already rejected price, so the preferred plan is to continue focusing on bearish continuation toward 4,140, 4,100, and 4,066.
Do you share the same bearish view on gold, or are you waiting for another retest of the order sell zone?
Fibonacci Extension
BTC Multi-Timeframe Analysis: Confluence of Bearish FormationsIdea Type: Short / Bearish Setup
Asset: BTC/USDT (Binance)
Timeframe: Multi-Timeframe Analysis (4H, 1D, 1W displayed on 1D chart)
Market Overview & Confluence Breakdown
When multiple independent timeframes align to point toward the exact same directional bias, the market structure demands close attention. As displayed in the attached chart, Bitcoin is currently showing a rare confluence of bearish Fibonacci extension structures across the 4-Hour, Daily, and Weekly charts.
The structural break below the macro 200 EMA on the Weekly timeframe has shifted the broader momentum, converting previous institutional support into a heavy overhead supply ceiling.
The Multi-Timeframe Bearish Scenarios
Our advanced Fibonacci structure indicator highlights three distinct, nested downside paths that validate each other:
1. The 4H & 1D Retracement Confluence (Immediate Focus)
The Zone: The price recently rallied into the overlapping 4H / 1D retracement zone (dotted area around $63,500 – $66,000).
The Response: Sellers aggressively defended this cluster, keeping the price structurally suppressed below local key liquidity.
The Targets:
The 4H target zone (orange box) sits between $36,000 and $41,500.
The 1D target zone (blue box) closely aligns just below it, stretching down toward $31,000 – $36,000.
2. The 1W Macro Expansion
The Zone: Should the market experience a deeper relief rally before expansion, the macro 1W retracement zone stands ready between $68,000 and $74,000 as the ultimate line of defense for macro bears.
The Target: The overarching 1W target zone (pink box) represents the final structural extension area, located between $21,000 and $34,000.
Invalidation Levels & Key Structures to Watch
In trading, structural invalidation is just as critical as the target zones.
Local Invalidation: A sustained daily close above the 4H / 1D retracement zone ($66,000) invalidates the immediate, aggressive downside acceleration path. This would likely trigger a liquidity squeeze up into the higher 1W retracement zone.
Macro Invalidation: The entire macro bearish structure across these timeframes remains completely intact unless the price breaks and holds above the 1W retracement zone (~$74,000). Reclaiming that level would invalidate the macro downside targets and shift the structure back to a bullish bias.
Community Discussion
Seeing three distinct timeframes nesting their targets so perfectly is a massive technical signal. Are you playing the immediate local rejection, or are you looking for a deeper retest of the macro 1W zone before entering short?
Drop your thoughts, charts, and scenarios in the comments below! If you found this multi-timeframe analysis valuable, don't forget to boost and follow for more clean market structures.
Disclaimer: This analysis is for educational purposes only and represents a personal technical view of the market structure. It does not constitute financial or investment advice. Always manage your risk according to your personal trading plan.
XAUUSD — EMA Bearish Trend, Fibonacci Target in Focus
Fundamental Analysis
Gold remains under pressure as traders continue to watch USD strength, Treasury yields, and upcoming U.S. macro data.
For now, the structure still favours sellers while XAUUSD trades below the main EMA range. Any recovery should be treated as a technical pullback unless price can reclaim the EMA resistance zone with strong confirmation.
Technical Analysis
On the 2H chart, XAUUSD is trading below EMA 34, EMA 89, and EMA 200. This confirms that the current trend remains bearish, with the EMA structure acting as dynamic resistance above price.
Price has already rejected from the higher area and is now trading around 4,179. The current move shows strong bearish pressure, and the chart highlights a key sell zone around 4,221 - 4,225.
This sell zone is important because it aligns with the broken structure, previous reaction area, and EMA trend pressure. If gold pulls back into this zone and fails to break higher, sellers may regain control.
The psychological resistance zone around 4,160 - 4,170 is also important. If price stays below this area after a failed recovery, the bearish continuation scenario remains active.
The medium-term downside target is the Fibonacci level around 4,067, marked as the main retracement target on the chart.
Important Key Levels
Current price area: 4,179
Main sell zone: 4,221 - 4,225
EMA resistance area: 4,254 - 4,285
Psychological resistance: 4,160 - 4,170
Short-term bearish trigger: below 4,160
Fibonacci medium-term target: 4,067
Extended liquidity target: 4,075 - 4,067
Invalidation area: above 4,254
Trading Scenario
Main Sell Scenario
Entry: 4,221 - 4,225
Stop Loss: 4,254
Take Profit 1: 4,160
Take Profit 2: 4,075
Take Profit 3: 4,067
Sell Condition
The preferred setup is to wait for gold to pull back into the 4,221 - 4,225 sell zone. This area is the key resistance zone on the chart and aligns with the bearish EMA structure.
A sell setup becomes more valid if price forms bearish rejection from this zone, such as a long upper wick, bearish engulfing candle, failed breakout, or lower high below the EMA range.
If price rejects from 4,221 - 4,225 and breaks below 4,160, the bearish continuation view becomes stronger. The next target would be 4,075, followed by the Fibonacci medium-term target around 4,067.
Entry Conditions
Wait for price to retest 4,221 - 4,225.
Look for bearish rejection before entering sell.
A break below 4,160 confirms stronger downside pressure.
If price breaks and holds above 4,254, the sell setup is invalid.
Overall, the main view remains bearish while XAUUSD trades below EMA 34, EMA 89, and EMA 200. The preferred plan is to wait for a pullback into the 4,221 - 4,225 sell zone, then look for bearish confirmation toward 4,160, 4,075, and the Fibonacci target around 4,067.
Do you share the same bearish view on gold, or are you waiting for a cleaner pullback into the sell zone first?
XLM — ABC Delivered, WCLs Now in PlayPrice has reached the bearish ABC C target on the 4H.
That’s a fact, not a forecast.
What happens next is not guaranteed .
Often after a sequence delivers, price looks for relief and retracement toward nearby liquidity — and in this case, the unreached WCL zones above are the obvious magnets.
But let’s be clear:
ABC delivery ≠ trend reversal
Price can accept the C target and continue lower
Or it can retrace toward WCLs before the next decision point
Both outcomes are valid until price accepts or rejects .
So the framework is simple:
If price retraces into WCL and rejects → bearish continuation remains intact
If price accepts above WCL → bias shifts and the structure changes
No assumptions.
No calling bottoms.
Just reacting to where price shows acceptance.
US Crude Oil (WTI) – Major Bearish BreakdownIdea Type: Short / Bearish Setup
Asset: US Crude Oil Spot (WTI)
Timeframe: 4-Hour (4H)
Market Analysis & Technical Setup
As shown in the chart, US Crude Oil is showing massive bearish momentum after a structural breakdown. The technical layers point heavily toward a continued downside expansion.
Key Technical Observations:
200 EMA Resistance: The price is trading significantly below the 200 Exponential Moving Average (EMA) on the 4H chart. The declining 200 EMA confirms a dominant macro bearish trend and acts as a dynamic ceiling for any relief rallies.
The Retracement Zone: The orange highlighted box marks the Golden Pocket and Retracement Zone (around $92.50 – $95.00). After testing this crucial supply liquidity area and failing to break back above the 200 EMA, the sellers took full control, resulting in an aggressive impulsive move down.
Current Price Action: The recent price action confirms heavy distribution. Immediate support levels are being sliced through with high momentum, displaying zero signs of a strong institutional buy response at current levels.
Trading Plan & Target Zone
The Bearish Target: Based on the current market structure and displacement, the primary objective remains the Target Zone on the 4H chart (blue dotted area between $65.00 and $72.50).
Invalidation / Scenario Shift: The overall bearish bias remains fully intact as long as the price stays structurally below the 200 EMA and the recent lower highs. Any short-term bounces should simply be viewed as potential entries or relief retracements into minor supply blocks before the next leg down.
Traders Note: Watch the lower timeframe order flow for confirmation if you are looking to catch minor pullbacks, but the macro direction on this 4H structure is heavily favored for the bears.
Disclaimer: This is a personal market analysis and not financial advice. Always manage your risk properly.
Gold Structural Reversal Into Bullish Impulse!The Gold market (XAUUSD) stabilizes in Friday's session, displaying a significant structural shift as buyers firmly grasp the near-term momentum. Following a highly volatile week driven by CPI and PPI releases, market participants are now shifting their focus toward the upcoming Michigan Consumer Sentiment Index. This late-week data catalyst will provide critical insights into consumer inflation expectations and overall economic health, directly influencing how institutional desks position their capital ahead of the weekly close.
Currently, a prominent tug-of-war is unfolding between short-term profit-taking and fresh structural accumulation. While long-term macroeconomic headwinds still linger, the immediate market order flow has turned strictly bullish, transitioning into an impulse structure as smart money targets higher liquidity pools.
Based on the newly established Bullish Impulse Wave structure on the M30 timeframe, the core technical levels to monitor include:
Major Upside Target (Potential Wave 5 Destination): 4,354.529 – The ultimate expansion target for the final leg of the impulse cycle, perfectly aligned with the Fibonacci Extension 1.618 level.
Immediate Resistance (Wave 3 Peak): 4,246.948 – The horizontal structural high where initial supply capped the recent rally, now serving as a breakout threshold.
Key Demand Layers (Potential Wave 4 Bottom): 4,160.882 (Fibonacci Retracement 0.5) and 4,126.709 (Fibonacci Retracement 0.382) – Vital Confluence Zones where institutional buyers are heavily expected to step in and defend the structure.
What's your assessment of this newly formed M30 impulse structure? Will Gold respect the internal Fibonacci demand layers to launch Wave (5), or will the sellers break the cycle before the weekly close? Drop your technical perspectives and charts in the comments section below!
XAUUSD: Wave 5 Reaches the Fibonacci Sell Swing Zone
Gold is pushing into an important resistance area after a strong recovery from the lower liquidity base around 4,053. From Kelly’s view, the current advance is now approaching the final part of a short-term Elliott Wave structure, where wave 5 may be close to completion.
The key idea is simple: gold is still rising, but price is now entering a Fibonacci resistance zone where the next reaction becomes very important.
⟡ Market structure
The chart shows a strong recovery from the 4,053 support area, followed by a clean bullish wave sequence through 4,180 and 4,290. Buyers have managed to push price back above the liquidity accumulation zone, which confirms that short-term momentum has improved.
However, gold is now trading near 4,326 and approaching the 4,406 resistance area, where the chart marks the possible end of wave 5. This zone also aligns with the Fibonacci extension area, making it an important reaction point for the next swing.
If price continues higher into 4,360–4,406 but begins to slow down, the market may start forming a sell swing from resistance.
➤ Key levels
◌ 4,290–4,326: current reaction and short-term support
◌ 4,360–4,406: Fibonacci resistance and wave 5 completion zone
◌ 4,180–4,240: liquidity accumulation zone
◌ 4,053: major support and invalidation area
◌ Below 4,180: area where the bullish recovery starts to weaken
⌁ Elliott Wave view
From an Elliott Wave perspective, gold appears to be developing a 5-wave bullish recovery after the previous ABC structure completed near the lower zone.
Wave 1 started from the 4,053 area.
Wave 2 corrected back into the base.
Wave 3 expanded strongly towards 4,290.
Wave 4 held above the accumulation zone.
Wave 5 is now developing towards the Fibonacci resistance zone around 4,360–4,406.
If wave 5 completes near this area and price prints rejection, gold may begin an A-B-C corrective pullback towards 4,240 or even 4,180.
▸ Trading scenario
Preferred scenario: wait for wave 5 to complete near the Fibonacci resistance area before looking for a reaction.
Sell reaction zone: 4,360–4,406 if bearish confirmation appears
Stop loss: above the confirmed wave 5 high
Take profit 1: 4,290
Take profit 2: 4,240
Take profit 3: 4,180
Alternative scenario: if gold breaks above 4,406 and holds with strong acceptance, the wave 5 sell swing idea weakens, and the market may continue extending higher before forming a new structure.
⌁ Kelly’s view
For Kelly, this is not a place to chase the upside aggressively. The recovery has been strong, but price is now moving into the zone where wave 5 may finish.
The cleaner approach is to watch how gold reacts around 4,360–4,406. If rejection appears, the market may shift from bullish continuation into a corrective sell swing.
Gold is still rising.
But structurally, wave 5 may be approaching its final resistance zone.
Share your view below.
WTI Crude Oil (XTIUSD) Update: US-Iran Peace Accord Accelerates WTI Crude Oil (XTIUSD) Update: US-Iran Peace Accord Accelerates Breakdown Toward Crucial 200 EMA & $75 Support Floor
### 🛢️ WTI Crude Oil (XTIUSD) Macro Update (Ref: XTIUSD_2026-06-15_08-34-17.png)
We are releasing a crucial technical and fundamental update for WTI Light Crude Oil ( ICMARKETS:XTIUSD - IC Markets) following pivotal geopolitical developments.
### 📰 Geopolitical Catalyst vs. Technical Reality
The recent fundamental announcement of a peace agreement/normalization breakthrough between the US and Iran has immediately stripped the geopolitical risk premium out of the energy complex. This shift has triggered an aggressive institutional liquidation phase, driving the current daily session down **-5.66% to 80.02**.
### 🔍 Technical Breakdown Matrix:
* **The 200 EMA Battleground:** Price action is actively attempting to breach and sustain a clean breakdown beneath the long-term trend baseline—the **200-period EMA (blue line at 80.35)**. Sustained daily acceptance below this node shifts the macro order flow firmly to the bears.
* **The $75–$77 Immediate Support Cluster:** As highlighted by our highlighted yellow target zone, the market is cascading into a major structural inflection point. A key horizontal support level rests at **77.16**, which tightly converges with a primary multi-month Ascending Trendline (the lower diagonal red support baseline) and the **1 Fibonacci extension node at 78.69**. We anticipate the market will attempt to catch a temporary bid or form a consolidation base within this **$75.00–$77.00 block**.
### 🎯 The Macro Downside Target ($66 Zone)
Should the fundamental selling pressure break through the diagonal trendline and the $75 cushion, it will open up a severe liquidity vacuum.
A confirmed breakdown beneath this cluster invalidates the long-term bullish market structure and sets a direct course toward our ultimate downside target established in our previous study: the master **1.618 Fibonacci extension layer located at 66.22**.
### Tactical Playbook:
We remain highly defensive on oil exposure. Any short-term counter-trend retracements up toward the broken 200 EMA (80.35) or the 72 EMA (91.54) will likely face heavy overhead distribution. Monitor the interaction within the $75–$77 structural zone closely for signs of deceleration; otherwise, prepare for a broader extension toward the $66 macro floor.
---
📊 **ChartPro Data** | By Rogerio Zaglia
*Geopolitical Energy Research, Structural Price Action & Fibonacci Geometry.*
⚠️ **Disclaimer:** For educational and informational purposes only. This technical update represents a personal trading framework and does not constitute financial or investment advice.
Gold (XAUUSD): Structural Breakdown & New Target ActivationFollowing a multi-month bullish expansion, Gold (XAUUSD) has experienced a significant structural shift on the Daily (1D) time frame. Price action recently encountered heavy resistance near the "Golden Pocket" liquidity zone ($4,800 - $5,000$). The inability to sustain higher prices inside this major threshold triggered a corrective sequence that has now evolved into an active bearish structural impulse.
Technical Breakdown
1. Structural Shift & Short Signal Confirmation
The Geometry: After reacting cleanly off the upper premium zones, price initiated a series of lower highs and lower lows.
The Breakout: A distinct structural peak/trough sequence developed as price consolidated above a prominent dynamic support line. The subsequent breakdown below this dynamic level acted as the institutional trigger, printing a clear "Short Signal" confirmation candle as structural momentum aggressively shifted to the downside.
2. Immediate Target Achieved ("Target Hit")
First Objective: The initial downside structural impulse projected a localized target zone around the $4,000 psychological level.
The Reaction: As visible on the chart, price successfully pierced this exact calculation box ("Target Hit"), exhausting the short-term algorithmic order flow and causing a minor temporary wick reaction as liquidity was tapped.
3. Macro Sequence Extension ("New Structure Activated")
The Higher Horizon: Because the previous localized support and structure lows were convincingly broken during this descent, a larger macro A-B-C structural sequence has officially been triggered.
The New Downside Target: With the macro sequence now dynamically active, the algorithm projects a major historical extension target zone further below. This high-probability expansion area lies within the $2,800 - $3,200 price belt ("New Structure Activated").
Strategic Outlook & Next Steps
The Retracement Phase (Pullback Hunt): Since the immediate short-term target has just been hit, entering shorts at the absolute bottom carries an unfavorable risk-to-reward ratio. The highest probability setup involves waiting for a corrective pullback.
Confluence Levels to Watch: Any retest of the broken dynamic support structure from underneath—or an entry into lower-timeframe bearish imbalances (such as 4H/1H Fair Value Gaps)—will serve as optimal validation zones to hunt for continuation entries toward the macro $3,000 target.
Invalidation: The macro bearish outlook remains fully valid as long as the market structures continue to print descending pivots and price remains capped below the recent breakdown swing high.
Disclaimer: This analysis is plotted strictly for educational purposes and visualization of market geometry. It does not constitute execution advice, financial recommendations, or specific buy/sell signals.
XAUUSD – Weekly Outlook Gold Remains Bearish Below Major Trendline
Gold is still trading under clear weekly pressure after losing the rising support structure and failing to reclaim the higher liquidity area. The daily chart shows that sellers remain in control while price is moving below the SMA 200 and below the long-term descending trendline.
FUNDAMENTAL ANALYSIS
Gold remains sensitive to the U.S. dollar, Treasury yields and upcoming U.S. economic data. If the dollar stays firm and rate-cut expectations remain weak, gold may continue to face selling pressure next week.
For now, the technical structure is still more important. As long as gold cannot reclaim the broken support and liquidity zone above, bearish continuation remains the main view.
TECHNICAL ANALYSIS – SMC + FIBONACCI
From an SMC perspective, gold has broken below an important support structure and confirmed weakness after failing to hold the previous trendline base. The recent move shows bearish displacement, and price is now testing the broken trendline area from below.
The zone around 4,218 – 4,300 is important because it may act as a sell-test area. If price fails to reclaim this zone, sellers may continue to defend the structure.
Above price, the liquidity zone around 4,400 – 4,446 is a stronger resistance area, also close to the SMA 200. A deeper recovery into this zone would still be considered a bearish retest unless gold breaks and holds above it clearly.
The main downside focus is the weekly low near 4,022. If this level breaks, gold may continue toward the strong support around 3,888, followed by the Fibonacci extension targets near 3,730 and 3,380.
KEY PRICE ZONES TO WATCH
Current price area: 4,218
Sell test trendline area: 4,218 – 4,300
Liquidity zone / SMA 200 resistance: 4,400 – 4,446
Strong resistance: 4,595
Lowest support this week: 4,022
Strong support: 3,888
Fibonacci Target 1: 3,730 – 3,700
Fibonacci Target 2: 3,400 – 3,360
Invalidation area for sell view: Above 4,446 – 4,595
TRADING SCENARIOS
Sell Scenario – Priority Weekly View
If gold retests the 4,218 – 4,300 area and shows rejection, I will watch for a bearish continuation setup.
Sell Zone: 4,218 – 4,300
Entry Condition: Bearish rejection, failed retest, lower-timeframe CHoCH, or strong bearish displacement from the broken trendline area.
Stop Loss: Above 4,300 or above the nearest swing high.
Take Profit:
TP1: 4,022
TP2: 3,888
TP3: 3,730 – 3,700
Alternative Sell Scenario
If gold recovers deeper into the 4,400 – 4,446 liquidity zone, I will still watch for sell reaction if price fails to reclaim the SMA 200 and descending trendline.
Sell Condition: Wait for rejection from 4,400 – 4,446 with bearish confirmation on the smaller timeframe.
Target: 4,022 – 3,888
Buy Scenario – Only Corrective Recovery
A buy setup is not the main view for next week. However, if gold holds above 4,022 and creates a bullish reaction, a short-term corrective bounce may appear.
Buy Zone: 4,022 – 4,000
Entry Condition: Liquidity sweep, bullish rejection, or lower-timeframe bullish CHoCH.
Take Profit:
TP1: 4,218
TP2: 4,300
Invalidation: If price breaks and holds below 4,022, the buy idea is invalid.
MY VIEW ON GOLD
My weekly view for gold remains bearish. The chart shows that price has lost an important support structure and is now trading below the SMA 200, while the descending trendline continues to pressure the market from above.
The cleaner plan is to wait for gold to retest resistance, then observe seller reaction on the smaller timeframe. The 4,218 – 4,300 area is the first sell-test zone, while 4,400 – 4,446 is the stronger liquidity resistance if price recovers deeper.
Overall, gold remains weak unless buyers can reclaim the liquidity zone and hold above the SMA 200. If 4,022 breaks, the next weekly downside path may open toward 3,888 and the Fibonacci extension targets below.
Do you think gold will reject from the trendline retest next week, or will price recover deeper into the 4,400 liquidity zone first?
XAUUSD – Gold Remains Under Pressure After Liquidity Break
Gold is still trading inside a bearish structure after the strong breakdown from the previous consolidation area. The current H4 chart shows that sellers are maintaining control below the descending trendline, while price is reacting near the short-term liquidity area around 4,021 – 4,092.
FUNDAMENTAL ANALYSIS
Gold remains highly sensitive to the U.S. dollar, Treasury yields and upcoming U.S. inflation-related data. When the market keeps pricing in a cautious Federal Reserve outlook, gold can stay under pressure, especially after a strong bearish technical move.
At the moment, the fundamental background does not strongly support aggressive buying. Unless there is a clear shift in risk sentiment or weaker U.S. data, the upside recovery may still be limited and sellers may continue to defend the higher supply zones.
TECHNICAL ANALYSIS – SMC + FIBONACCI
From an SMC perspective, gold has already broken below several short-term structures and created bearish displacement on the H4 chart. The previous CHoCH areas have failed to support price, showing that the market has shifted into a lower-high and lower-low structure.
The descending trendline is still pressing from above, while price is trading below the SMA 200, confirming that the broader momentum remains weak. The current Doji candle near the liquidity zone shows hesitation, but not yet a strong bullish reversal.
The nearest upper reaction area is the liquidity zone around 4,161 – 4,182, which also aligns with the 0.618 Fibonacci retracement. If price pulls back into this area and fails to break higher, it may become a clean sell continuation zone.
Above that, the FVG area around 4,286 – 4,294 remains a stronger supply zone. As long as gold stays below this region, the bearish scenario remains the main view.
On the downside, the market is likely watching the day low around 4,024 and the lower liquidity zone near 4,021. If this zone breaks clearly, price may continue expanding toward the Fibonacci extension target around 3,833 – 3,817.
KEY PRICE ZONES TO WATCH
Current price area: 4,082
Nearest support / liquidity: 4,024 – 4,021
Short-term pullback zone: 4,161 – 4,182
Sell reaction zone: 4,161 – 4,182
Major FVG / supply zone: 4,286 – 4,294
Buyside liquidity: 4,363
Main bearish target: 3,833 – 3,817
Invalidation area: Above 4,294
TRADING SCENARIOS
Sell Scenario – Priority View
If gold recovers into the 4,161 – 4,182 zone and shows rejection, I will watch for a bearish continuation setup.
Sell Zone: 4,161 – 4,182
Entry Condition: Wait for bearish rejection, failed breakout, lower-timeframe CHoCH, or strong bearish displacement from the liquidity zone.
Stop Loss: Above 4,182 or above the nearest swing high.
Take Profit:
TP1: 4,024 – 4,021
TP2: 3,833
TP3: 3,817 if bearish momentum expands.
Alternative Sell Scenario
If gold breaks directly below 4,021 with strong momentum, sellers may continue to control the market.
Sell Condition: Wait for a clean H4 break below 4,021, then watch for a retest and rejection from the broken support.
Target: 3,833 – 3,817
Buy Scenario – Only Short-Term Reaction
A buy setup is not the main view today. However, if gold sweeps the 4,021 liquidity area and quickly recovers back above 4,024, a short-term corrective bounce may appear.
Buy Zone: 4,024 – 4,021
Entry Condition: Only consider buying if there is a clear liquidity sweep, bullish rejection candle, and lower-timeframe bullish CHoCH.
Take Profit: 4,161 – 4,182
Invalidation: If price breaks and holds below 4,021, the buy idea is invalid.
MY VIEW ON GOLD
My main view for gold today is still bearish. The chart shows clear selling pressure, price remains below the descending trendline, and the major FVG zones above have not been filled yet.
I prefer looking for sell setups after pullbacks rather than buying too early. The 4,161 – 4,182 zone is the key area for sellers to defend. If gold fails there, the next downside target may be the 3,833 – 3,817 Fibonacci extension zone.
Overall, gold is still weak unless buyers can reclaim the higher FVG zone around 4,286 – 4,294.
Do you think gold will retest 4,161 – 4,182 before continuing lower, or will sellers break 4,021 directly today?
Japan 225 (NI225): Macro Bullish Trend Heading Towards TargetAs seen, the Japan 225 (Daily) is displaying a stellar textbook bullish market structure. After a healthy multi-month consolidation pattern (yellow zig-zag corrective wave) that completed in late March near the $50,000 macro support line, the index experienced a massive impulsive continuation.
Price has cleanly broken above the previous local resistance levels ($58,000 and $62,400), effectively flipping the entire zone into a strong demand foundation. It is currently moving aggressively higher within a broad ascending structural channel (solid blue lines).
Key Technical Catalysts
Impeccable Macro Trend: The price is trading safely above the 200 EMA (white line), which continues to slope steadily upward, confirming strong macro-bullish institutional backflow.
Resistance Turned Support: The old consolidation ceiling around $62,400 has been completely cleared and successfully retested, establishing a rock-solid higher low structure.
Ascending Channel Geometry: Price is currently advancing towards the upper boundary of its dominant ascending channel. A minor short-term pause or shallow intraday retest of the local $65,500 zone (yellow horizontal line segment) would be a completely healthy development before the next leg up.
Overbought Extensions: The dashboard indicates that while the overarched trend momentum is entirely bullish, short-term oscillators are pushing into overbought territory. This signals that while the upside is heavily favored, chasing entries at the exact current peak ($66,808) carries higher short-term risk than waiting for minor intraday cool-offs.
Trading Scenarios & Execution
🔵 Long Entry Strategy (Trend Continuation)
Optimal Entry Area: Look for long entries on minor pullbacks towards $65,000 - $65,500 or upon a clean structural bull-flag breakout on lower timeframes.
Stop Loss: A daily close below the $62,000 support level invalidates the immediate aggressive upside momentum.
Target Zones:
Target 1: $69,000 (Psychological milestone and channel mid-line junction).
Target 2 (Primary Macro Goal): $71,000 - $73,500 (The highlighted yellow target box marked as Major, which aligns perfectly with macro-extension measurements).
🔴 Potential Short Strategy (The Correction Scenario)
Thesis: Should the market begin to correct—either just before or right after hitting the major Major target zone—we anticipate a deeper, healthy macro retracement.
Execution & Outlook: This potential short scenario targets a pullback into the Golden Pocket (the 0.618 - 0.65 Fibonacci retracement level of the entire impulsive run). This area provides massive technical confluence, as the steadily climbing 200 EMA (white line) is expected to catch up and meet the price exactly within this Golden Pocket zone by the time the correction plays out. This would offer a textbook institutional reload zone for long-term buyers.
⚠️ Risk Management Notice
Disclaimer: This analysis is purely based on the chart structures presented and does not constitute financial advice. Global indices can experience sudden volatility shifts due to macroeconomic data releases. Trade with predefined stop losses and strict risk allocation.
What is your outlook on the Japanese market? Do you expect a direct run into the $70k handle, or will we see a deeper retest first? Let us know your view in the comments section! 👇
METC | Coal Making Moves In The Energy Space | LONGRamaco Resources, Inc. engages in the operation and development of coal mining properties. The firm deals with metallurgical coal in central and southern West Virginia, southwestern Virginia and southwestern Pennsylvania. Its portfolio consists of Elk Creek, Berwind, RAM Mine, and Knox Creek. The company was founded by Randall W. Atkins in August 2015 and is headquartered in Lexington, KY.
Gold Preparing for a Trendline Breakout?Gold is showing early signs of a bullish recovery after completing a five-wave decline and sweeping liquidity below the recent lows around 4376. The strong rejection from that area suggests that sellers may be losing control, while buyers begin to step back into the market.
The recent rally has already reclaimed a portion of the previous decline and is now approaching a key descending trendline that has capped price since the recent highs. A successful breakout above this trendline would be an important shift in market structure and could open the door for a larger bullish expansion.
In the short term, a pullback into the highlighted Order Block around 4500–4512 would be a healthy development. This area could provide buyers with an opportunity to re-enter before the next leg higher. As long as price holds above this zone, the bullish scenario remains intact.
A strong reaction from the Order Block followed by a breakout of the trendline would increase the probability of price targeting 4638, with further upside potential toward 4712 if momentum continues to build.
For now, the market appears to be transitioning from a corrective phase into a potential bullish expansion. The key focus remains on whether buyers can defend the retracement and generate enough momentum to break above the descending trendline.
UNG | "Power Plant Day" or Payday? Why UNG is Coiling | LONGIf you thought your wallet felt light after the holidays, buckle up. Natural gas is about to pull a "Phoenix" act, and it’s not just because the groundhog saw its shadow. Between a geopolitical powder keg in the Middle East and the ghost of winter storms past, the "buy the dip" crowd is about to look like geniuses - and everyone else is going to be wearing three sweaters indoors.
1. The "Strait" Jacket: The Trump Deadline
As of this morning, April 7, 2026, the market is holding its breath. President Trump has set a hard 8:00 PM ET deadline for Iran to reopen the Strait of Hormuz or face "decimation" of its energy infrastructure. After the joint US-Israel strikes on February 28, the "will they, won't they" drama has officially pivoted to "they did," and now we’re in the "what next?" phase.
The Math: Roughly 20% of the world’s LNG flows through that narrow strip of water. It’s currently blocked, and Trump is threatening to turn Iran’s power plants into expensive parking lots if the gates don't open tonight.
The Snark: If you thought your gas bill was high, wait until the "Strait" becomes a "Dead End." Analysts are predicting global LNG prices could quadruple. That’s not a "pop"—that’s a moon mission without a flight plan, fueled by a President who treats geopolitical deadlines like a season finale of The Apprentice.
2. "Winter Storm Fern" Left the Cupboard Bare
While Trump is bringing the heat to the Middle East, Winter Storm Fern already brought the cold to our inventories. Remember late January? While you were complaining about the slush, Fern was busy devouring the US natural gas supply.
The Record: We saw the largest weekly storage withdrawal in history (360 Bcf).
The Fallout: Despite the Trump administration’s "Energy Dominance" push to drill everywhere including your backyard, inventories are still struggling to recover from that historic drain. We’re basically running the heater on "E," and the EIA just hiked forecasts because we're one global supply disruption away from a real problem.
3. The Technical "Spring-Load": 3 Mini Bullish Wedges
From a swing trader's perspective, the chart for UNG (Natural Gas) is starting to look like a coiled rattlesnake.
The Triple Threat: We are currently seeing three mini bullish descending wedges forming on the 4-hour chart. For the uninitiated: that’s technical speak for "the sellers are exhausted and the buyers are hiding in the bushes with a net."
The MACD Divergence: The 3D MACD is curving up, flashing a classic divergence. While the "mild weather" crowd hammered prices down to the $2.80 - $3.20 range, the momentum is shifting.
The Gap: With Sunday's open already showing volume spikes, that $3.20 entry looks like a gift-wrapped souvenir from a simpler time.
The Verdict
The market was priced for a "boring" shoulder season. Instead, it got a geopolitical ultimatum and a technical triple-wedge setup. If you haven't looked at UNG or BOIL for a scalp, you're essentially betting that the Middle East will suddenly find its "zen" and Trump will miss a deadline.
Positioning for "The Divergence Seeker": We are watching the divergence between "peace-time pricing" and "war-time reality." If the 8 PM deadline passes without a deal, the "Buy" signal won't just be a bar on your TradingView chart - it’ll be a vertical line.
Gold Futures (GC1!) Daily: Perfect Convergence Target at 4,374 (Gold Futures (GC1! - COMEX) is developing a very precise bearish expansion structure on the Daily Chart, heading toward a major technical confluence zone.
As macro sellers keep pressing the price down along the local descending structure, we can clearly map an institutional accumulation area where buyers are highly likely to step in.
### The Power of Confluence (Target: 4,374):
The core of this technical study relies on a textbook structural convergence highlighted by two independent indicators pointing to the exact same price level:
* **The 1.0 Fibonacci Extension (100% Projection):** Drawn from the recent swing structure, the major downside target measures exactly at **4,374.2**.
* **The 200-Period Exponential Moving Average (EMA 200):** The dynamic purple line, which defines the long-term macro trend, is currently climbing right through **4,374.1**.
When a 100% Fibonacci expansion merges perfectly with the 200 EMA, it creates an incredibly powerful gravitational target for price action.
### Key Support Levels Below:
Should the selling pressure accelerate or temporarily overshoot the confluence zone, the major horizontal institutional demand walls are already perfectly mapped out below the 200 EMA:
* **Immediate Macro Support:** 4,306.6
* **Major Structure Wall:** 4,167.9
* **The 1.618 Fibonacci Extension:** 4,118.9
### Strategic Takeaway:
The price is actively drifting lower to test the strength of the "4,374 Wall". As a disciplined position and swing chartist, this is not a zone to chase shorts. Instead, it is a high-probability area to monitor for buyer absorption, exhaustion candles, and potential long-term reversal setups.
---
📊 **ProData Chart** | By Rogerio Zaglia
*12+ years of daily global market technical analysis.*
⚠️ **Disclaimer:** This analysis is for educational and informational purposes only. It does not constitute financial advice or an investment recommendation. Past performance is not indicative of future results.
NBIS | A.I. Centric Cloud Platform | LONGNebius Group NV is a technology company that provides infrastructure and services to AI builders worldwide. It offers Nebius AI, an AI-centric cloud platform provides full-stack infrastructure, including large-scale GPU clusters, cloud services, and developer tools. The company also operates through specialized brands: Toloka AI, which partners in data for generative AI development; TripleTen, an edtech platform focused on re-skilling individuals for tech careers; and Avride, which develops autonomous driving technology. Nebius Group was founded by Elena Kolmanovskaya, Ilya Segalovich, Mikhail Fadeev, and Arkady Volozh in 1989 and is headquartered in Amsterdam, the Netherlands.
IonQ Daily: Strong Bullish Momentum Targets 1.618 Fibonacci ExteIonQ Inc. ( NYSE:IONQ ) is displaying a highly explosive bullish structure on the Daily Chart, serving as a textbook example of a long-term trend reversal and Fibonacci expansion.
After spending months consolidating and accumulating below its key baseline, the stock has officially shifted its macro regime.
### Key Technical Insights:
* **The Macro Trend Reversal:** In early May, IONQ decisively broke above its 200-Period Exponential Moving Average (EMA 200 - purple line currently at 42.97). This structural breakout invalidated the long-term bearish trend and opened the floodgates for institutional volume.
* **The Pivot Confirmation:** The asset formed a solid local higher low and has now cleared the previous swing high at the $65.23 level (the Fibonacci 1.0 ratio). This price action confirms a clean bullish expansion phase.
### Strategic Scenario & Targets:
With the price sustaining its momentum above the breakout level, the path of least resistance remains strictly to the upside:
* **The Primary Target (77.42):** The next major objective is the highly reliable **1.618 Fibonacci Extension at 77.42**. This is the natural profit-taking zone where the current wave should find its next major technical test.
* **The Macro Resistance (82.39):** Just above the Fibonacci target lies a major historical horizontal resistance wall at 82.39 (red line).
### Risk Management Note:
The bullish bias is firmly secured as long as the price stays above the broken pivot level ($61.00 - $65.00 zone), which should now act as dynamic support on any short-term retracements.
---
📊 **ProData Chart** | By Rogerio Zaglia
*12+ years of daily global market technical analysis.*
⚠️ **Disclaimer:** This analysis is for educational and informational purposes only. It does not constitute financial advice or an investment recommendation. Past performance is not indicative of future results.
Ethereum’s Long-Term Odyssey (2030-2040): The Road to $492K via Ethereum’s Long-Term Odyssey (2030-2040): The Road to $492K via Wave (III)
Hello Traders! 🚀
As an Elliott Wave enthusiast, I’ve been dissecting Ethereum’s long-term structure since 2015. Today, I’m sharing my “Aggressive Idea” for the next decade of market evolution.
Key Technical Observations:
Cycle Degrees: We completed the massive Wave (I) at the 2021 peak. Since then, we have been meticulously navigating a complex Wave (II) correction.
The “Ruining” Flat: Currently, ETH is in the late stages of a Running/Regular Flat structure in Wave (II). The recent price action hints at a final 5th wave completion—likely involving a minor truncation or final washout—before the massive breakout.
Alternation Principle: Looking ahead, I anticipate the future Wave IV (expected around the turn of the decade) will contrast sharply in character, providing a unique rhythm to this long-term trend.
The Launchpad: We are currently consolidated within the 14.6% - 23.6% Fibonacci Retracement zone. In the context of an extended cycle, this shallow retracement is a hallmark of extreme underlying bullish strength.
The Projected Targets:
First Stop: $9,984 (Psychological & Technical pivot)
The Heart of Wave III: $29,285
The “Moon Shot”: 167K−492K (Extended Wave III targets projected for 2030-2040)
Bottom Line:
The “Corrective Channel” (red line) is our final frontier. Once broken, Ethereum enters the most powerful sub-wave of the Supercycle. ETH historically leads in momentum; expect it to set the pace for the entire crypto space.
“In Elliott Wave, we don’t just trade price; we trade the human psychology reflected in time. Patience, our primary indicator.”
Market sentiment isn’t fixed; it’s a fluid process of structural verification. We remain neutral, waiting for the price to confirm whether the symphony of waves points to an immediate recovery or a final corrective dip.
Patterns whisper. Structure decides. The market executes.
The symphony of Elliott Waves and the music of market cycles create a unique harmony. Listen closely.
- Signed, Mr. Nobody 🎭
Evidence to start the uptrend (Jun 22, 2022)
The rise of Ethereum is more likely, until the extension of the (Jan 30, 2023)
Big Move !! 5 Wave (Aug 4, 2023)
Diagonal Pattern For Big Move Upside (Sep 13, 2023)
Simpel Flat??? Sharp ???Big Flat (Sep 7, 2023)
Diagonal pattern?? or 1.2-1.2 (Oct 18, 2023)
1.2&1.2 Or Diagonal?? (Nov 16, 2023)
For now, the flat correction pattern has been extended (Jan 23, 2024)
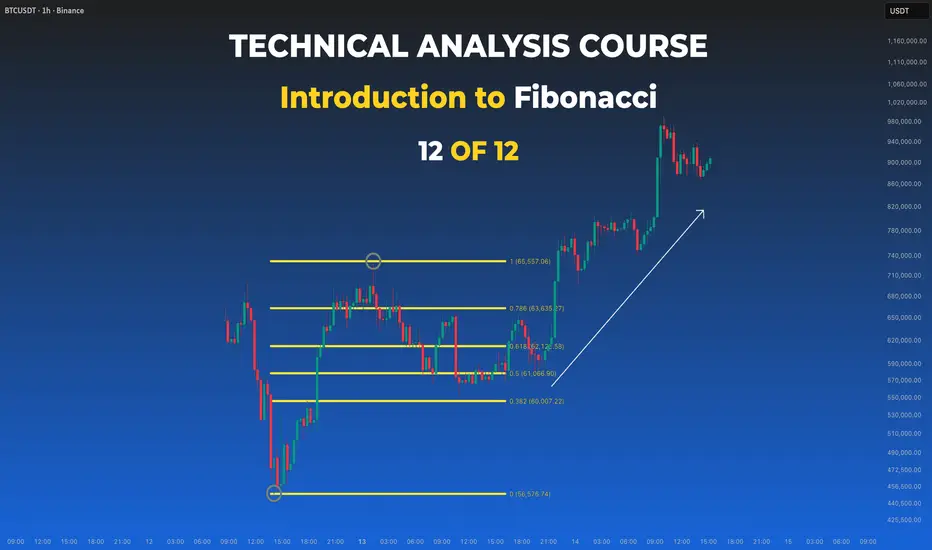
Fibonacci Convergence: Finding Strong Support and ResistanceUnderstanding Fibonacci Convergence in Trading
*******************************
In the previous articles, we learned:
Day 01: Fibonacci Trading Tools
Day 02: Fibonacci Retracement Trading Strategy for Beginners
Day 03: Fibonacci Projection: Finding Exit Points in Trading
Today, we will learn one of the most powerful Fibonacci concepts:
Fibonacci Convergence
^^^^^^^^^^^^^^^^^^^^^^
This is one of the last major Fibonacci concepts beginners should learn before moving toward advanced trading techniques.
Fibonacci convergence helps traders:
Identify strong support and resistance zones
Plan entry and exit points
Decide stop loss placement
Manage position size
Build a complete trading plan
Important Before Learning Fibonacci Convergence
^^^^^^^^^^^^^^^^^^^^^^
Before studying Fibonacci convergence, you should already understand:
Fibonacci Retracement
Fibonacci Extension
Swing highs and swing lows
ABC correction patterns
Without understanding these basics, convergence may look confusing.
What Is Fibonacci Convergence?
*******************************
Market trends are built from many smaller swings inside one bigger trend.
Fibonacci convergence happens when:
You draw Fibonacci retracement levels on multiple swings, and
Different Fibonacci levels appear close to each other in the same price area
When several Fibonacci levels meet near the same zone, that area becomes a stronger support or resistance level.
This area is called a:
Fibonacci Convergence Zone
Fibonacci Cluster
Confluence Area
Professional traders pay close attention to these zones because the market often reacts strongly there.
Why Fibonacci Convergence Is Powerful
*******************************
A single Fibonacci level may work sometimes.
But when:
38.2% from one swing, and
61.8% from another swing
appear near the same price area, the probability of market reaction becomes stronger.
This is because multiple traders may be watching the same area from different swing calculations.
The more Fibonacci levels that meet together, the stronger the support or resistance zone may become.
How to Draw Fibonacci Convergence
*******************************
Let’s learn step-by-step.
Step 1: Identify the Main Trend
^^^^^^^^^^^^^^^^^^^^^^
First, check whether the market is in:
An uptrend (Higher highs and higher lows)
A downtrend (Lower highs and lower lows)
Remember: Fibonacci convergence works best in trending markets.
Step 2: Find Multiple Swings
^^^^^^^^^^^^^^^^^^^^^^
Now identify different price swings on the chart.
For example:
Large swing: A → B
Smaller swing inside the trend: C → D
Another correction swing: E → F
The market usually creates many swings inside one trend.
Step 3: Draw Fibonacci Retracement Levels on Each Swing
^^^^^^^^^^^^^^^^^^^^^^
Apply Fibonacci retracement separately on every important swing.
For example:
Draw Fibonacci from Swing A to B
Draw another Fibonacci from Swing C to D
Draw another Fibonacci from Swing E to F
Your chart may start looking crowded. That is normal.
Step 4: Look for Overlapping Levels
^^^^^^^^^^^^^^^^^^^^^^
Now carefully observe the retracement levels.
Suppose you see:
61.8% retracement from one swing
50% retracement from another swing
38.2% retracement from a third swing
all located near the same price zone. This is Fibonacci convergence. That price area becomes an important support or resistance zone.
Example of Fibonacci Convergence
^^^^^^^^^^^^^^^^^^^^^^
Imagine this setup:
Swing 1 → 61.8% retracement at $2,450
Swing 2 → 50% retracement at $2,455
Swing 3 → 38.2% retracement at $2,448
All these levels are very close.
So the zone between: $2,448 to $2,455
becomes a strong Fibonacci convergence area.
Traders may expect:
Price reversal
Strong support
Strong resistance
Heavy buying or selling activity
near that area.
How to Make Fibonacci Convergence Stronger
*******************************
Fibonacci convergence becomes more powerful when combined with:
Trend lines
Moving averages
Support and resistance
Candlestick patterns
Volume analysis
Market structure
Example:
If a convergence zone also matches: 200 Moving Average, Previous support zone and Bullish candlestick pattern then the setup may become much stronger .
Fibonacci convergence is one of the most powerful concepts in Fibonacci trading.
Important: Fibonacci convergence is not magic. Sometimes the market will respect the zone. Sometimes it will break through it completely. That is why traders must always use: Stop losses, Risk management, and Confirmation signals
Never trade only because Fibonacci levels overlap.
Fibonacci Projection: Finding Exit Points in TradingUnderstanding Fibonacci Expansion and Fibonacci Extension
****************************
In the previous articles, we learned:
Day 01: Fibonacci Trading Tools
Day 02: Fibonacci Retracement Trading Strategy for Beginners
In this article, we will learn about Fibonacci Projection . Projection tools are helpful for finding possible exit points and profit targets .
Why Are Exit Points Important?
****************************
The answer is simple: You make money only when you close the trade and book your profit.
If your trade is still open and showing profit, that profit is only virtual profit. Market prices change every second.
Sometimes, unexpected news can suddenly move the market against you. Within seconds, your profit may disappear and turn into a loss.
That is the reality of trading.
However, even a poorly executed trade can sometimes become profitable if you understand these two important Fibonacci tools:
Fibonacci Expansion
Fibonacci Extension
Let’s begin with the first one.
Tool 1: Fibonacci Expansion
****************************
What Is Fibonacci Expansion?
The Fibonacci Expansion tool is used to identify possible future price targets.
This tool is based on three points:
Point A
Point B
Point C
If you remember the ABC pattern from the previous article , this is exactly what we need here.
How to Draw Fibonacci Expansion
^^^^^^^^^^^^^^^^^^^^^^
Step 1: Select the Fibonacci Expansion tool from your trading software or charting platform.
Draw a trend line from: Point A to Point B
Step 2: Move the second line to Point C.
Once the tool is plotted, you will see projection levels on the chart.
The most popular expansion levels are:
61.8%
100%
161.8%
261.8%
How Fibonacci Expansion Levels Are Calculated
^^^^^^^^^^^^^^^^^^^^^^
The levels are calculated using the distance between Point A and Point B.
Examples:
61.8% target = 0.618 × distance between A and B
100% target = 1.000 × distance between A and B
161.8% target = 1.618 × distance between A and B
261.8% target = 2.618 × distance between A and B
The levels such as:
161.8%
261.8%
may act as:
Support levels
Resistance levels
Profit targets
Tool 2: Fibonacci Extension
****************************
What Is Fibonacci Extension?
The Fibonacci Extension tool is simpler than Fibonacci Expansion.
Instead of using three points, it only uses:
Point A
Point B
The extension levels are calculated based on the distance between these two points.
How Fibonacci Extension Is Calculated
^^^^^^^^^^^^^^^^^^^^^^
For example:
The 161.8% extension level is calculated by taking 61.8% of the distance between Point A and Point B and adding it to Point B.
This creates a projected target level above or below the current move.
Why Fibonacci Expansion Is Often More Accurate
****************************
Fibonacci Expansion uses:
Point A
Point B
Point C
Because it includes the correction wave (Point C), many traders believe it gives more accurate projection levels compared to Fibonacci Extension.
Difference Between Fibonacci Expansion and Fibonacci Extension
****************************
Fibonacci Expansion: Uses 3 points (ABC) to calculate projection levels.
Fibonacci Extension: Uses 2 points (AB) to calculate projection levels.
Most Common Fibonacci Extension Levels
****************************
The most commonly used extension levels are:
127%
138.2%
161.8%
261.8%
These levels may act as future support, resistance, or profit-taking zones.
Important Reality About Projection Levels
****************************
Three things every trader must understand:
You never know in advance exactly where the price will stop.
Fibonacci projection levels are not magic numbers.
They are simply areas where there is a possibility that the market may react.
That is why traders should always combine Fibonacci tools with:
Risk management
Stop losses
Trend analysis
Market confirmation signals
Fibonacci Expansion and Fibonacci Extension are powerful tools for identifying possible exit points and profit targets.
They help traders:
Plan trades in advance
Manage risk better
Avoid emotional decisions
Understand market structure
But remember:
No trading tool works perfectly every time. Successful trading comes from discipline, patience, practice, and proper risk management.
In the next article, we will explore Fibonacci convergence .
Fibonacci Retracement Trading Strategy for BeginnersUnderstanding the ABC Pattern and Retracement Levels
In the previous article , we learned about the most popular Fibonacci retracement levels:
23.6%
38.2%
50%
61.8%
78.6%
If you missed the previous article, make sure to read it first.
Today, we will learn how to use these retracement levels with the ABC pattern.
Why Prices Move in Waves
+-+-+-+-+-+-+-+-+-+-+-+-+
Prices rarely move in one direction for a long time. Sometimes, after major news or events, the market may suddenly skyrocket or crash, making trading difficult.
Most of the time, prices move in a zigzag pattern called waves. This idea comes from the Elliott Wave Theory.
We will study Elliott Wave Theory in a future tutorial. For now, our goal is to understand Fibonacci retracement levels in a simple way.
Understanding the ABC Pattern
+-+-+-+-+-+-+-+-+-+-+-+-+
First, you need to identify a market swing:
A move from Point A to Point B is called the impulsive wave.
A move from Point B to Point C is called the corrective wave.
Point C should stay between Point A and Point B.
It is not always easy to identify the ABC pattern correctly. It takes practice, patience, and experience.
How to Draw Fibonacci Retracement Levels
+-+-+-+-+-+-+-+-+-+-+-+-++-+-+-+-+-
After finding the ABC move:
Select the Fibonacci Retracement tool on your charting platform.
Draw the tool from the low at Point A to the high at Point B in an uptrend.
In a downtrend, draw it from the high to the low.
For more accurate results, use candlestick charts instead of line charts or area charts.
Should the Price Exactly Touch the Retracement Level?
+-+-+-+-+-+-+-+-+-+-+-+-++-+-+-+-+-+-+-+-+-+-
Many beginners believe the price must perfectly touch the retracement level.
That is not always true.
Sometimes the price may reverse slightly above or below the level. If the market reacts near the retracement zone, the setup may still be valid.
Which Retracement Levels Are Important?
+-+-+-+-+-+-+-+-+-+-+-+-+-+-+-+-+-
The standard retracement levels are:
23.6%
38.2%
50%
61.8%
78.6%
Note: The 50% level is not officially part of the Fibonacci sequence, but traders still consider it very important.
Where Should You Enter a Trade?
+-+-+-+-+-+-+-+-+-+-+-+-+-+-
There are three common approaches.
Door 1 — Aggressive Entry (Highest Profit Potential)
*********
You enter the trade when the price reaches a retracement level such as:
61.8%
50%
38.2%
You assume the correction is ending and Point C has formed.
This strategy offers high profit potential, but it also carries higher risk.
Door 2 — Confirmation Entry (Moderate Risk)
*********
Instead of entering immediately, wait for confirmation.
For example:
The price reacts near 61.8%
An oscillator gives a signal
Moving averages support the move
A bullish or bearish candlestick appears
After confirmation, you can enter the trade.
This method reduces the chance of failure compared to Door 1.
Door 3 — Safe Entry ( Recommended for Beginners )
*********
Wait until the price breaks above the recent high in an uptrend, or below the recent low in a downtrend.
This is the safest approach because the trend confirmation is stronger.
However, the possible profit may be smaller compared to earlier entries.
Which Entry Method Is Best?
+-+-+-+-+-+-+-+-+-+-+-+-+-+-
The answer depends on:
Your experience
Your risk-taking ability
Your market knowledge
Your trading psychology
Remember: You do not need to catch the exact bottom or top to make money. If you enter after the correction ends, you are already ahead of many traders and investors.
Stop Loss Using Fibonacci Retracement
+-+-+-+-+-+-+-+-+-+-+-+-+-+-
Fibonacci retracement levels are also useful for placing stop losses.
For example:
If you enter a long trade near Point C, Point A can act as your stop loss.
If the entry is near the 61.8% retracement level, some traders may place a tighter stop near the 78.6% level.
Fibonacci levels can also help with trailing stop losses.
Combination Strategy 1: Fibonacci + Trend Lines
+-+-+-+-+-+-+-+-+-+-+-+-+-+-
Fibonacci tools work especially well in trending markets.
You can combine Fibonacci retracement levels with trend lines to:
Identify strong support and resistance
Spot possible breakout areas
Place stop losses below the trend line
No strategy works every time, but this combination often offers:
Small potential risk
Larger potential reward
Combination Strategy 2: Fibonacci + Support and Resistance
+-+-+-+-+-+-+-+-+-+-+-+-+-+-
Another powerful method is combining Fibonacci retracement levels with important support and resistance zones.
These support or resistance areas may come from:
Previous highs
Previous lows
Important market reaction zones
You can also strengthen this strategy using moving averages such as:
10 MA
20 MA
50 MA
100 MA
200 MA
Example
If the:
50 Moving Average, and
50% retracement level
are located near the same price area, that zone may become a strong support level.
Final Thoughts
+-+-+-+-+-
Fibonacci retracement is not a magic system.
It is a tool that helps traders understand:
Market corrections
Trend continuation
Support and resistance
Risk management
The more you practice identifying ABC patterns and retracement zones, the better your understanding of market behaviour will become.
In the next article, we will explore Fibonacci projections and convergence.
Hindustan Zinc – Rounding Bottom Breakout (Pre-emptive)Hindustan Zinc – Rounding Bottom Breakout (Pre-emptive)
Setup: Rounding bottom formation on higher timeframe
CMP: ₹690
SL: ₹570 (structure breakdown)
🎯 Targets (trail progressively)
T1: ₹737 T2: ₹807 T3: ₹895 T4: ₹1,110 T5: ₹1,236
Fibonacci confluence: Long-term Fibonacci extension 1.61 ≈ ₹1,211, aligning with T5 zone → strengthens the structural target.
🔗 Why this works
Silver linkage: Hindustan Zinc benefits from silver strength; the ongoing global silver run supports the upside bias.
Fundamentals: Quarterly results were strong, improving confidence to hold through volatility.
Structure: Rounding bottom indicates accumulation → expansion if the neckline sustains.
⚠️ Risk & Execution Notes (read carefully)
If global cues turn unstable and silver corrects, expect sharp volatility.
Do NOT go all-in. Use staggered buying near dips/confirmations.
Strict position sizing is critical; patience required to capture higher targets.
Trail SL once T1–T2 is achieved to protect capital.
⚠️ Clarification:
This is an independent analysis based purely on technical and market study. No part of Religare is involved in this view or recommendation.
📝 Important:
I am not responsible for any loss or profit incurred. I am not taking any fees for these views – just sharing my analysis for educational and informational purposes.
📉 Disclaimer: Not SEBI-registered. Please do your own research or consult a financial advisor before taking any investment decision.