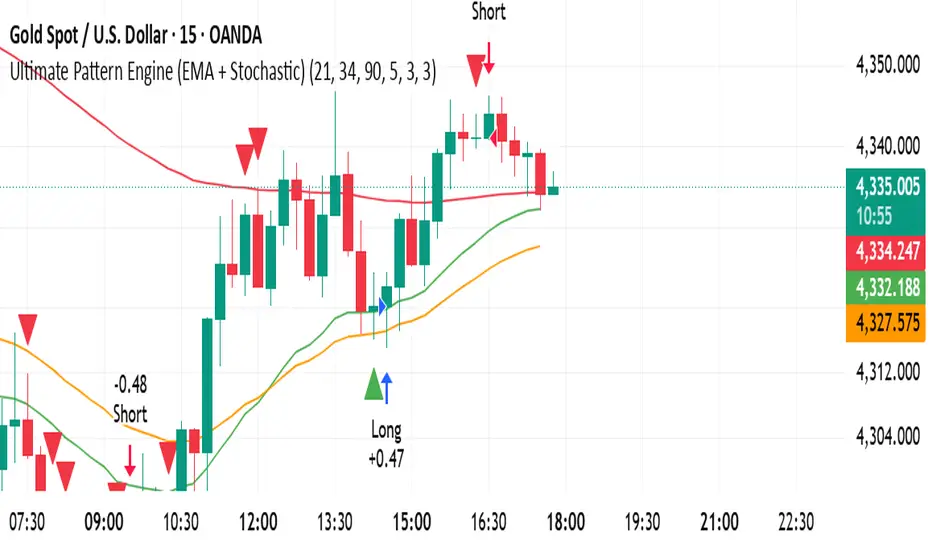
EMA Crossover Strategy [15M]EMA Crossover Strategy — Stats Panel + Pip/$ Tracking + Chop Filter
A clean, rules-based EMA crossover strategy built for XAUUSD (Gold) on the 15-minute timeframe, with multi-timeframe signal confirmation, dynamic risk/reward boxes, and a full live stats panel.
🔧 How It Works
Signals are generated when the Fast EMA (5) crosses the Slow EMA (13) on the higher timeframe. The stop loss is placed at the EMA intersection point, and the take profit is calculated automatically using your chosen Risk:Reward ratio (default 2:1).
📊 Features
✅ Multi-timeframe EMA crossover detection (no repainting)
✅ Dynamic SL placed at EMA intersection — not a fixed pip distance
✅ Automatic TP calculated from your RR ratio
✅ Visual Risk/Reward boxes anchored by time (stay pinned when scrolling/zooming)
✅ VWAP filter — only takes longs above VWAP, shorts below
✅ ADX chop filter — avoids sideways markets below your ADX threshold
✅ EMA separation filter — skips signals when EMAs are too close together
✅ Stats panel (bottom left) — total trades, win rate, net RR, pips captured/lost, net $/oz
✅ Active trade panel (top right) — live entry, SL, TP, risk in pips and price
✅ JSON alerts for webhook/bot integration
✅ TP ✓ and SL ✗ hit labels on chart
⚙️ Inputs
SettingDefaultDescriptionHigher Timeframe15MHTF for EMA signalsFast EMA5Fast EMA lengthSlow EMA13Slow EMA lengthRR Ratio2.0Risk:Reward multiplierVWAP FilterOnTrend direction filterADX FilterOnChop/sideways filterADX Threshold20Minimum ADX for a valid signalEMA Sep FilterOnMinimum EMA gap filterPip Size0.1Set to 0.1 for XAUUSD (OANDA)
📌 Notes
Built and optimised for XAUUSD on OANDA — adjust pip size for other brokers or instruments
Uses barmerge.lookahead_off to prevent repainting
Drawings are anchored by time (xloc.bar_time) so they stay correctly positioned when scrolling or changing zoom
Alerts fire in JSON format — ready for webhook or bot automation
⚠️ Disclaimer
This script is for educational and informational purposes only. Past performance is not indicative of future results. Always manage your own risk. อินดิเคเตอร์

Golden Cross Chob ZoneGolden Cross Chob Zone
Golden Cross Chob Zone is a visual trend-following indicator designed to help traders study bullish trend regimes using EMA 50, EMA 200, Chop Zone trend strength, pullback behavior, and structured visual risk references.
The script combines:
* EMA 50 and EMA 200 regime analysis
* Golden Cross and Death Cross detection
* Chop Zone trend-strength coloring
* Sideways / no-trade filtering
* Multiple bullish entry-event types
* Visual Entry / Stop / Target reference lines
* EMA 200 exit logic
* Compact labels with detailed tooltips
* Dashboard status and event counters
* Alert conditions for key events
This script is an indicator, not a strategy. It does not place orders, does not execute trades, and does not produce TradingView Strategy Tester backtest results. The visual BUY, TP, SL, and EMA200 EXIT labels are chart-analysis events only. They are intended to help users study how the selected rules behave on the chart, not to guarantee performance or provide financial advice.
Important note about signals and performance
Golden Cross Chob Zone does not guarantee profitable trades.
The BUY labels are not automatic trading recommendations. They mark technical conditions where the script detected one of its bullish entry-event rules.
The TP HIT, SL HIT, EMA200 EXIT, and DC EXIT labels are visual tracking references only. They are not broker fills, not strategy orders, and not official backtest results.
The dashboard statistics are simple event counters based on the script’s visual tracking logic. They should not be interpreted as verified strategy performance, win rate, or realistic trading results.
Users should combine this tool with their own analysis, risk management, position sizing, and market context.
Core idea
The main idea of this indicator is to detect bullish market conditions where EMA 50 is above EMA 200, then look for structured bullish continuation events such as:
* Golden Cross breakout
* EMA 50 pullback confirmation
* EMA 50 bounce
* EMA 50 reclaim
The script also uses Chop Zone coloring to estimate whether the trend environment is strong, weak, choppy, or bearish. A sideways / no-trade filter can block normal BUY events when the market is too flat, too compressed, or price is not clearly above EMA 200.
Main components
1. EMA 50 and EMA 200 trend regime
The script uses two exponential moving averages:
Fast EMA
Default: EMA 50
Slow EMA
Default: EMA 200
The Fast EMA is used for pullbacks, bounces, reclaims, and Golden Cross entries.
The Slow EMA is used as the main regime filter and as an optional dynamic exit reference.
Bullish regime
A bullish regime exists when EMA 50 is above EMA 200.
This is the script’s most important directional filter. The script is designed mainly for long-side trend analysis.
Golden Cross
A Golden Cross occurs when the Fast EMA crosses above the Slow EMA.
The script can mark this event with a GC label.
Death Cross
A Death Cross occurs when the Fast EMA crosses below the Slow EMA.
The script can mark this event with a DC label.
Important: GC and DC labels are moving-average structure events. They are not guaranteed buy or sell signals.
2. EMA regime fill
The script can shade the area between EMA 50 and EMA 200.
Green fill
Fast EMA is above Slow EMA.
Red fill
Fast EMA is below Slow EMA.
This helps users quickly identify whether the chart is in a bullish or bearish EMA regime.
3. Chop Zone filter
The Chop Zone section estimates the slope strength of a selected EMA by measuring its angle relative to the recent price range.
The script calculates:
* a recent high-low range,
* an EMA slope,
* a normalized slope angle,
* a color grade based on the slope direction and strength.
The Chop Zone grade is then translated into color categories.
Positive Chop Zone grades
Turquoise
Strong upward trend condition.
Dark green
Clear upward trend condition.
Pale green
Mild upward trend condition.
Teal
Weak upward condition.
Neutral / yellow
Yellow
Choppy or neutral slope condition.
Negative Chop Zone grades
Light orange
Weak downward condition.
Orange
Mild downward condition.
Pink
Clear downward condition.
Dark red
Strong downward condition.
The Chop Zone is used as a trend-quality filter for normal BUY signals. Users can choose the minimum Chop Zone grade required to allow buys.
Minimum Grade To Allow Buys
Any green
Allows any positive green / teal condition.
Pale green or better
Requires a stronger positive Chop Zone reading.
Dark green or better
Requires a clear upward trend condition.
Turquoise only
Requires the strongest upward Chop Zone condition.
4. Chop Zone strip
The script can plot a small colored strip at the bottom of the price pane.
Each square represents the Chop Zone color for that bar.
This gives a compact visual reading of trend strength and choppiness without needing a separate pane.
5. Candle coloring by Chop Zone
The script can color price candles using the Chop Zone colors.
This helps the user visually connect candle movement with the current trend-strength classification.
Candle coloring is visual context only. It is not a standalone entry or exit signal.
Entry logic
The script supports several bullish entry-event types.
A BUY label can appear only when the script’s selected rules are met. By default, the logic is long-side focused and requires EMA 50 to be above EMA 200, except that Golden Cross breakout has its own optional filter settings.
1. Golden Cross Breakout Entry
The Golden Cross breakout entry is designed to identify a bullish breakout condition on the bar where EMA 50 crosses above EMA 200.
A GC breakout BUY can occur when:
* Golden Cross happens,
* EMA 50 is above EMA 200,
* close is above EMA 50,
* close is above EMA 200,
* candle is bullish,
* optional Chop Zone condition passes,
* optional sideways filter condition passes.
This entry type is displayed as:
GC BREAKOUT
Important: This is not a guaranteed breakout signal. It only marks that the selected Golden Cross breakout conditions were met.
2. Classic Pullback Entry
The classic pullback logic waits for price to touch or come close to EMA 50, then requires a bullish confirmation candle within a selected number of bars.
A classic pullback BUY can occur when:
* EMA 50 is above EMA 200,
* Chop Zone filter allows buys,
* price touches or nearly touches EMA 50,
* confirmation candle appears within the selected confirmation window,
* candle closes above EMA 50,
* optional prior-high confirmation passes.
This entry type is displayed as:
PULLBACK
3. EMA 50 Bounce Entry
The EMA 50 bounce entry is a more direct bounce condition.
A bounce BUY can occur when:
* EMA 50 is above EMA 200,
* Chop Zone filter allows buys,
* candle is bullish,
* close is above EMA 50,
* low touches or nearly touches EMA 50.
This entry type is displayed as:
EMA50 BOUNCE
4. EMA 50 Reclaim Entry
The EMA 50 reclaim entry looks for price recovering back above EMA 50.
A reclaim BUY can occur when:
* EMA 50 is above EMA 200,
* Chop Zone filter allows buys,
* candle is bullish,
* close is above EMA 50,
* previous close was at or below EMA 50.
This entry type is displayed as:
EMA50 RECLAIM
5. One open signal at a time
The script includes an option called:
Only One Open Signal At A Time
When enabled, the script does not print a new BUY signal while a previous signal is still being visually tracked by the Entry / SL / TP logic.
This helps reduce repeated labels in the same open setup.
Sideways / no-trade filter
The script includes a market filter designed to reduce normal BUY events in sideways or unclear conditions.
The sideways filter can check:
* EMA 50 / EMA 200 spread,
* EMA 50 slope,
* EMA 200 slope,
* price position relative to EMA 200,
* cooldown after previous exit.
The filter is designed to block normal BUY signals when market conditions are too flat, compressed, or unclear.
Important: The Golden Cross breakout entry can be allowed separately from the normal sideways filter, depending on the user settings. This is useful when the user wants to observe the first strong breakout immediately after a Golden Cross.
Filter elements
Minimum EMA50-EMA200 Spread %
Measures the distance between EMA 50 and EMA 200 as a percentage of price.
Higher values reduce signals in sideways markets.
EMA Slope Lookback
Defines how many bars are used to check if EMA 50 or EMA 200 is rising.
Require EMA 50 Slope Up
When enabled, normal BUY events require EMA 50 to be rising.
Require EMA 200 Slope Up
When enabled, normal BUY events require EMA 200 to be rising.
Require Price Above EMA 200
When enabled, normal BUY events require close to be above EMA 200.
Cooldown After Exit
Blocks new normal BUY events for a selected number of bars after TP, SL, or EMA200 exit.
This is intended to reduce repeated entries after an exit, especially in sideways markets.
Stop / exit and target logic
The script includes visual reference levels for Entry, Stop / Exit, and Target.
These levels are not strategy orders. They are chart references only.
Stop / Exit Mode
The script supports three stop / exit modes:
1. EMA 200 Break Exit
This mode uses the current EMA 200 as a dynamic exit reference.
The exit can trigger when:
* low touches EMA 200, or
* close falls below EMA 200,
depending on the selected EMA 200 break trigger.
This mode is dynamic because the EMA 200 changes as new bars form.
2. Fixed EMA 200 at Entry
This mode freezes the stop reference at the EMA 200 value on the BUY signal bar.
Unlike the dynamic EMA 200 exit, this reference does not move after entry.
3. Fixed Pullback Low
This mode places the stop reference below the recent pullback low.
The pullback low is calculated using the selected lookback period.
SL Buffer
The script allows an optional ATR-based buffer under the chosen stop anchor.
A buffer of 0.00 uses the stop anchor directly.
Increasing the value places the fixed stop reference farther away from the stop anchor.
Take-profit logic
The take-profit level is based on prior swing-high structure.
The script first looks for the highest high over the selected swing-high lookback period before the signal bar.
If that swing-high target is not available, is below entry, or gives too little reward-to-risk, the script uses a fallback R-multiple target.
Target: Swing-High Lookback
Defines how far back the script looks for a prior swing-high target.
Fallback R Multiple
Defines the fallback target based on risk distance.
Minimum Acceptable Target RR
If the prior swing-high target gives less than this minimum RR, the script uses the fallback R target instead.
Visual lines
When enabled, the script can draw:
Entry line
A dashed reference at the BUY close price.
SL / exit reference line
A red reference line based on the selected stop / exit mode.
TP line
A green reference line based on the selected target logic.
If EMA 200 Break Exit is used, the SL reference line can follow the EMA 200 dynamically.
Labels
BUY label
The BUY label appears when one of the selected entry-event rules is triggered.
If compact labels are enabled, the label stays small and the full details are placed in the tooltip.
The BUY tooltip can include:
* entry type,
* entry price,
* reference SL,
* target,
* RR,
* target mode,
* exit mode,
* EMA 50 / EMA 200 regime,
* EMA spread,
* filter status,
* cooldown status,
* Golden Cross breakout status,
* Chop Zone grade.
TP HIT label
The TP HIT label appears when price reaches the visual take-profit reference.
This label is a visual tracking event only. It is not a broker fill or a verified backtest result.
SL HIT label
The SL HIT label appears when the fixed stop reference is touched.
This applies when the selected mode uses a fixed stop reference.
EMA200 EXIT label
The EMA200 EXIT label appears when the dynamic EMA 200 exit condition is triggered.
Depending on settings, this can happen when:
* low touches EMA 200, or
* close falls below EMA 200.
DC EXIT label
The DC EXIT label can appear when a Death Cross occurs while a tracked signal is open and the selected exit logic allows that condition.
This is a moving-average structure exit event, not a strategy order.
Label spacing
The script places labels using ATR-based spacing so they are not directly attached to candles.
Label Distance From Candles controls how far labels are placed vertically away from price bars.
Dashboard
The dashboard summarizes the current condition of the indicator.
Dashboard fields
Regime
Shows whether the EMA structure is bullish or bearish.
BULL
EMA 50 is above EMA 200.
BEAR
EMA 50 is below EMA 200.
The dashboard can also show how many bars have passed since the last Golden Cross or Death Cross.
Chop Zone
Shows the current Chop Zone condition, such as:
* STRONG UP
* TREND UP
* MILD UP
* WEAK UP
* CHOP
* WEAK DOWN
* MILD DOWN
* TREND DOWN
* STRONG DOWN
Filter
Shows whether the normal market filter is allowing signals or blocking them.
OK
Normal market filter conditions are acceptable.
NO TRADE
Normal market filter is blocking normal BUY events.
The dashboard also shows EMA spread percentage.
Setup
Shows the current setup state, such as:
SIGNAL OPEN
A visual signal is currently being tracked.
COOLDOWN
New normal signals are blocked temporarily after an exit.
GC BREAKOUT READY
Golden Cross breakout conditions are present.
NO TRADE
Market filter is blocking normal entries.
PULLBACK ARMED
Price has touched the EMA 50 pullback zone and is waiting for confirmation.
WAITING PULLBACK
Bullish regime exists, but no valid entry event has triggered.
STAND ASIDE
The EMA regime is not bullish.
Open
Shows current open visual tracking references:
* Entry
* SL / exit reference
* TP
Stats
Shows simple event counters:
* total signals,
* wins counted by TP events,
* losses counted by SL / exit events,
* TP-rate based on the script’s internal visual events.
Important: These are not official Strategy Tester results and should not be presented as backtesting performance. They are simple chart-event counters for study and comparison only.
Alerts
The script includes alert conditions for:
Golden Cross
Triggered when EMA 50 crosses above EMA 200.
GC Breakout BUY
Triggered when the Golden Cross breakout entry conditions are met.
Death Cross
Triggered when EMA 50 crosses below EMA 200.
Pullback Touch
Triggered when price touches or approaches the EMA 50 pullback zone.
BUY Signal
Triggered when a selected BUY event occurs.
Chop Zone -> Green
Triggered when Chop Zone shifts into a positive / green condition.
Chop Zone -> Red
Triggered when Chop Zone shifts into a negative / red condition.
TP Hit
Triggered when the visual take-profit reference is reached.
Stop / EMA200 Exit
Triggered when the stop reference or EMA 200 exit condition is reached.
Alerts are notifications only. They do not instruct the user to buy or sell.
Settings explained
Trend EMAs
Fast EMA Length
Sets the fast EMA. Default is EMA 50.
Slow EMA Length
Sets the slow EMA. Default is EMA 200.
Fill Between EMAs
Shows or hides the colored area between the two EMAs.
Chop Zone Filter
Range Lookback
Defines the range used to normalize the EMA slope.
Slope EMA Length
Defines the EMA used for the Chop Zone slope calculation.
Minimum Grade To Allow Buys
Defines how strong the Chop Zone must be before normal BUY events are allowed.
Show Chop Zone Strip
Shows or hides the colored strip at the bottom of the price pane.
Color Price Bars By Chop Zone
Colors candles using the Chop Zone condition.
Entry Logic
Allow Golden Cross Breakout Entry
Allows a BUY event on the Golden Cross bar if the breakout conditions are met.
GC Breakout Requires Green Chop Zone
Requires Chop Zone to be green for Golden Cross breakout entries.
Fast-EMA Touch Tolerance (%)
Allows a candle low to come close to EMA 50 instead of requiring an exact touch.
Confirm Within (bars)
Defines how many bars are allowed between an EMA 50 touch and a confirmation candle.
Confirm Candle Must Close Above Prior High
Requires the confirmation candle to close above the previous bar’s high.
Allow Classic Pullback Entry
Enables the classic pullback entry-event logic.
Allow EMA 50 Bounce Entry
Enables the EMA 50 bounce entry-event logic.
Allow EMA 50 Reclaim Entry
Enables the EMA 50 reclaim entry-event logic.
Only One Open Signal At A Time
Blocks new BUY events while a previous visual signal is still open.
Sideways / No-Trade Filter
Enable Sideways / No-Trade Filter
Enables or disables the normal market filter.
Apply Sideways Filter To GC Breakout
Applies the sideways filter to Golden Cross breakout entries when enabled.
Minimum EMA50-EMA200 Spread (%)
Requires a minimum distance between EMA 50 and EMA 200.
EMA Slope Lookback (bars)
Defines the slope lookback for EMA slope checks.
Require EMA 50 Slope Up
Requires EMA 50 to be rising.
Require EMA 200 Slope Up
Requires EMA 200 to be rising.
Require Price Above EMA 200
Requires close to be above EMA 200.
Cooldown After Exit (bars)
Blocks normal BUY events after an exit for the selected number of bars.
Stop Loss / Target
Stop / Exit Mode
Chooses between dynamic EMA 200 exit, fixed EMA 200 at entry, or fixed pullback low.
EMA 200 Break Trigger
Chooses whether the dynamic EMA 200 exit uses a low touch or a close below EMA 200.
ATR Length
Controls the ATR used for stop buffer and label spacing.
SL Buffer (ATR multiples)
Adds an optional ATR buffer to the stop reference.
Pullback Low Lookback (bars)
Defines the lookback for the fixed pullback low stop mode.
Target: Swing-High Lookback (bars)
Defines the lookback for the prior swing-high target.
Fallback R Multiple
Defines the fallback target if the swing-high target is not usable.
Minimum Acceptable Target RR
Defines the minimum reward-to-risk required before using the swing-high target.
Visuals / Dashboard
Show Dashboard
Shows or hides the dashboard.
Dashboard Position
Moves the dashboard to a selected chart corner.
Mark Golden / Death Crosses
Shows or hides GC and DC labels.
Draw Entry / SL / TP Lines
Shows or hides the visual reference lines.
Show BUY Triangle
Shows or hides the BUY triangle marker.
Use Compact Labels
Uses smaller labels with full details stored in tooltips.
Show BUY Label
Shows or hides the BUY label.
Label Distance From Candles (ATR)
Controls vertical spacing between labels and candles.
How to use this indicator
A practical workflow:
1. Check whether EMA 50 is above EMA 200.
2. Check the Chop Zone condition.
3. Check whether the dashboard says OK or NO TRADE.
4. Watch for one of the selected BUY event types.
5. Review the visual Entry, SL / exit reference, and TP reference.
6. Use the tooltip on the label for full signal details.
7. Treat all labels as chart-analysis events, not as automatic trade instructions.
8. Combine the signal event with market structure, volume, higher timeframe analysis, and risk management.
Example interpretation
If a GC BREAKOUT label appears, it means EMA 50 crossed above EMA 200 and the selected breakout conditions were met. It does not guarantee that price will continue higher.
If a PULLBACK label appears, it means price touched the EMA 50 pullback zone and then produced a bullish confirmation candle within the selected confirmation window.
If an EMA50 BOUNCE label appears, it means price touched or nearly touched EMA 50 and closed back above it with a bullish candle.
If an EMA50 RECLAIM label appears, it means price closed back above EMA 50 after previously being at or below it.
If EMA200 EXIT appears, it means the dynamic EMA 200 exit condition was triggered.
If TP HIT appears, it means price reached the visual target reference.
Important limitations
This indicator does not predict future price movement.
It does not guarantee profitable trades.
It does not place orders.
It does not produce Strategy Tester results.
BUY labels are not financial advice.
TP / SL / exit labels are not broker fills.
Dashboard stats are internal visual event counters, not verified backtest statistics.
EMA-based systems can perform poorly in choppy, sideways, or low-volume markets.
Chop Zone classification is based on slope and range normalization, not on future price prediction.
The script is designed mainly for long-side trend-following analysis.
Different symbols, markets, sessions, and timeframes may require different settings.
Users are responsible for their own trade decisions, risk management, and position sizing.
Recommended use
Golden Cross Chob Zone is best used as a decision-support and chart-analysis tool for traders who study:
* Golden Cross / Death Cross structure,
* EMA 50 and EMA 200 trend regimes,
* EMA pullbacks,
* EMA 50 bounces,
* EMA 50 reclaim events,
* trend strength and choppiness,
* visual risk references,
* long-side trend continuation conditions.
It should be used as one part of a broader trading process, not as a standalone trading system.
Originality and purpose
Golden Cross Chob Zone combines several visual and analytical components into one workflow:
* EMA 50 / EMA 200 regime detection,
* Golden Cross breakout logic,
* Chop Zone trend-strength filter,
* pullback / bounce / reclaim entry-event logic,
* sideways market filtering,
* visual Entry / SL / TP references,
* dynamic EMA 200 exit option,
* compact labels with detailed tooltips,
* dashboard state monitoring,
* alert conditions for key events.
The purpose is to help users study bullish trend-continuation conditions with clearer visual context and fewer signals during weak or sideways conditions.
อินดิเคเตอร์

อินดิเคเตอร์

MA Suite SMA + EMA [Institutional]MA Suite SMA + EMA
A single overlay that replaces a whole stack of separate moving-average indicators. It plots up to 6 fully configurable SMAs and 6 EMAs side by side, with everything you need to read trend structure at a glance — and nothing you have to fight with.
Core
- 6 SMA + 6 EMA slots, each with its own enable toggle, length, color, and line width.
- Sensible institutional defaults (20 / 50 / 100 / 150 / 200) with the 20, 50 and 200 emphasized by thickness.
- Disabled lines disappear from both the chart and the status line, so the data window stays clean — you only ever see the values you actually use.
Multi-timeframe
- Compute every MA from a higher timeframe (e.g. show daily MAs while viewing an intraday chart).
- Permanent 20-week and 200-week SMA anchors that hold their value on any lower timeframe, with optional smoothing to remove the weekly "staircase."
Slope projection
- Tick ext on any line to extend it forward along its current slope — a quick look at where a moving average is heading. The 200 SMA and both weekly anchors are projected by default.
Context tools
- % distance table showing how far price sits from each active MA — fast read on stretch and mean-reversion.
- Slope coloring (lines fade when falling) and an optional bias background (price above/below the 200 SMA).
- Golden / death-cross markers, a configurable ribbon fill, and an anchored VWAP with standard-deviation bands.
- Built-in alerts for MA crosses and price/MA crossovers.
One indicator, every moving-average reference an institutional trader actually looks at. อินดิเคเตอร์

Market Regime RSI MatrixMarket Regime RSI Matrix (MRM)
Market Regime RSI Matrix (MRM) is a multi-timeframe momentum and market context framework designed to transform traditional RSI analysis into a broader market regime model.
Rather than relying on a single RSI reading from the active chart timeframe, this indicator combines RSI measurements from multiple independent timeframes into a weighted composite engine called the Master RSI. It then evaluates the degree of agreement between those timeframes, estimates the persistence of the current market condition, classifies the prevailing market regime, and visualizes these relationships through adaptive momentum zones and dashboard components.
The objective of this script is not to generate isolated buy or sell signals, but to provide a structured view of how momentum is distributed throughout the market across multiple horizons.
📊 How It Works
The indicator is built around a hierarchical momentum framework composed of several interconnected modules.
Multi-Timeframe Master RSI Engine
At the core of the indicator is the Master RSI, a composite momentum value constructed from up to ten independent RSI calculations.
Each timeframe can be individually selected and assigned its own weight.
The composite value is calculated as:
Master RSI =
Σ(RSI × Weight) / Σ(Weight)
This allows shorter-term traders to emphasize lower timeframes, while swing traders can prioritize higher timeframe momentum.
Unlike traditional RSI implementations, the resulting Master RSI represents the collective behavior of multiple market participants operating on different time horizons.
🤝 Consensus Engine
Momentum strength alone does not necessarily imply broad market participation.
To address this, the script measures how many monitored timeframes agree on directional bias.
Each timeframe contributes to a bullish or bearish count according to whether its RSI is above or below the equilibrium level:
Bullish TF:
RSI ≥ 50
Bearish TF:
RSI < 50
Consensus is then calculated as:
Consensus Score =
|Bull TF − Bear TF| / Total TF × 100
Higher values indicate stronger alignment among market participants.
For example:
Consensus = 90%
9 timeframes bullish
1 timeframe bearish
suggests broad agreement across the monitored horizons.
Lower values indicate disagreement and fragmented market participation.
📈 Trend Strength Module
The indicator estimates momentum persistence by smoothing the Master RSI through two exponential moving averages:
Fast Trend EMA = EMA(Master RSI, 5)
Slow Trend EMA = EMA(Master RSI, 13)
The distance between these two curves provides an estimate of directional intensity.
Trend conditions are classified into:
• Weak
• Moderate
• Strong
• Very Strong
This framework helps distinguish between stable trends and environments where momentum lacks conviction.
🎯 Probability Engine
The Probability Engine combines several independent components into a unified score designed to estimate the persistence of the current market condition.
Inputs include:
• Consensus alignment
• Trend strength
• Master RSI positioning
• Dynamic Fibonacci context
The model aggregates these components using weighted contributions:
Probability Score =
Consensus × 40%
+ Trend Strength × 30%
+ Fibonacci Context × 20%
+ RSI Position × 10%
The resulting value is expressed as a percentage.
Higher scores indicate that the current market condition exhibits stronger internal agreement within the framework.
The Probability Score is intended as contextual information and should not be interpreted as a prediction of future price movement.
📐 Adaptive Fibonacci Momentum Zones
Instead of relying on fixed RSI thresholds such as 30 and 70, the script constructs dynamic Fibonacci zones using the observed Master RSI range.
The calculation window automatically adapts to the chart timeframe through the Adaptive Lookback Engine.
Typical lookback behavior:
Lower timeframes:
Longer observation windows
Higher timeframes:
Shorter observation windows
Standard Fibonacci ratios are then projected throughout the observed Master RSI range:
0.000
0.236
0.382
0.500
0.618
0.786
1.000
These zones serve as contextual momentum regions rather than predictive targets.
The indicator additionally estimates the corresponding price levels associated with each momentum zone, allowing users to compare momentum structure with actual price location.
🌡️ Multi-Timeframe RSI Heatmap
To improve readability, the script provides a visual heatmap displaying RSI values from every monitored timeframe.
Each row represents one timeframe and its current RSI value.
Color intensity reflects the relative position of the RSI within its momentum range, allowing users to quickly identify:
• Broad directional alignment
• Divergence between short-term and long-term momentum
• Emerging transitions in participation
The heatmap is intended to complement the Consensus Engine by providing a more granular view of internal market structure.
🧭 Market State Engine
One of the defining components of the framework is the Market State Engine.
Rather than describing conditions simply as bullish or bearish, the indicator classifies the market into five distinct regimes:
Bull Trend
Occurs when:
• Consensus is elevated
• Trend strength is positive
• Probability is high
• Master RSI maintains strong momentum
This environment suggests broad participation and directional persistence.
Bear Trend
Occurs when:
• Consensus is elevated
• Trend strength is negative
• Probability is high
• Master RSI reflects persistent downside momentum
This environment suggests coordinated selling pressure across timeframes.
Accumulation
Occurs when:
• Consensus is limited
• Probability remains subdued
• Master RSI operates below equilibrium
This condition may represent balance-building phases where directional conviction has not yet emerged.
Distribution
Occurs when:
• Consensus remains weak
• Probability remains subdued
• Master RSI operates above equilibrium
This condition may indicate loss of participation following sustained advances.
Transition
Any market environment not satisfying the criteria above is classified as Transition.
These phases often occur during regime changes, trend exhaustion, or evolving participation dynamics.
⚙️ Customization Options
Users can configure:
• Up to ten independent RSI timeframes
• Individual timeframe weights
• RSI calculation length
• Signal smoothing length
• Adaptive or manual Fibonacci lookback
• Fibonacci visualization settings
• Heatmap visibility
• Dashboard display preferences
This flexibility allows the framework to adapt to different asset classes, trading styles, and analytical objectives.
📖 How To Use
Possible applications include:
Use Consensus as a directional filter.
Higher Consensus values suggest broader market agreement.
Monitor Probability before acting on directional setups.
Increasing Probability may indicate strengthening market conditions.
Use Market State to identify the dominant regime.
Trend environments and transitional environments often require different decision-making approaches.
Observe the Heatmap for internal divergence.
Conflicting lower and higher timeframe momentum may signal weakening participation.
Use Fibonacci Momentum Zones as contextual reference areas.
These regions are intended to frame momentum behavior rather than provide precise price targets.
The indicator is designed to complement existing analytical processes and may be combined with price action, market structure, volume analysis, or individual risk management techniques.
💡 Originality
This script represents an original framework that integrates weighted multi-timeframe momentum aggregation, participation consensus measurement, adaptive momentum zoning, probability modeling, and market regime classification into a unified analytical dashboard.
Its primary innovation lies in treating RSI not as an isolated oscillator, but as a distributed representation of market participation across multiple horizons.
The combination of:
• Weighted Master RSI construction,
• Consensus-based participation analysis,
• Adaptive Fibonacci momentum zones,
• Composite probability estimation,
• Multi-timeframe heatmap visualization,
• and Market State classification,
forms a cohesive framework designed to improve contextual awareness rather than generate deterministic trading signals.
This complete implementation was developed as an integrated analytical model and is not derived from any previously published TradingView script.
⚠️ Disclaimer
This script is provided for educational and informational purposes only.
It does not constitute financial advice, investment advice, trading advice, or a recommendation to buy or sell any financial instrument.
All calculations are derived from historical market data and mathematical transformations of price behavior. Technical analysis is inherently uncertain, and past performance does not guarantee future results.
Users should conduct their own research and apply appropriate risk management before making trading decisions. อินดิเคเตอร์

Velocity Breakout Strategy (VBS)Overview
The Velocity Breakout Strategy (VBS) is a comprehensive, institutional-grade swing trading system designed to identify high-probability momentum shifts. Rather than relying on a single lagging indicator, VBS synthesizes five distinct dimensions of market data: Macro Trend, Market Structure, Smart Money Concepts (SMC) valuation, Volatility (ATR/ADX), and Intrabar Volume Delta.
The goal of VBS is to filter out low-probability "chop" and only trigger entries when structural momentum aligns with aggressive buying volume.
Core Mechanics & Underlying Logic
1. Trend & Gradient Cloud Baseline The foundation of VBS is a multi-timeframe moving average system utilizing a Micro (9), Fast (20), and Slow (50) EMA. The relationship between the Fast and Slow EMAs paints a dynamic Gradient Cloud, instantly visualizing the macro trend.
2. Intrabar Volume Delta Estimation Standard volume tells you how much was traded, but not who was in control. VBS includes a custom Volume Delta Estimation engine. It approximates buying vs. selling pressure within a single candle by analyzing where the candle closes relative to its total high-to-low range.
The Filter: VBS can be configured to strictly block any buy signals if the current candle exhibits negative Delta (where estimated selling pressure outweighs buying pressure), preventing entries into hidden institutional distribution.
3. Smart Money Concepts (SMC) Valuation Zones VBS calculates a rolling 100-bar Dealing Range to map out institutional liquidity. It splits this range to identify "Premium" (overvalued) and "Discount" (undervalued) zones. The strategy actively looks for pullback entries (Reloads) when the asset drops into the Discount zone.
4. Volatility & Dynamic ATR Trailing Stops Risk management is handled by a responsive ATR Trailing Stop that adapts to the Average Directional Index (ADX).
During trending phases, the ATR multiplier is wide to let the trade breathe.
When the ADX detects a volatility "Squeeze" (ADX < 20), VBS dynamically tightens the ATR multiplier, protecting profits before a sudden volatile expansion occurs.
5. Master Candle Consolidation VBS scans for extreme volatility contraction using a "Master Candle" concept. If the price prints 4 consecutive bars entirely within the High/Low bounds of a previous Master Candle, the system arms a Breakout Trigger.
Entry Signals (When to Buy)
VBS generates specific, visual entry signals on the chart:
A+ Buy (Lime Triangle): A Golden Cross (20/50 EMA) occurs simultaneously with a verified Higher Low in market structure, backed by positive volume delta.
Risky Buy (Orange Triangle): A Golden Cross occurs, but the strict Higher Low market structure is not yet confirmed.
Bullish Reload (Blue Arrow): A zero-lag pullback entry. Price dips into the SMC Discount zone, touches the Fast EMA, and sweeps liquidity (long lower wick), closing with positive delta.
Consolidation Breakout (Purple Arrow): Price violently breaks the bounds of a 4-bar Master Candle consolidation in the direction of the macro trend.
Exit Strategy (When to Sell)
ATR Trail Exit (Red Down Triangle): The primary exit. Triggers when price closes below the dynamic ATR Trailing Stop.
Macro Break: A failsafe exit triggered if a Death Cross (20 EMA crossing under 50 EMA) occurs while holding a position.
The Strategy Manual: How to Use the Settings
We have built a professional-grade algorithm, which means it has "levers" designed to adapt to almost any market condition. Think of these settings as the steering wheel, gas pedal, and brakes for your strategy. Here is your complete manual on exactly what each setting does, when to change it, and how to use it.
1. Moving Averages & Trend These define the "macro environment." They tell the algorithm whether it is allowed to look for long setups or if it needs to stay out.
Micro EMA Length (Default: 9): The fast-moving trigger line. Decrease to 5 if you are scalping on a 1-minute chart. Increase to 12 if you want to ignore tiny 1-bar pullbacks.
Fast/Slow EMA Length (Default: 20/50): The core trend cloud. If you are swing trading daily charts and want to catch massive, long-term trends, change these to the traditional 50 and 200.
2. Smart Triggers & Structure This is the "Brain" of the algorithm that filters out bad setups.
Real-Time Lookback (Micro) (Default: 12): How many candles backward the script looks to verify a recent "Higher Low" was made before a crossover. If the script is missing valid entries because the pullback was long and drawn out, increase this to 20.
Pivot Lookback/Forward (Macro) (Default: 5): Purely visual. It dictates how many candles are needed to confirm the HH/LL text labels on the chart.
Require Higher Low for A+ Entry (Default: Checked): The strictest safety filter. Uncheck this if you are trading highly volatile assets (like Crypto) that often V-bottom and explode upward without stopping to form a higher low.
Max Run-up % (Chase Filter) (Default: 10.0): Stops the algorithm from buying if the price has already pumped 10% from the bottom. If you are trading Small Caps that regularly pump 30% in a single candle, you must increase this to 20 or 30.
Block Entries in Gray Chop Zone (Default: Checked): The anti-whipsaw filter. Uncheck only if you are actively trying to buy at the absolute bottom of a sideways consolidation box before the momentum officially kicks in.
3. Master Candle Consolidation Your custom logic for catching coiled breakouts.
Required Follow-up Bars (Default: 4): How many candles must get trapped inside the Master Candle. Reduce to 3 on high-timeframes (Daily/Weekly) where 4 days of resting is rare. Increase to 6 or 8 on 5-minute charts to ensure the consolidation is truly exhausted.
Use Master High/Low Bounds (Default: Checked): If unchecked, it only uses the candle body (Open to Close). Uncheck this on highly volatile, "wicky" charts where a single stray wick keeps ruining your consolidation count.
Require Bull Trend & Green ATR for Breakout (Default: Checked): Uncheck this if you want to trade "Reversal Breakouts" (buying an upward breakout before the macro trend has officially flipped bullish).
4. Smart Money Concepts (SMC) Ensures you are buying at a wholesale price.
Dealing Range Lookback (Default: 100): Decrease to 50 for faster, more aggressive zone shifting during rapid market regimes.
Require SMC Zone for Reloads (Default: Checked): Uncheck this during a raging, parabolic bull market where price never pulls back deep enough to hit the discount zone.
5. Dynamic ATR Exits (ADX Squeeze) Your trailing stop-loss manager.
Base ATR Multiplier (Trend) (Default: 3.0): Change to 2.0 for tighter risk management on large-cap stocks. Increase to 4.0 or 5.0 for highly erratic Crypto assets.
Tight ATR Multiplier (Chop) (Default: 1.5): The "choke" stop. Keep this very tight (1.0 to 1.5) to protect profits when momentum dies.
ADX Squeeze Threshold (Default: 20): Increase to 25 if you want the algorithm to aggressively lock in profits the second a trend shows minor weakness.
6. Volume Analysis & POC (Visuals)
Volume Lookback & StDev Multiplier: These dictate when the Fuchsia (Distribution) and Blue (Accumulation) diamonds appear. If you are getting too many diamond alerts, increase the Multiplier to 4.0 so it only flags true anomaly volume.
POC Profile Rows (Default: 40): Resolution of the Volume Profile calculation that draws the yellow Point of Control line. Increase to 100 for a more precise POC line. Decrease to 20 if your TradingView app is lagging.
The VBS Dashboard
The script features a built-in, non-intrusive HUD (Heads Up Display) utilizing a "Lazy-Draw" architecture to prevent memory buffer crashes. It provides a real-time readout of:
Current Macro Trend & Market Structure (HH/HL/LL/LH)
Intrabar Delta State (Positive/Negative)
Volatility State (Expanding vs. ADX Squeeze)
Current SMC Zone (Premium vs. Discount)
Real-time Stop Risk (%)
Usage & Backtesting Notes
By default, the strategy is optimized for comprehensive backtesting. It utilizes a fixed quantity size (qty=1) and allows pyramiding. This ensures the Strategy Tester captures and records the success rate of every single signal generated by the engine, providing a pure, unclouded view of the strategy's mathematical edge.
Disclaimer: VBS is an educational tool designed for analyzing market structure and volume dynamics. It does not guarantee profits. Always use proper risk management and test extensively on paper before deploying real capital.
กลยุทธ์

9 / 21 EMA Pullback Scalper | 5mEasy scalping method off the 9/21 EMA. Uses the 5 min TF. Best if only done from 9:45-15:00 time zone.
Use 9 EMA + 21 EMA on the 5m chart
Enter when price pulls back to the 9 EMA in a trending move
Only trade when 9 EMA is above 21 EMA (long) or below (short)
Simple, visual, easy to execute fast with alerts.
Element: Description
9 EMA line: Bold, colored green in bull trend / red in bear trend
21 EMA line: Same color, slightly faded
Shaded fill: Between the two EMAs — instantly shows trend strength and direction
BUY / SELL: Arrow labels at signal bars. Hover for RSI, EMA values, gap %
Stop-Loss dashed line: Drawn at the lowest low (long) or highest high (short) of the last 3 bars
Info table: Bottom-right corner — live trend, 9 EMA, 21 EMA, RSI, gap %
RSI Filter Blocks longs above 70, shorts below 30
EMA Gap Filter Requires minimum 0.05% spread between EMAs — kills signals in sideways chop
Cooldown Minimum 5 bars between same-direction signals — stops cluster spam อินดิเคเตอร์

อินดิเคเตอร์

Daily EMA Stack 10/21/50/100/200Daily EMA Stack 10/21/50/100/200
A clean multi-timeframe EMA overlay that displays the 10, 21, 50, 100, and 200 Daily EMAs on any chart timeframe.
Unlike standard moving averages that recalculate based on the current chart interval, this indicator anchors all calculations to the Daily timeframe. Whether you're viewing a 1-minute, 5-minute, hourly, daily, or weekly chart, the displayed EMAs remain the true Daily EMAs.
Features:
• 10, 21, 50, 100, and 200 Daily EMAs
• One-click visibility instead of managing multiple indicators
• Individual EMA on/off controls
• Consistent Daily EMA levels across all timeframes
• Color-coded for quick identification
• Lightweight and uncluttered design
EMA Colors:
10 EMA – Red
21 EMA – Orange
50 EMA – Green
100 EMA – Cyan
200 EMA – Purple
Designed for momentum, swing, and growth traders who use Daily moving averages for trend analysis while executing on lower timeframes.
อินดิเคเตอร์
กลยุทธ์

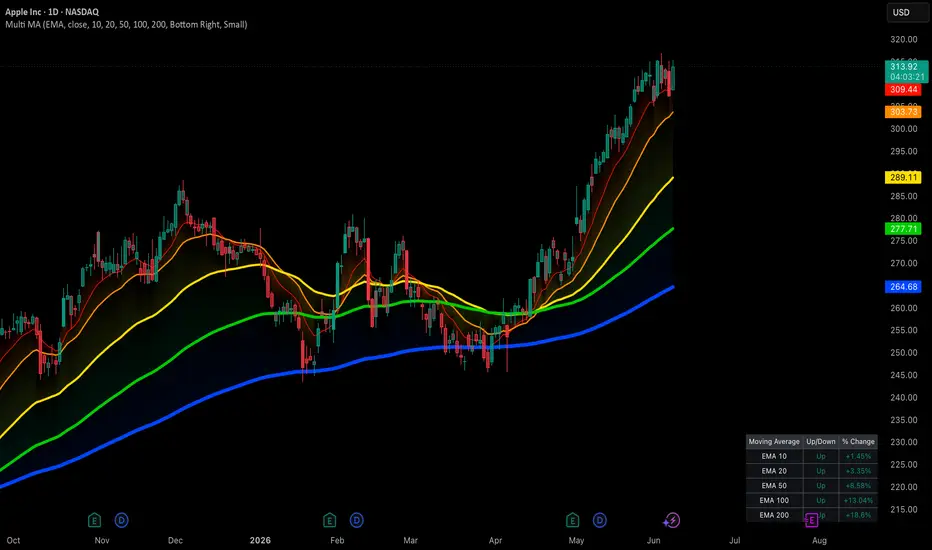
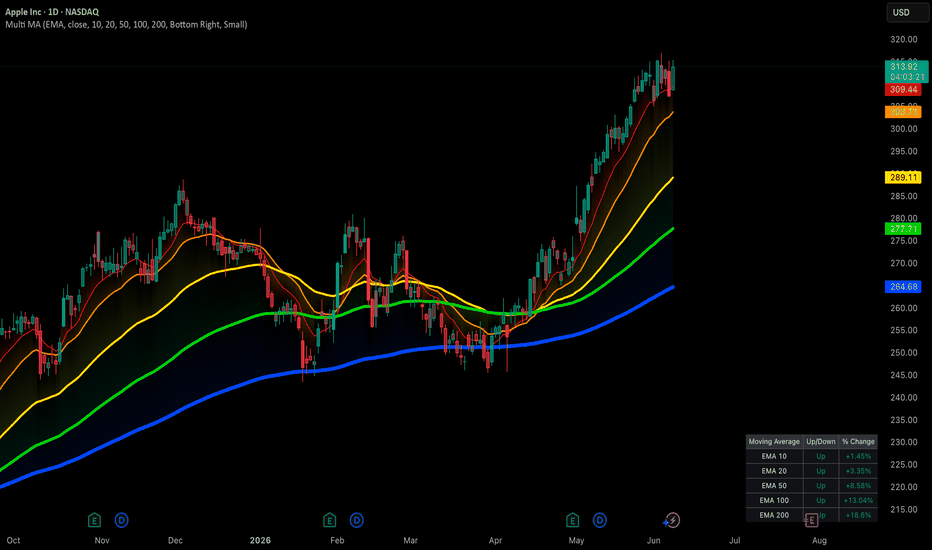
Multiple MA Dashboard [PUCHON]📊 Multiple MA Dashboard
The Multiple MA Dashboard plots up to 5 moving averages of a chosen type (EMA, SMA, WMA, or RMA) directly on your chart and summarizes their relationship to price in a clean, real-time table. Instead of eyeballing where price sits relative to each average, this indicator gives you an instant Up/Down read and the exact percentage distance for every MA.
✨ Features:
- 📈 5 Configurable Moving Averages: Set independent lengths (defaults: 10, 20, 50, 100, 200) sharing one MA type and source.
- 🔁 Switchable MA Type: Choose between EMA, SMA, WMA, and RMA from a single dropdown — all 5 lines update together.
- 📋 Live Dashboard Table: Displays each MA's label, trend direction (Up/Down), and percentage distance from price, refreshed on the latest bar.
- 🎨 Dynamic Trend Coloring: Lines, fills, and table text automatically switch between your chosen "Up" and "Down" colors based on whether price is above or below each MA.
- 🌈 Price-to-MA Fill Zones: Shaded regions between price and each MA make the gap easy to see at a glance.
- ⚙️ Fully Customizable: Adjust MA lengths, source, dashboard position, text size, and theme colors to fit your setup.
🧮 Calculation Logic:
The core getMa function selects the moving average algorithm based on the user's choice, while each MA's color and table row are derived from a simple comparison between price and that MA.
getMa(simple string type, series float src, simple int len) =>
switch type
"EMA" => ta.ema(src, len)
"SMA" => ta.sma(src, len)
"WMA" => ta.wma(src, len)
"RMA" => ta.rma(src, len)
=> ta.ema(src, len)
💡 Interpretation:
- 🟢 Up (price > MA): Price is trading above the average — shown in your "Up Trend" color with a positive % distance.
- 🔴 Down (price < MA): Price is trading below the average — shown in your "Down Trend" color with a negative % distance.
- 📏 % Change: The percentage gap between price and each MA, useful for gauging how stretched or compressed price is relative to that average.
⚠️ Disclaimer:
This tool is provided for educational and informational purposes only. It does not constitute financial advice and does not guarantee future performance. Always combine it with your own analysis and proper risk management. อินดิเคเตอร์
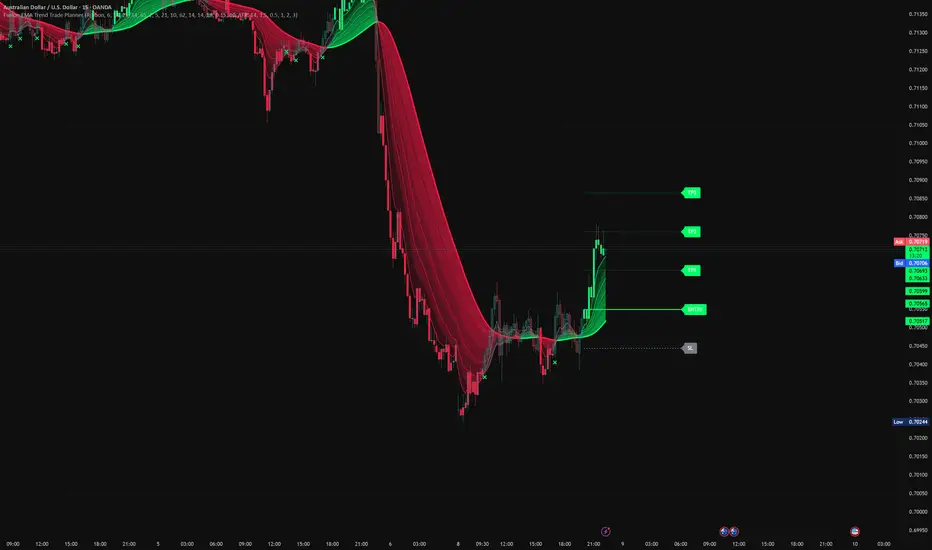
Fusion EMA Trend Trade PlannerFusion EMA Trend Trade Planner
Back to basics.
This tool was built for traders who want a cleaner way to read trend direction, avoid messy chop, and plan risk before entering a trade.
Instead of filling the chart with separate tools for trend, confirmation, filtering, and risk levels, this script combines those steps into one simple workflow.
The goal is not to predict the future.
The goal is to answer four basic questions:
• Is the market trending?
• Is the trend clean or messy?
• Does the broader context support the move?
• Where would entry, stop loss, and take profit levels sit?
━━━━━━━━━━━━━━━━━━━━
🔹 Core Idea
━━━━━━━━━━━━━━━━━━━━
Fusion EMA Trend Trade Planner is built around a simple trend-following process:
1. Find clean EMA structure.
2. Check the 21-period Basis Cloud.
3. Use optional filters if extra confirmation is wanted.
4. Plot a simple risk/reward trade plan.
5. Watch for trend deterioration.
━━━━━━━━━━━━━━━━━━━━
🔹 Fusion EMA Structure
━━━━━━━━━━━━━━━━━━━━
The main trend engine uses four exponential moving averages.
A bullish trend is shown when the EMAs are stacked cleanly:
Fast EMA > Medium EMA > Slow EMA > Anchor EMA
A bearish trend is shown when the EMAs are stacked the opposite way:
Fast EMA < Medium EMA < Slow EMA < Anchor EMA
This is different from a basic two-line crossover.
A single moving average can show direction, but a stacked EMA structure can show both direction and trend quality.
When the EMAs are separated and aligned, the trend structure is cleaner.
When the EMAs compress or cross, the market may be losing structure.
When the structure is mixed, candles can turn grey. This is a visual warning that the trend is no longer clean.
━━━━━━━━━━━━━━━━━━━━
🔹 Fusion Ribbon
━━━━━━━━━━━━━━━━━━━━
The ribbon shows the relationship between the four EMAs.
When the ribbon is clean and expanded, trend structure is stronger.
When the ribbon compresses or turns grey, the market may be entering chop, transition, or weak trend conditions.
This makes it easier for newer traders to visually separate:
• Clean trend
• Weak trend
• Choppy market
━━━━━━━━━━━━━━━━━━━━
🔹 21-Period Basis Cloud
━━━━━━━━━━━━━━━━━━━━
The Basis Cloud is built around a smoothed 21-period basis average.
The number 21 was chosen because it is a Fibonacci number commonly used by trend traders as an intermediate market rhythm.
The cloud also uses a shorter reference average to create a layered visual zone around the basis.
The Basis Cloud is not designed as a simple crossover signal.
Its job is to act as a directional context layer.
In simple terms:
• Green cloud = basis direction is rising
• Red cloud = basis direction is falling
The Fusion EMA Structure and Basis Cloud are calculated separately.
This means traders can compare two different views of the market:
• EMA trend structure
• 21-period basis direction
When both agree, the setup has cleaner directional context.
When they disagree, conditions may be weaker or less clear.
━━━━━━━━━━━━━━━━━━━━
🔹 Higher Timeframe Filter
━━━━━━━━━━━━━━━━━━━━
An optional higher timeframe Fusion EMA can be used for extra context.
This helps traders avoid taking setups that go directly against broader trend structure.
For example:
• Current chart is bullish
• Higher timeframe is also bullish
• Setup has better alignment
This does not guarantee success, but it helps keep trades in line with the bigger picture.
━━━━━━━━━━━━━━━━━━━━
🔹 Optional Quality Filter
━━━━━━━━━━━━━━━━━━━━
The script includes an optional Quality Filter for traders who prefer additional confirmation.
By default, the indicator focuses on Fusion EMA Structure, Basis Cloud direction, and Trade Planning.
For traders who want a more selective approach, the Quality Filter can be enabled to evaluate:
• EMA ribbon expansion
• Price position relative to the Basis Cloud
• Higher timeframe agreement
• ADX trend strength
The filter is not intended to predict win rates or assign confidence scores.
Its purpose is simply to reduce participation during weaker trend conditions.
Many traders may prefer to leave the filter disabled and use Fusion EMA Structure and Basis Cloud alignment alone.
━━━━━━━━━━━━━━━━━━━━
🔹 Trade Planner
━━━━━━━━━━━━━━━━━━━━
When a valid setup appears, the script can draw a full trade plan:
• Entry
• Stop Loss
• TP1
• TP2
• TP3
Stop loss can be calculated using:
• ATR-based stop
• Percentage-based stop
Take-profit levels are based on adjustable risk/reward values.
This helps traders see the risk before entering instead of chasing candles blindly.
The Trade Planner is a visual planning tool only. It does not place trades automatically.
━━━━━━━━━━━━━━━━━━━━
🔹 Grey Exit Marker
━━━━━━━━━━━━━━━━━━━━
If a trade is active and the EMA structure turns grey, the script can print a small X marker.
This means the original clean trend structure has weakened.
It does not mean price must reverse.
It simply means the condition that created the trade setup is no longer clean.
━━━━━━━━━━━━━━━━━━━━
🔹 Suggested Workflow
━━━━━━━━━━━━━━━━━━━━
For a bullish setup:
1. Wait for green candle structure.
2. Check that the ribbon is clean.
3. Check that price is above the Basis Cloud.
4. Use the optional Quality Filter if you want extra confirmation.
5. Use the Trade Planner to review entry, stop loss, and targets.
6. Watch for grey candles or exit markers.
For a bearish setup:
1. Wait for red candle structure.
2. Check that the ribbon is clean.
3. Check that price is below the Basis Cloud.
4. Use the optional Quality Filter if you want extra confirmation.
5. Use the Trade Planner to review entry, stop loss, and targets.
6. Watch for grey candles or exit markers.
━━━━━━━━━━━━━━━━━━━━
🔹 Originality
━━━━━━━━━━━━━━━━━━━━
This script was designed as a complete trend-following workflow, not as a random collection of indicators.
The goal of this script was not to merge unrelated indicators into a single chart.
Each component was selected to perform a specific role within the workflow:
• Fusion EMA Structure identifies trend alignment.
• Fusion Ribbon visualizes trend quality.
• 21-Period Basis Cloud provides directional context.
• Optional Quality Filter helps reduce participation during weaker conditions.
• Trade Planner converts trend conditions into predefined risk levels.
• Grey Exit Marker highlights trend deterioration.
Together, these components form a single trend-analysis and trade-planning process rather than functioning as separate standalone indicators.
The purpose is to move from trend reading to trade planning in one clean process.
━━━━━━━━━━━━━━━━━━━━
🔹 Important Notes
━━━━━━━━━━━━━━━━━━━━
This indicator does not:
• Predict future price movement
• Guarantee profitable trades
• Estimate win probability
• Replace risk management
• Call every top or bottom
It is designed to help traders identify cleaner trend conditions and plan trades more consistently.
Simple idea:
Find the trend.
Check the structure.
Plan the risk.
Do not chase messy candles. อินดิเคเตอร์

AI Source Switching Moving Average (Zeiierman)█ Overview
The AI Source Switching Moving Average is an adaptive price-selection and trend intelligence system that combines historical analog recognition, machine learning classification, neural learning, feature optimization, dynamic source selection, and AI-driven trend management into a single framework.
Rather than calculating a moving average from a fixed source such as Close, Open, High, or Low, the indicator continuously evaluates which price source currently contains the most useful market information.
The script transforms each OHLC source into a multi-dimensional feature space, stores historical behavior, searches for similar historical environments, and allows those analogs to vote on which source currently provides the highest predictive value.
An adaptive feature-weighting engine continuously learns which characteristics best separate bullish and bearish conditions, while an online neural model adds a second layer of directional intelligence.
█ Why Is This One Unique
Most moving averages are static.
You select a source:
• Close
• Open
• High
• Low
Then the moving average simply smooths that source. This indicator does something fundamentally different.
Instead of assuming one source is always optimal, it continuously evaluates all four OHLC streams and determines which source currently contains the strongest information based on historical behavior.
The indicator effectively asks:
"Which price source has historically produced the best outcome under conditions most similar to the current market?"
That selected source then becomes the input for the moving average and AI Supertrend. This transforms a traditional moving average into a dynamic source-selection engine.
█ How It Works
⚪ Builds Multi-Dimensional OHLC Features
The model does not analyze raw prices directly.
Each OHLC source is transformed into a behavioral fingerprint consisting of:
• Trend Structure
• Mean-Reversion State
• Momentum
• Volatility Profile
• Range Position
• Price Slope
Every source becomes its own market state representation.
oT = featTrend(open, atrNow)
oM = featMean(open)
oMo = featMomentum(open)
oV = featVol(open)
oR = featRange(open)
oS = featSlope(open, atrNow)
The same feature process is applied to High, Low, and Close.
hT = featTrend(high, atrNow)
lT = featTrend(low, atrNow)
cT = featTrend(close, atrNow)
Instead of asking:
"Where is price?"
The model asks:
"How is this source behaving?"
⚪ Creates A Historical Memory Bank
Every confirmed bar is stored together with:
• Source feature state
• Future market outcome
• Volatility-normalized labels
This becomes the learning dataset.
moveFwd = close - close
bandFwd = learnAtrFactor * atrNow
outcome = moveFwd > 2 * bandFwd ? 3 :
moveFwd > bandFwd ? 2 :
moveFwd > 0 ? 1 :
moveFwd < -2 * bandFwd ? -3 :
moveFwd < -bandFwd ? -2 :
moveFwd < 0 ? -1 : 0
Each stored row contains the feature snapshot plus the outcome label.
rowO = makeRow(oT , oM , oMo , oV , oR , oS , outcome)
Each confirmed observation becomes a real historical example the model can reference later.
if barstate.isconfirmed and bar_index > horizonBars + 120
if validO
addBank(bankO, rowO, memoryDepth)
addBank(bankAll, rowO, memoryDepth * 4)
⚪ Uses Historical Analog Matching
Once enough data has been collected, the model begins searching for historical situations that resemble current conditions.
Similarity is measured using a compressed Lorentzian-style distance function:
compress(d) =>
math.log(1.0 + math.abs(d))
The gap between the current feature state and each historical row is then calculated across all features.
gapTo(t, m, mo, v, r, s, array row) =>
wT * compress(t - row.get(0)) +
wM * compress(m - row.get(1)) +
wMo * compress(mo - row.get(2)) +
wV * compress(v - row.get(3)) +
wR * compress(r - row.get(4)) +
wS * compress(s - row.get(5))
This helps reduce outlier influence and prevents any single feature from dominating the comparison process.
The goal is not to find identical charts. The goal is to find historically similar market environments.
⚪ Let Historical Analogs Vote
After finding the closest historical examples, the model allows them to vote.
Closer analogs receive greater influence. More distant analogs contribute less.
wg = 1.0 / (1.0 + g)
score += cls * wg
bull += cls > 0 ? wg : 0.0
bear += cls < 0 ? wg : 0.0
The weighted voting system produces:
• Analog Score
• Directional Bias
• Agreement Fraction
• Similarity Tightness
• Market Conviction
analog = total > 0 ? score / total : 0.0
dir = analog > 0.15 ? 1 : analog < -0.15 ? -1 : 0
agree = total > 0 ? (dir == 1 ? bull : dir == -1 ? bear : 0.0) / total : 0.0
tight = clamp(1.0 - avgGap / gapScale, 0.0, 1.0)
This creates a probabilistic ranking system rather than a binary signal engine.
⚪ Auto-Optimizes Feature Importance
Different markets reward different behaviors.
A feature that is extremely predictive today may become less useful tomorrow. The indicator solves this problem using adaptive Fisher-discriminant optimization.
The engine continuously measures which features best separate bullish outcomes from bearish outcomes.
f = math.pow(meanB - meanS, 2) / (varB + varS + 0.000001)
• Features with higher predictive value receive larger weights.
• Features with lower predictive value gradually lose influence.
norm = maxF > 0 ? fish.get(j) / maxF : 1.0
imp.set(j, math.max(floor, norm * 8.0))
The optimized weights are smoothed over time.
wAuto.set(j, prev + fisherSpeed * (wRaw.get(j) - prev))
This allows the model to adapt automatically without requiring manual optimization.
⚪ Adds Neural Learning
Beyond analog classification, the indicator includes an online neural learning layer.
The neural model continuously updates itself using confirmed market outcomes and adjusts internal directional bias over time.
neuralScore(t, m, mo, v, r, s) =>
nt * t + nm * m + nmo * mo + nv * v + nr * r + ns * s + nb
The neural layer evaluates:
• Trend Structure
• Mean Reversion
• Momentum
• Volatility
• Range Position
• Slope Behavior
Training is performed using an Adam-style optimizer.
adam(weight, grad, mom, vel, step) =>
newMom = beta1 * mom + (1.0 - beta1) * grad
newVel = beta2 * vel + (1.0 - beta2) * grad * grad
mHat = newMom / (1.0 - math.pow(beta1, step))
vHat = newVel / (1.0 - math.pow(beta2, step))
newWeight = weight - learnRate * mHat / (math.sqrt(vHat) + eps)
This creates a second intelligence layer that works alongside the analog engine.
⚪ Ranks All Four Sources
Every bar receives independent scores for:
• Open
• High
• Low
• Close
rO = rankSource(oT, oM, oMo, oV, oR, oS, oAnalog, oAgree, oTight, oK)
rH = rankSource(hT, hM, hMo, hV, hR, hS, hAnalog, hAgree, hTight, hK)
rL = rankSource(lT, lM, lMo, lV, lR, lS, lAnalog, lAgree, lTight, lK)
rC = rankSource(cT, cM, cMo, cV, cR, cS, cAnalog, cAgree, cTight, cK)
The ranking combines:
• Analog Classification Strength
• Historical Agreement
• Similarity Quality
• Feature Separation
• Neural Confidence
rankSource(t, m, mo, v, r, s, analog, agree, tight, k) =>
neural = useNeural ? neuralScore(t, m, mo, v, r, s) : 0.0
directional = math.abs(analog) / 3.0
raw = directional * 0.35 + agree * 0.25 + tight * 0.20 + normScore(neural) * neuralInfluence + (k >= kNeighbors ? 0.10 : 0.0)
clamp(raw, 0.0, 1.0)
The highest-ranked source becomes the active source for both the moving average and Supertrend.
bestId = safeRO >= safeRH and safeRO >= safeRL and safeRO >= safeRC ? 0 :
safeRH >= safeRL and safeRH >= safeRC ? 1 :
safeRL >= safeRC ? 2 : 3
This means the indicator can dynamically switch between Open, High, Low, and Close depending on which source currently demonstrates the strongest historical edge.
⚪ Builds An Adaptive AI Moving Average
After selecting the best source, the indicator calculates a moving average using that dynamically chosen input.
hardSrc = bestId == 0 ? open :
bestId == 1 ? high :
bestId == 2 ? low : close
The selected source is then smoothed and passed into the moving-average engine.
aiSourceRaw = hardSrc
aiSource = ta.ema(aiSourceRaw, srcSmoothLen)
aiMA = ma(aiSource, maLen, maType)
Unlike traditional averages that remain tied to a fixed source, the AI MA continuously adapts to changing market conditions.
The result is a smoother and more context-aware trend representation.
█ Main Weakness
The indicator is not deep learning.
It does not train a large neural network.
Instead, it operates as an online analog classifier enhanced by adaptive feature weighting and lightweight neural optimization.
Because it learns from historical analogs, performance can vary depending on:
• Symbol
• Timeframe
• Market Regime
• Memory Depth
• Feature Configuration
• Learning Horizon
As with all adaptive systems, historical similarity does not guarantee future outcomes.
█ How To Use
⚪ Reading The AI Moving Average
• Rising average = bullish conditions dominate.
• Falling average = bearish conditions dominate.
• Strong slope = stronger trend conviction.
• Flat slope = weaker directional conviction.
The AI Moving Average can be used much like a traditional moving average, but with the added benefit of dynamic source selection.
Use it for:
• Identifying trend direction
• Spotting trend changes
• Confirming momentum shifts
• Dynamic support and resistance analysis
• Pullback and retest opportunities
• Trend continuation setups
In bullish conditions , traders may look for price to remain above the moving average and use pullbacks into the average as potential continuation zones.
In bearish conditions , traders may look for price to remain below the moving average and use rallies into the average as potential resistance areas.
⚪ Reading The AI Supertrend
The AI Supertrend acts as:
• Trend Filter
• Dynamic Trailing Stop
• Market Structure Guide
• Bullish flips indicate positive trend conditions.
• Bearish flips indicate negative trend conditions.
Because the band width adapts to model confidence, trend changes become more responsive during strong conditions and more tolerant during weak conditions.
Use the AI Supertrend for:
• Trend confirmation
• Trade management
• Trailing stop placement
• Exit planning
• Market structure analysis
• Trend-following systems
Many traders may choose to remain long while price stays above the bullish trail and remain short while price stays below the bearish trail.
The Supertrend can also be used as a dynamic stop-loss framework, allowing positions additional room during uncertain conditions while tightening risk management when the AI model detects stronger directional conviction.
█ Settings
MA Type: Selects the moving average formula used after source selection.
MA Length: Controls the smoothing period of the AI moving average.
AI Source Smoothing: Smooths source transitions after source switching.
Memory Depth: Controls how many historical examples are stored.
Analog Count: Controls how many historical analogs participate in voting.
Learning Horizon: Controls how far ahead outcomes are evaluated.
Analog Spacing: Controls sampling diversity within the memory bank.
Learning Sensitivity × ATR: Controls how future outcomes are classified.
Use Neural Online Training: Enables the adaptive neural learning layer.
Neural Influence: Controls neural contribution to source ranking.
Learning Rate: Controls neural adaptation speed.
Huber Delta: Controls error sensitivity during training.
Auto Optimize Feature Weights: Enables adaptive feature importance learning.
Adaptation Speed: Controls weight adjustment speed.
Weight Floor: Sets minimum feature influence.
Minimum Rows: Controls when Fisher optimization becomes active.
Show AI Supertrend: Displays the adaptive trail.
ATR Length: Controls volatility measurement.
ATR Multiplier: Controls trail width.
AI Band Adaptivity: Controls AI influence over trail width.
-----------------
Disclaimer
The content provided in my scripts, indicators, ideas, algorithms, and systems is for educational and informational purposes only. It does not constitute financial advice, investment recommendations, or a solicitation to buy or sell any financial instruments. I will not accept liability for any loss or damage, including without limitation any loss of profit, which may arise directly or indirectly from the use of or reliance on such information.
All investments involve risk, and the past performance of a security, industry, sector, market, financial product, trading strategy, backtest, or individual's trading does not guarantee future results or returns. Investors are fully responsible for any investment decisions they make. Such decisions should be based solely on an evaluation of their financial circumstances, investment objectives, risk tolerance, and liquidity needs.
อินดิเคเตอร์

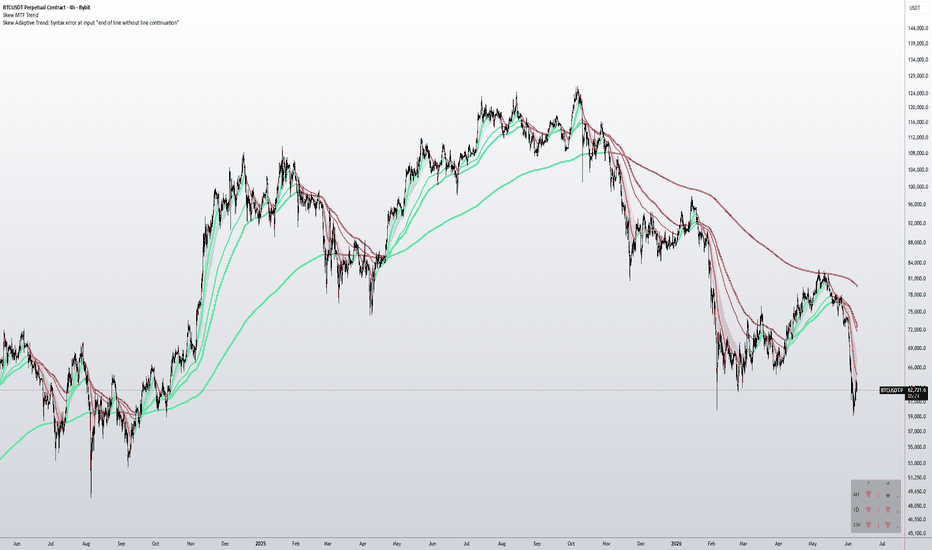
Skew MTF TrendMulti-timeframe trend structure at a glance.
Three fully configurable timeframes on one chart every average colored by its native timeframe's trend state: green above, red below, gray neutral.
Main Timeframe (default 4H)
EMAs 21, 50, 100, 200. A ribbon fills between the 21/50/100 — green when bull-stacked, red when bear-stacked, gray when mixed.
HTF 1 (default Daily)
EMAs 50 and 200 with trend coloring.
HTF 2 (default Weekly)
EMAs 21, 50, 200 and SMA 200 with trend coloring.
All three timeframes can be changed to any combination. Linewidth scales by layer (Main: 2, HTF 1: 3, HTF 2: 4) for instant visual separation. Master toggles show/hide each timeframe with one click. Every period and line is independently configurable.
Trend Table
A compact table in the bottom right reads trend state per timeframe using the 50 EMA and 200 EMA:
▲ Green — price above both the 50 EMA and 200 EMA (uptrend)
▼ Red — price below both the 50 EMA and 200 EMA (downtrend)
● Gray — price between the 50 and 200, or mixed (pending)
The table dynamically displays each selected timeframe, updating automatically when settings change.
Trading with it
The 50 EMA is the key level that defines the trend. The 200 EMA is the level you trade into.
Uptrend — Price holds the 50 EMA as support, table showing ▲. Dips into the 50 EMA and the ribbon are buying opportunities. If price dips deeper, the 200 EMA is the next level to bid — the last line of trend defense.
Downtrend — Price rejects the 50 EMA as resistance, table showing ▼. Rips into the 50 EMA and the ribbon are selling opportunities. The 200 EMA above is the level to sell into on deeper retracements.
Chop — Price is caught between the 50 and 200, table showing ● on one or more timeframes. Neither side has control. Reduce size or sit flat until the 50 EMA cleanly holds or rejects.
When all three timeframes agree, the trend is strong. When they disagree, conditions are transitional. อินดิเคเตอร์
อินดิเคเตอร์
EMA Horizon█ OVERVIEW
The EMA Horizon indicator offers a modern, structural upgrade to the classic Exponential Moving Average. While standard EMAs are indispensable tools for trend identification, they inherently suffer from "live candle blindness" —flickering wildly on the current unclosed bar and causing traders to miss critical intraday touches or fall into false breakout traps.
EMA Horizon solves this by calculating an immediate forward-looking volatility corridor based on the asset's actual physical extremes (High/Low), anchored tightly to its closing history. It provides an unchanging, reliable boundary range for the current candle asset space, allowing traders to see exactly where the EMA would be pushed under extreme conditions.
---
█ THE PROBLEM WITH STANDARD EMAs
A standard EMA updates continuously based on the live ticking close . During highly volatile periods, the indicator line bends and flexes dramatically inside the current bar. This real-time distortion creates two major issues:
The Flicker Trap: Price can spike out of an EMA zone and snap back before the candle closes, leaving no historical trace of the breach and causing missed execution opportunities.
Lagging Boundaries: Standard bands (like envelopes or Keltner channels) look backward at historical averages. They fail to tell you how a single massive, aggressive live expansion bar will mathematically impact the underlying moving average trend line right now.
---
█ THE SOLUTION & MECHANICAL EDGE
EMA Horizon does not simply calculate an EMA of all Highs or all Lows (which smoothly degrades accuracy over time). Instead, it preserves the integrity of pure historical closing prices up to the immediate moment.
From that clean historical baseline, it executes a "one-off" look-ahead calculation: it processes the current candle's High and Low as if they were the immediate next closing prices .
The High Band shows the ultimate ceiling the EMA could reach on the next step.
The Low Band shows the absolute floor the EMA could drop to on the next step.
By utilizing the built-in Bands Offset parameter, you can shift this entire calculation forward across your timeline. When shifted, the boundaries sitting under your live candle are locked—derived entirely from the previous candle's completed structure. This eliminates real-time repainting and gives you an unshakeable roadmap for price interaction.
---
█ FEATURES
Pure History Anchoring: The base EMA line relies strictly on closing prices, ensuring your core trend logic remains untainted by extreme wicks.
Next-Bar Step Simulation: Dynamically maps out the mathematical limits of the moving average based on immediate price expansion boundaries.
Global Visual Alignment: The script features a unique global offset parameter that shifts both the baseline EMA and its projection bands uniformly. This completely avoids visual distortion and allows you to perfectly map historical structures without losing physical perspective.
---
█ HOW TO USE
Add to Chart: Search for "EMA Horizon" in your TradingView indicator panel and apply it.
Configure your Length: Adjust the Length input to match your primary trend tracking asset class (e.g., 9 for short-term momentum, 21 or 50 for structural trends).
Set your Offset Look:
Set Bands Offset to 0 to observe the real-time maximum range expansion matching the current candle's high/low.
Set Bands Offset to 1 to push the indicator one bar to the right. This allows you to track how the current live asset price responds to the locked, unchangeable projection generated by the previous closed bar.
Identify True Deviations: Watch for instances where a candle aggressively drives through the green horizon cloud. If the asset price slices cleanly past the projected bands, it indicates an exhaustion phase or an institutional velocity breakout that goes beyond standard mathematical trend boundaries.
อินดิเคเตอร์

อินดิเคเตอร์

EMA Trend Dash Board by [Itto Ryu]# EMA Trend Dash Board — Trend stage classifier on a 5-EMA stack
A pure-EMA trend dashboard. Five exponential moving averages (10/20/50/100/200)
plus three derived signals — stack alignment, EMA50 slope, and the fast-vs-trend
gap — classify the market into one of four trend stages: ACCEL → MATURE → DECEL
→ REVERSAL. A 0-to-100 Bull/Bear score and a state-machine VERDICT row summarise
all of it in a single glance.
## What's different from a generic EMA ribbon
Most EMA-ribbon scripts only colour the EMAs. This one adds:
1. **Stage classification** — instead of "trending vs ranging", the script tells
you *where in the trend you are*. Stage 1 (ACCEL) is for adds; Stage 3 (DECEL)
warns to trim; Stage 4 (REVERSAL) tells you the stack has lost alignment.
2. **Bull/Bear score (0–100)** — composed of:
- Price-above-EMA: 8 pts each (max 40)
- Stack-pair ordering: 10 pts each (max 40)
- Trend-EMA slope direction: 10 pts
- Gap expansion (only when stack aligned): 10 pts
3. **Verdict state machine** — combines stage + score into one action label
(STRONG SETUP, SIGNAL CLEAR, TREND ACCEL, EASE, WATCH, EXIT, ...).
## Defaults (and why)
| Input | Default | Reasoning |
|---|---|---|
| EMA lengths | 10 / 20 / 50 / 100 / 200 | Classic Stan Weinstein / Mark Minervini ladder |
| Slope/Gap lookback | 5 bars | Catches turns without over-smoothing on intraday |
| Slope flat threshold | 0.1% | Below this magnitude the trend EMA is treated as flat — avoids false up/down on chop |
| Gap expansion threshold | 0.05% | Min change in |gap| to count as expanding/compressing |
| Dashboard | top_right, normal | Standard placement; tiny/small for low-res screens |
## Visual elements
| Element | Meaning |
|---|---|
| 5 EMA lines | EMA 1 (fast, yellow) → EMA 5 (long, slate). EMA 3 (Trend, pink) drawn thicker as the slope reference |
| Fast-Trend fill | Green when EMA1 > EMA3, red otherwise. Quick visual on momentum direction |
| Right-edge labels | EMA name tags at the latest bar |
| Dashboard | Trend / EMA Stack / Trend Dynamics / Scoring / Signal / Verdict sections |
## Who this is for
- Trend-following swing traders who already use EMA stacks but want a state read-out
- Discretionary traders who want a "what stage am I in?" check without staring at the chart
- Anyone replacing 3-4 separate EMA indicators with one consolidated dashboard
## Who this is NOT for
- Pure mean-reversion / range traders — EMAs are the wrong tool
- Tick scalpers — the stage/gap thresholds are tuned for swing+intraday, not sub-minute
- Anyone needing entry/exit signals automated — this is a *read-out*, not a strategy
## How to use
1. Apply on standard candle chart, any timeframe (works best 15m → Daily)
2. Read the **Stage** row first — that's your context
3. Cross-check with **Verdict** row — that's your action
4. The Bull/Bear bars give a confidence reading; the SIGNAL row gives the discrete label
5. Configure alerts on STRONG Long/Short or Stack Broken for hands-off monitoring
## Common mistakes
- **Entering on Stage 4 just because Verdict says STRONG SETUP** — Stage 4 = stack lost alignment, by design it forces a re-check. Wait for re-alignment.
- **Reading dashboard on Heikin Ashi** — EMAs are calculated on HA close (a smoothed value), not real close. Numbers will not match a standard-chart EMA. Use standard candles for the dashboard.
- **Tuning EMA lengths for one symbol and assuming portability** — re-test on each instrument; trend EMAs are regime-dependent.
## Disclosure
- **Pine version**: v6
- **Repaint**: NO — all calculations use confirmed-bar data. Dashboard and right-edge labels refresh on the last bar (cosmetic only) and do not modify historical bars.
- **Lookahead**: NONE — no `request.security` calls.
- **Chart type**: Designed for standard candle charts. On Heikin Ashi / Renko / Range / PnF / Kagi the EMA values are calculated against the chart's synthetic close and will not match a standard-chart EMA.
- **Originality**: Generic 5-EMA inputs; novel additions are the Stage classifier, Bull/Bear scoring weights, and Verdict state machine.
- **Predecessor**: Extracted from the author's earlier "Ichimoku Trend Dash Board" (Ichimoku + EMA combined). This EMA-only variant strips Ichimoku, ADX, RSI, MACD, and SL/TP logic for a focused trend-stage read.
## Disclaimer
For educational purposes only. Not financial advice. Trading involves
substantial risk of loss — past performance does not guarantee future results.
You are solely responsible for your own trading decisions. Script provided
"as is" with no warranty; author is not liable for any losses. อินดิเคเตอร์

อินดิเคเตอร์
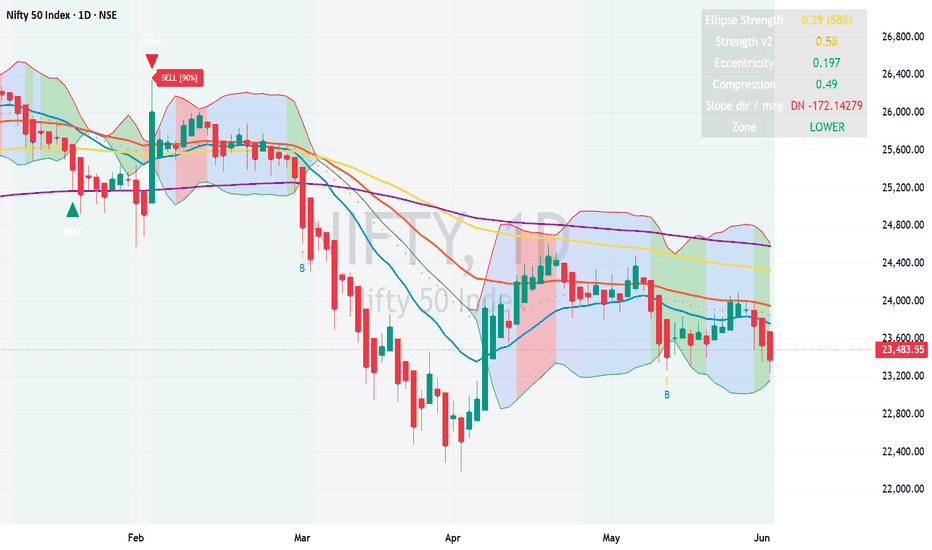
Traq APEX EMA System + ConfluenceFull Description:
Traq APEX EMA System + Confluence is a discretionary trading indicator designed to evaluate trend pullbacks using a combination of EMA structure, market structure, liquidity context, and risk-reference levels.
The script is built around the idea that an EMA pullback signal is more useful when it occurs in the presence of supporting structure. Instead of treating an EMA rejection alone as a trade signal, the script checks whether additional conditions are present, such as recent break of structure, internal liquidity sweeps, active fair value gap retests, higher-timeframe EMA alignment, session context, VWAP direction, and previous day/week liquidity levels.
Main Components
EMA Ribbon and Bias
The script plots an EMA ribbon using multiple moving averages. The ribbon is used to evaluate trend structure, compression, expansion, and pullback location. A separate bias EMA is used to judge broader directional context. The script can optionally require the price to agree with the bias EMA and can also require the bias EMA slope to support the trade direction.
Higher-Timeframe EMA Context
The indicator includes two configurable higher-timeframe EMA states. By default, these use the last closed higher-timeframe candle to avoid live higher-timeframe flicker. Users can choose between “No Opposition” and “Strict Alignment” modes.
“No Opposition” allows neutral higher-timeframe conditions but blocks signals when the selected higher timeframes oppose the trade direction. “Strict Alignment” requires both selected higher timeframes to align.
Pullback Signal Engine
The Traq APEX signal engine looks for pullbacks into the EMA ribbon followed by a rejection candle. Users can choose shallow, mid, or deep pullback depth. A minimum body-size filter based on ATR is included to reduce weak rejection candles.
The plotted signal is not intended to be a market-entry instruction. The displayed entry reference uses a stop-entry concept: above the signal candle high for long setups and below the signal candle low for short setups.
Break of Structure Context
The script tracks confirmed swing highs and swing lows using pivot logic. A bullish BOS occurs when the price closes above a prior swing high by a minimum point threshold. A bearish BOS occurs when the price closes below a prior swing low by a minimum point threshold. BOS is used as a structure filter and dashboard condition, not as a separate visual clutter layer.
Internal Liquidity Sweeps
The script tracks internal swing liquidity using pivot highs and lows. A buy-side sweep occurs when price trades through a recent swing high. A sell-side sweep occurs when the price trades through a recent swing low. These sweeps can be required as part of the confluence layer.
Internal liquidity drawings are capped through managed line and label arrays so that old liquidity markings do not consume the script’s drawing budget.
Active FVG Retest Tracking
The script detects bullish and bearish fair value gaps and stores multiple active FVGs in arrays. FVGs are only added and removed on confirmed bars to avoid intrabar rollback artifacts. Users can choose the mitigation mode: Touch, Midline, or Full Fill.
FVG retests can be used as a score component or required as a stricter filter.
External Liquidity Map
The script includes previous day high/low, previous week high/low, and previous week equilibrium. These levels are used as external liquidity context and optional score components.
External liquidity sweeps can be used to increase confluence but are not required by default.
Confluence Score
The script scores long and short conditions separately using available components such as BOS, internal sweep, FVG retest, session, VWAP direction, and external liquidity sweep. Users can set a minimum score threshold. This allows the script to be tested as either a broad pullback tool or a stricter confluence filter.
Risk Reference Levels
When a final signal appears, the script can display a stop reference and fixed R:R target. Stops are based on recent liquidity sweep levels when available, otherwise a fallback swing/ATR reference is used. These levels are visual references only and should be evaluated against each trader’s own risk plan.
How to Use
Start by using the script as a visual decision-support tool, not as an automated signal system.
Suggested starting settings for testing:
Use Closed HTF Bars: ON
MTF Mode: No Opposition
Require Recent BOS: ON
Require Internal Sweep: ON
Require Active FVG Retest: OFF
Require External Sweep: OFF
Minimum Confluence Score: 3
FVG Mitigation Mode: Midline
Max Internal LIQ Drawings: 20 to 30
Show Base Debug: ON during testing
The base debug markers can help show where the EMA pullback engine wanted to fire but the confluence layer blocked the signal.
Limitations
This script does not predict future price movement. It does not guarantee profitable trades, accuracy, win rate, or any specific trading result.
The indicator is designed for discretionary analysis and requires user judgment. Signals can fail, especially during choppy, low-volume, news-driven, or range-bound conditions.
Swing structure and liquidity levels are based on pivot confirmation, which means they are confirmed with delay. This avoids repainting after confirmation but does not identify swings instantly.
Higher-timeframe context defaults to closed HTF bars for stability. If users disable closed HTF mode, higher-timeframe arrows and context may update intrabar.
Risk labels and target labels are references only. They should not be treated as financial advice or as a substitute for proper position sizing, market context, and independent testing.
Chart Setup
For publication, use a clean candlestick chart with only this script applied. Avoid adding unrelated indicators, extra drawings, logos, promotional text, or contact references. The script output should be clearly visible, including the EMA ribbon, dashboard, liquidity labels, and a small number of example signals.
Disclaimer
This script is for educational and analytical use only. It does not provide financial advice, does not predict future market movement, and does not guarantee trading results. Users should test settings on their own markets and timeframes before relying on any output.
อินดิเคเตอร์

V-AEMA VMR [LB]Concept
The V-AEMA VMR (Volume-Adaptive Exponential Moving Average with Volatility-Modulated Regime) is a hybrid trend-following indicator that combines an EMA baseline with a volatility-based drift component. It produces a dynamic core line whose colour reflects the trend regime, surrounded by two levels of adaptive bands that expand or contract based on volume intensity. The indicator generates directional entry signals when price breaks the first band in the direction of the trend, and projects take-profit zones when price fully exits both bands.
Mathematical Foundation
The core line (Hybrid Line) is a weighted blend of a standard EMA and a volatility-shifted version of that same EMA :
HybridLine = EMA * W + (EMA + Drift) * (1 - W)
where the drift is derived from the Z-Score of price relative to the EMA, scaled by ATR :
Drift = Z_Score * ATR * 0.35
Z_Score = (Price - EMA) / StdDev(Price, L_vola)
Band width starts from a base volatility measure combining standard deviation and ATR :
BaseWidth = StdDev * 0.65 + ATR * 0.35
This base is then adjusted by a volume ratio and user-defined multipliers :
UpperWidth = BaseWidth * (BaseUpMult + (VolRatio - 1) * VolImpactUp)
LowerWidth = BaseWidth * (BaseDnMult + (VolRatio - 1) * VolImpactDn)
where VolRatio = min(max(Volume / SMA(Volume, L_vol), 0.35), 2.50) .
Two band levels are generated : Band 1 at HybridLine +/- Width, and Band 2 (extreme) at HybridLine +/- Width * 1.55 (upper) / 1.40 (lower).
What Problem Does It Solve ?
Conventional envelope indicators (Bollinger Bands, Keltner Channels) apply fixed multipliers to a single volatility metric and ignore volume dynamics. The V-AEMA VMR adapts its band width to both volatility and volume surges, producing wider bands during high-participation moves and narrower bands during quiet periods. The hybrid core line reduces pure EMA lag by incorporating a volatility offset, while the dual-band structure filters signals by strength : a break of Band 1 triggers an entry, while a break of Band 2 confirms an explosive move and projects a take-profit zone.
How To Interpret
Core line colour – cyan/green indicates the hybrid line is rising (bull regime) ; magenta/red indicates it is falling (bear regime).
Cloud and bands – the area between Band 1 and Band 2 forms a halo that thickens when volume expands. Narrow bands suggest low conviction or consolidation.
Entry signals – a triangle appears below the bar when price crosses above Upper Band 1 while the hybrid line is rising (long). A triangle appears above the bar when price crosses below Lower Band 1 while the hybrid line is falling (short). These signals are confirmed by the trend direction.
Take-profit zones – when the entire bar (high and low for shorts, low and high for longs) clears the extreme band (Band 2) in the direction of the signal, a coloured box is projected forward. The box represents a potential target zone based on the breakout amplitude and ATR, scaled by the TP Factor.
Info panel – displays the current regime (BULL/BEAR), the volume ratio (values above 1.0 indicate above-average participation), and the current upper/lower deviation values in price units.
Parameters
EMA Length – period of the base exponential moving average (default 55).
Volatility Length – period for the standard deviation used in the Z-Score calculation (default 34).
Volume Length – period for the volume moving average used in the volume ratio (default 34).
EMA Weight – blend ratio between the pure EMA and the volatility-drifted version. Higher values produce a smoother line ; lower values make it more reactive to volatility (default 0.80).
Upper Base Deviation – core multiplier for the upper band width before volume adjustment (default 1.55).
Lower Base Deviation – core multiplier for the lower band width before volume adjustment (default 1.05).
Volume Impact Upper/Lower – sensitivity of the upper and lower bands to the volume ratio. Higher values make bands expand more aggressively when volume surges (default 0.95 / 0.55).
ATR Length – period of the Average True Range used in band width and TP zone calculations (default 14).
Show Cloud – toggles the filled areas between bands.
Show Info Panel – toggles the real-time dashboard.
Show Signals – toggles the entry triangles.
Show TP Zones – toggles the take-profit projection boxes.
TP Projection Bars – how many bars forward the TP zone extends.
TP Factor – scales the height of the TP zone relative to the breakout range.
Max Historical TP Zones – limits the number of TP boxes kept on the chart.
Reference
This indicator is a proprietary design synthesising concepts from adaptive moving averages (Kaufman, Ehlers), volatility envelopes (Bollinger, Keltner), and volume-weighted band models. It does not correspond to a single academic publication. อินดิเคเตอร์

Adaptive MA Fibonacci Zones MTF# Adaptive MA Fibonacci Zones MTF
Adaptive MA Fibonacci Zones MTF is a multi-timeframe technical analysis tool that projects Fibonacci-based price levels around a selected moving average.
The indicator allows traders to choose from multiple moving average types, including EMA, SMA, WMA, SMMA, DEMA, TEMA, HMA, VWMA, ALMA, and KAMA. Two independent higher timeframes can be analyzed simultaneously, making it easier to compare trend structure and potential reaction zones across different market perspectives.
### Features
• Supports multiple moving average calculation methods
• Displays two configurable higher timeframes on a single chart
• Automatically generates Fibonacci-based projection levels around each moving average
• Dynamic bullish and bearish level calculation depending on price position relative to the selected moving average
• Optional Fibonacci level labels
• Visual trend direction labels for each timeframe
• Useful for identifying potential support, resistance, pullback, and expansion areas
### How It Works
The script calculates a selected moving average on two user-defined timeframes. A customizable percentage range is then applied around each moving average, and Fibonacci ratios are projected within that range. When price is above the moving average, levels are projected upward. When price is below the moving average, levels are projected downward.
### Notes
This indicator is designed as a visual analysis tool and should not be considered financial advice. Fibonacci levels and moving averages are analytical references that may be used alongside other forms of technical analysis and risk management techniques.
อินดิเคเตอร์

Moving averages. JB styleMoving averages. JB style
A clean, configurable multi-MA overlay. Up to four moving averages, each colored by its own slope, with debounced crossover markers, weight-scaled line widths, an EMA/SMA switch, a regular-hours session lock, and five color palettes — all tuned so the indicator reads as a separate layer over your candles instead of blending into them.
WHAT IT DOES
- Up to 4 moving averages. Defaults are 9 / 21 / 50 / 200, and every slot has its own editable length and show/hide toggle, so you can run one MA or all four. Source is fixed to close to keep the panel simple.
- EMA or SMA from one dropdown. The MA Type dropdown flips all lines between simple and exponential, reusing the same lengths and styling.
- Slope-based coloring. Each line is colored by its own slope: a blue tone when rising, an orange/amber tone when falling, and neutral gray when essentially flat. Colors sit deliberately off the green/red axis so the lines never blend into the candles.
- Weight-scaled widths. Faster MAs are thin, slower MAs are thick, so the long-term anchors stand out at a glance. The slowest MA is drawn as a dotted circle line to mark it as the long-term reference.
- Crossover markers. A hollow ring with a centered dot marks crossovers between adjacent MAs (1x2, 2x3, 3x4) — including the classic 50/200 — a bright bull tone for a bullish cross and an amber tone for a bearish one, placed right at the crossing price.
- Five palettes. Dark, Light, Neon, Ocean, and Solarized. Candles are never recolored on any theme.
WHY IT'S DIFFERENT
Most moving-average indicators just draw lines and color them by whether price is above or below — which whipsaws constantly. This one is built around signal reliability:
1. Slope coloring instead of price-vs-MA coloring. Color reflects whether the average itself is rising or falling — a steadier read of trend than the noisy "is price above the line" flip.
2. A slope deadband kills color flicker. Near-flat averages normally strobe between colors on every tick. Here the slope must clear an ATR-scaled threshold before the color flips; otherwise the line goes neutral. A flat ribbon looks flat — which is itself useful information.
3. Crossovers are MA vs MA, not price vs MA. A faster average crossing a slower one needs agreement between two degrees of smoothing, so it fires far less on noise than a single line being touched by price.
4. A debounce filter removes chop without lagging the signal. The marker fires on the actual crossover, then suppresses further crosses until the two averages genuinely separate (by an ATR-scaled amount) and reconverge. A cluster of back-and-forth chop crosses produces one marker on the real cross — not a smear of noise, and not delayed to a later cross.
5. Confirmed-bar markers don't repaint. A crossover marker appears only after the bar closes, so it never flashes mid-bar and then vanishes.
6. Regular-hours session lock. Every MA (and the ATR behind the filters) is computed from a regular-session feed, so a 200-MA reads the same whether your chart shows extended hours or not. The lines simply hold flat through pre/post-market instead of drifting. On 24/7 instruments this is a harmless no-op.
7. Always the chart's own timeframe. The session lock swaps only the session, never the timeframe — the MAs are always calculated on the timeframe you're viewing.
8. Lines that don't fight the candles. Bull/bear line colors are deliberately blue/orange rather than green/red, so the indicator reads as a clean layer over the candles instead of camouflaging into them.
INPUTS
- Palette: color theme for lines and markers (Dark / Light / Neon / Ocean / Solarized).
- MA Type: SMA or EMA, applied to all lines.
- Regular Hours Only: compute all MAs and ATR from a regular-session feed, regardless of the chart's session.
- Show Crossovers: toggle all crossover markers.
- Slope Deadband (x ATR): minimum slope before the color flips; 0 disables (default 0.02).
- Crossover Min Sep (x ATR): debounce gap — after a marked cross, the next one is suppressed until the MAs separate by this amount and reconverge; 0 disables (default 0.10).
- MA #1-4 Show / Length: per-slot visibility and period (defaults 9 / 21 / 50 / 200).
อินดิเคเตอร์