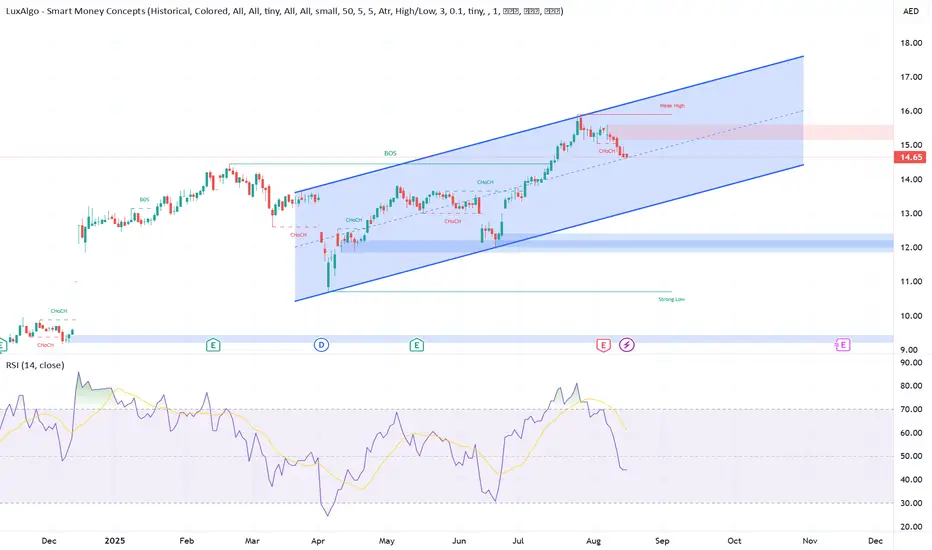
Dubai Islamic Bank (DIB), 2h chart_ Buy Setup
DIB has been in a solid daily uptrend since mid-2024, respecting the rising trendline.
Recently, price completed an ABC corrective structure, pulling back from 12.10 highs → 9.50s.
It is now sitting at the demand zone (9.35–9.50), with signs of buyers stepping back in.
Trend & Structure
Macro Trend: Bullish (higher highs/lows intact).
Current Phase: End of Wave (C) correction.
Next Cycle Projection: Elliott Wave 1–5 up, with 12.75+ targets in sight.
Supply & Demand
Demand Zone (Strong Support): 9.35 – 9.50 (already tested).
Next Resistance Levels (Supply):
11.25
12.10 (previous high)
12.75 (projected Wave 5 target)
Elliott Wave Outlook
Completed: (A)-(B)-(C) correction.
Next: Bullish cycle projected → Wave (1) → (2) → (3) → (4) → (5) toward 12.75.
Measured projections:
Wave (1): 10.87 (+18%)
Wave (3): 12.10 (+27%)
Wave (5): 12.75 (+33%)
💰 Trade Idea
Entry Zone: 9.50 – 9.55 (demand zone bounce).
Stop Loss: 9.35 (below demand).
Take Profit Levels:
TP1: 10.87 (Wave 1)
TP2: 12.10 (Wave 3)
TP3: 12.75 (Wave 5)
🎯 Risk/Reward :
To TP1 = ~1:7
To TP2 = ~1:12
To TP3 = ~1:18+
⚖ Risk Management
Max risk per trade = 1–2% of portfolio.
Move SL to Break-Even (BE) once TP1 is hit.
Scale out 30% at TP1, 30% at TP2, hold rest for TP3.
"In trading, the key is not being right, but having an edge and sticking to it." – Paul Tudor Jones
⚠️ Disclaimer
This is not financial advice. For educational purposes only. Always DYOR before trading.
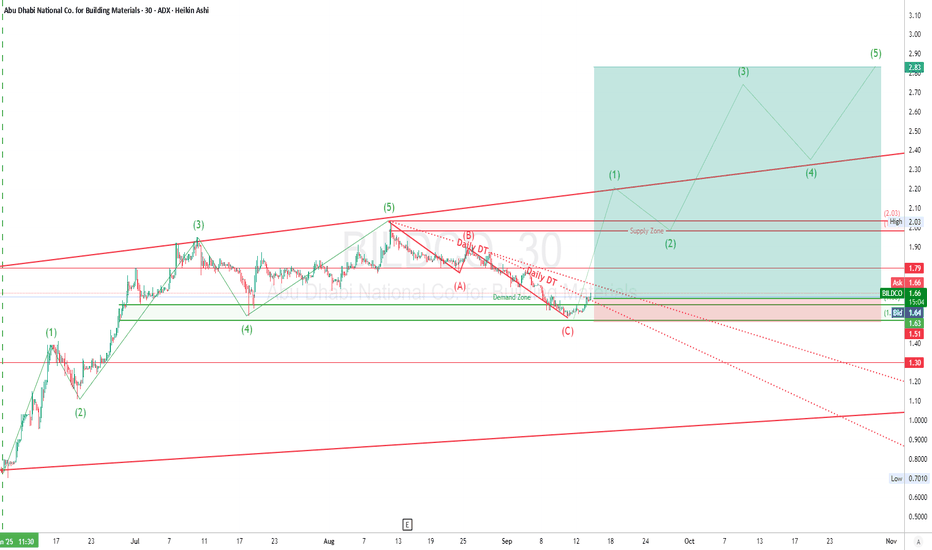
BILDCO -ADX 30-min Long
BILDCO rallied impulsively from the 0.70 low (June) to a peak near 2.05 (early Aug).
We clearly had a 5-wave Elliott impulsive structure up (green (1)-(5)).
This was followed by a sharp A-B-C corrective wave, bottoming at 1.52-1.60 Demand Zone last week.
Current price is 1.63, bouncing off demand, indicating bulls may be regaining control.
🔎 Trend & Structure
Primary Trend: Bullish (higher highs + higher lows on higher TF).
Correction Phase: Completed A-B-C at demand.
Channel Breakout: Price broke out of the falling daily trendline (DT), confirming potential trend reversal.
Next Wave Structure: Projected new Elliott Wave cycle (1-5) targeting 2.83 in coming weeks.
🏦 Supply & Demand
Demand Zone (Strong Support): 1.52 – 1.60 (freshly tested & defended).
Supply Zone (First Hurdle): 2.00 – 2.05 (previous high).
Major Supply (Target Resistance): 2.80 – 2.85 (completion of Wave 5).
🛠 Trade Idea (Swing Setup)
Entry Zone: 1.60 – 1.65 (already in demand).
Stop Loss: 1.50 (below demand).
Take Profit Targets:
TP1: 2.05 (supply retest).
TP2: 2.40 (Wave 3 mid-target).
TP3: 2.80 – 2.85 (final Wave 5).
🎯 Risk/Reward Estimate: >1:10
⚖ Risk Management
Max risk per trade = 1-3% of account equity.
Move SL to BE once price hits 2.00 (1:1 RR).
Consider scaling out 30% at 2.05, 30% at 2.40, hold rest for 2.80+.
"The market is a device for transferring money from the impatient to the patient." – Warren Buffett
⚠️ Disclaimer
This is not financial advice. For educational purposes only. Always do your own research before trading or investing.
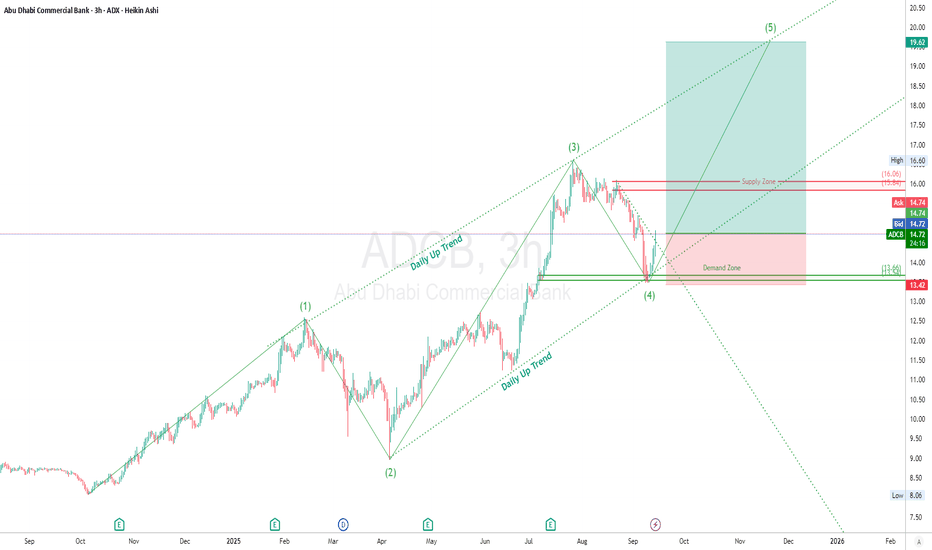
ADCB (ADX) · 3H TF— Long Bias: Long continuation into Wave (5) after a clean Wave (4) tag of demand + trendline confluence.
Solid daily uptrend channel (two “Daily Up Trend” guides on your chart). Wave (3) topped in Aug, corrective leg drove into prior demand 13.60–13.85 where Wave (4) likely completed.
Sharp reaction from demand = buyers defended the channel lower rail and reclaimed short-term structure.
Overhead supply 15.96–16.06 is the first trouble area; sustained acceptance above there opens air to the mid/high channel and the Wave (5) projection near 19.6.
Trend / Breakout
Structure: HL → HH sequence intact on higher TFs; 3H momentum turn from demand.
Elliott Wave (current count)
(1) impulse → (2) deep pullback → (3) extended thrust → (4) corrective drop into demand → (5) targeting ~19.6 ( fib/projection level). Invalidation of this count is a decisive break below the (4) low / demand.
Supply & Demand
Demand: 13.60–13.85 (Wave-4 base + trendline + prior structure).
Supply: 15.96–16.06 (prior distribution). Secondary supply near 17.7–18.0 (channel mid/prior reaction).
Trading Plan:
Entry (limit/scale-in): 14.70–14.85 (post-pullback fills).
Add on breakout (optional): Above 16.10 after a 3H close + retest.
Stop Loss: 13.42 (beneath demand & Wave-4 low).
Take Profits:
TP1: 16.20 (≈1R) — first de-risk; move SL → BE.
TP2: 17.80 (~2.2R) — mid-channel/supply pocket.
TP3: 19.60 (~3.5R) — Wave-5 projection.
Planned R/R: ~1 : 3.5 (14.80→19.60 vs 13.42 stop).
Risk Management & Trade Management
Max NGM:RISK : 1–3% of account per plan.
If price tags 1R (~16.18), lock BE on remainder.
Scaling: 40% off at TP1, 30% at TP2, trail remainder using 3H swing lows or channel midline.
If rejection at 16.0 supply with heavy wicks/volume, consider partial hedge or rebuy lower at demand with the same invalidation.
Macro: UAE banks track rate expectations (fed-linked) and regional liquidity; watch GCC risk sentiment.
“Cut your losses short and let your winners run.” — William O’Neil
Disclaimer: This is educational market commentary, not investment advice. Markets carry risk; manage position size and follow your plan.
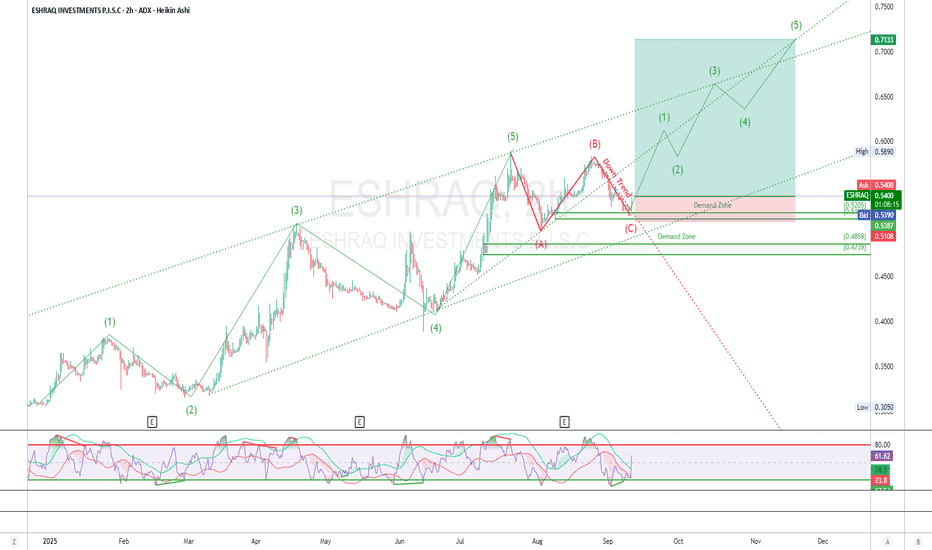
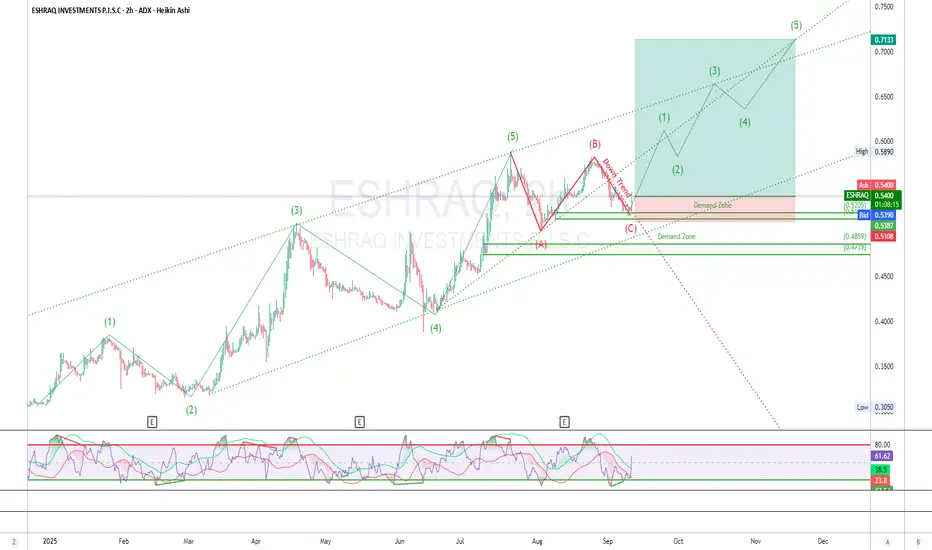
ESHRAQ INVESTMENTS P.J.S.C — ADX 2H TF Long
ESHRAQ has been moving in a clear Elliott Wave cycle — strong impulsive legs followed by corrective retracements. The chart shows a completed 5-wave impulse (green count), followed by an ABC correction (red count).
Currently, price is consolidating around 0.52–0.54, right above the demand zone at 0.48–0.51. This area is acting as the potential launchpad for the next bullish wave.
📊 Performance Recap:
1M: +12% (holding support, sideways structure)
3M: +40% (impulse + retracement)
YTD: +75% (strong trend since early 2025)
🔀 Trend & Structure:
Primary Trend: Bullish (higher highs + higher lows intact)
Short-term: Corrective, inside ABC pattern
Key Break: Break above the trend line confirms continuation into impulsive leg/new wave
Elliott Wave Count:
Completed Wave (1)-(5) up to July 21st
Ongoing ABC correction: Currently ending Wave (C) near demand zone
Next phase expected: Impulse Wave (1)-(5) toward 0.71+
🟩 Key Supply/Demand Zones:
Demand Zone: 0.48 – 0.51 ✅ (accumulation/buy area)
Breakout Confirmation: 0.55+
Target Area: 0.70 – 0.72 (wave 5)
RSI divergence aligns with momentum and accumulation
🎯 Trade Setup:
Entry: 0.51–0.54 (demand zone accumulation/Breakout)
Stop Loss: 0.47 (below demand "invalidation")
Take Profit: 0.71–0.72 (Wave 5)
Risk/Reward: ~3.5R
Max Risk: 1–3% of trading capital
🧭 Trade Management:
Move SL → BE once price clears 0.58
Scale out at 0.65 partial, ride remainder to 0.71
If demand zone breaks, wait for deeper retest near 0.45 before re-entry
"Markets move in waves, but only the patient catch the tide."
⚠️ Disclaimer:
This analysis is for educational purposes only and not financial advice. ADX small/mid-cap names can be illiquid and volatile — trade with strict risk management.
QIC (Umm Al Qaiwain General Investment Co. P.S.C) — 10Min TF BuyQIC printed a parabolic +120% breakout from the long-term descending trendline back in July, followed by a textbook retest of the breakout structure. After topping out at 2.00, it retraced in a controlled corrective fashion and is now tapping into a clean Demand Zone (1.30–1.35), aligning with prior structure support.
This is a bullish reversal opportunity if the zone holds.
🔀 Trend & Structure:
Long-term Trend: Bullish breakout from descending resistance
Short-term: Corrective pullback toward structure
Price Action: Inside corrective wedge/bullish flag
Breakout Zone Retest: 1.35 demand level now being tested
🟩 Key Zones:
Demand Zone (Buy Area): 1.30 – 1.35 ✅
Entry Trigger: 1.38–1.40 (break and hold above micro-structure)
Stop Loss: Below 1.30
Target Zone: 1.88 – aligns with measured move logic and supply
🎯 Trade Setup:
Entry: 1.38–1.40
Stop Loss: 1.30
Take Profit: 1.88
Risk/Reward: ~6R
Max $ Risk: 1–3% of capital only
"ADX stocks often move stealthily, and accumulation breakouts like this often have delayed reactions — patience is key"
Avoid panic if price revisits 1.33–1.34 one more time; structure is still valid above 1.30
“The market does not beat them. They beat themselves, because though they have brains they cannot sit tight.” – Jesse Livermore
⚠️ Disclaimer:
This is not financial advice. QIC is a thinly traded ADX name — ensure your capital exposure reflects your risk profile. Use proper stop-loss placement and position sizing.
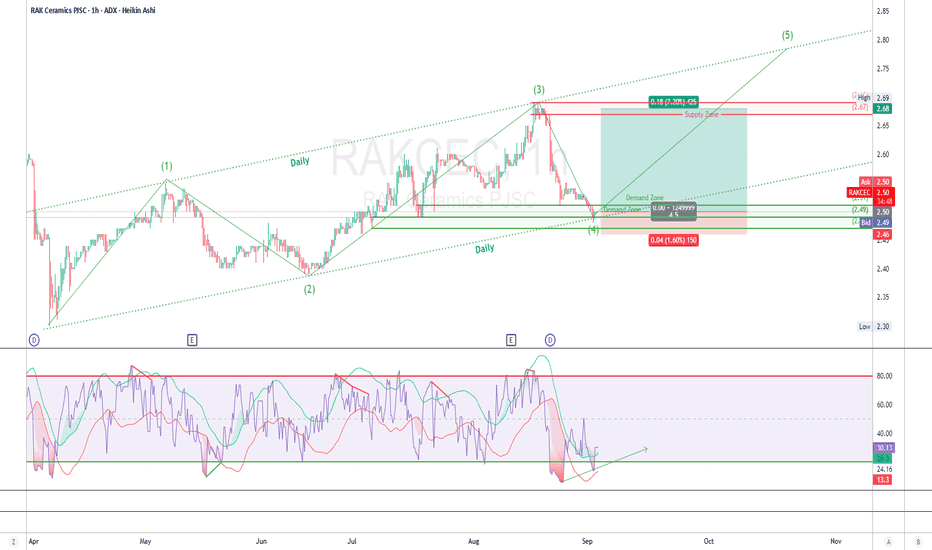
RAK Ceramics (ADX: RAKCEC) – Bullish RSI Divergence
RAKCEC signals a critical bullish RSI divergence exactly at the Wave (4) low and Demand Zone, significantly strengthening the bullish reversal scenario.
RSI Divergence Insight
Price made a lower low at Wave (4)
RSI made a higher low, forming classic bullish divergence
RSI also bounced from oversold territory and crossed signal lines upward
This adds momentum confirmation to the Wave (5)
Trade Setup
📌 Entry: 2.48 (within Daily Demand Zone)
🛑 Stop Loss: 2.44 (beneath DZ)
🎯 Take Profit: 2.68 (just before major Supply Zone)
📊 Risk/Reward Ratio: ~4.5:1 — still very favorable
⚙️ Risk & Trade Management
💸 Risk only 1–3% of your capital
🔒 Move SL to break even once RR = 1:1 (approx 2.52–2.53)
🎯 Scale out:
50% at 2.60
Let the rest run into 2.68 zone
Watch for RSI topping in overbought zones above 70 later — potential signal for Wave (5) exhaustion
“The market is a device for transferring money from the impatient to the patient.” – Warren Buffett
⚠️ Disclaimer: This is not investment advice. Always conduct your own analysis or consult with a financial advisor. Trading carries risk.
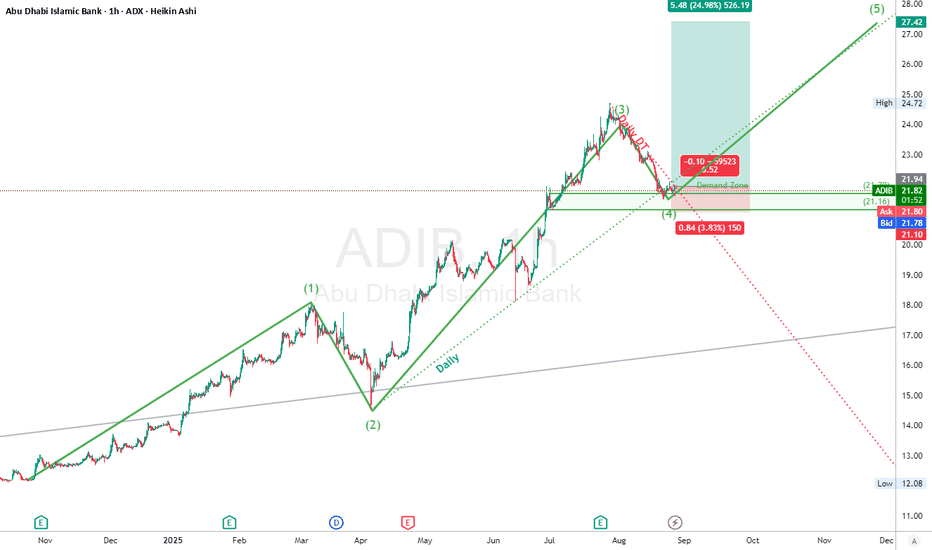
Abu Dhabi Islamic Bank (ADIB) – ADX– 1H chart -LongADIB is showing textbook Elliott Wave behavior. After a strong impulsive wave structure into wave (3), price corrected cleanly into the **Demand Zone** and held above the key support at **21.16** – right in line with a classic wave (4) retracement.
The drop into this zone followed a **bullish descending channel (bullish DT)**, indicating exhaustion of sellers and potential reaccumulation. Price is now rebounding from this base, suggesting wave (5) may just be starting.
A beautiful confluence of:
* Fib levels,
* Demand zone,
* Channel breakout,
* Wave (4) support.
The bulls are stepping in. This is **prime positioning**.
### 🟩 **Demand Zone**
* Key Zone: **21.10–21.78 AED**
* Clean support on both price structure and psychology; price wicked into zone but rejected downside.
### 🎯 **Trade Idea**
* **Entry**: 21.70–21.80 AED (current levels)
* **Stop Loss**: 21.10 AED (beneath structure low)
* **Take Profit**: 27.42 AED (projected wave (5) target)
* **Risk/Reward**: \~5.48R
"The market is a device for transferring money from the impatient to the patient." – Warren Buffett
### ⚠️ **Disclaimer**
This is not financial advice. Always perform your own analysis and manage your risk accordingly. This is for educational purposes only.
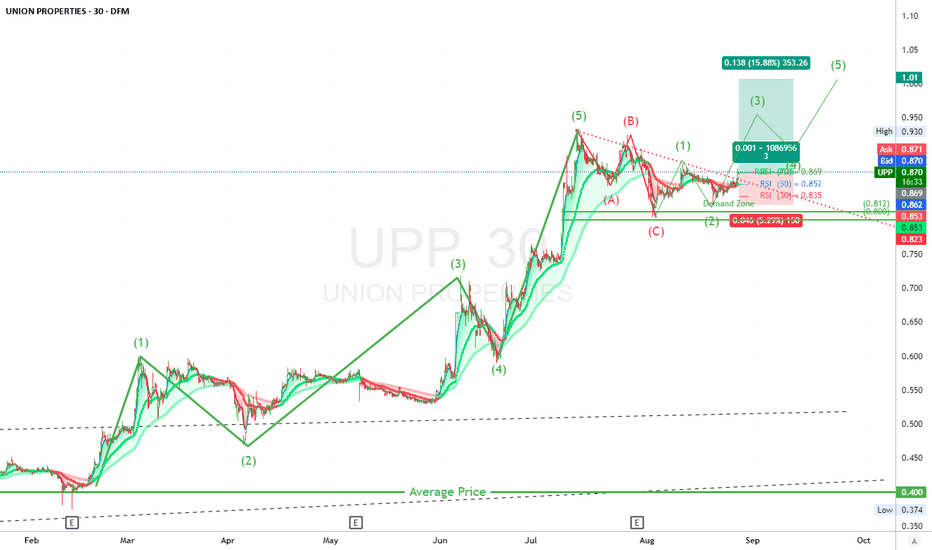
Union Properties (UPP) DFM 30-min Long
UPP just completed a textbook **ABC corrective wave** following a sharp impulsive rally that ended in a clean 5-wave move (Elliott Wave cycle complete). The correction dipped into a **15 min demand zone** formed from a previous consolidation range and found support there.
From the corrective low (C), price has printed a bullish impulsive structure suggesting the beginning of a new wave sequence (potentially wave (3) of a larger wave (5)).
We've broken above a descending wedge, retested the upper bound, and now pushing off demand. Volume and RSI behavior suggest accumulation. Structure is bullish AF.
### 🟩 **Demand Zone**
* **Key Zone**: 0.823–0.853 AED
* Strong reaction at this zone; confirmed by bounce
### 🎯 **Trade Idea**
* **Entry**: 0.862–0.870 AED (current price)
* **Stop Loss**: 0.823 AED (below demand & invalidation of new impulse)
* **Take Profit**: 1.01 AED (measured move of Wave (3), also previous high)
* **Risk/Reward**: \~3.26R
### 💰 **Risk Management**
* Max \ NGM:RISK : **1–3% of total capital**
* Risk per trade should align with personal equity curve and win rate
“Be fearful when others are greedy and greedy when others are fearful.” – Warren Buffett
### ⚠️ **Disclaimer**
This analysis is for educational purposes only. Trading carries risk. Always conduct your own due diligence before making trading decisions.
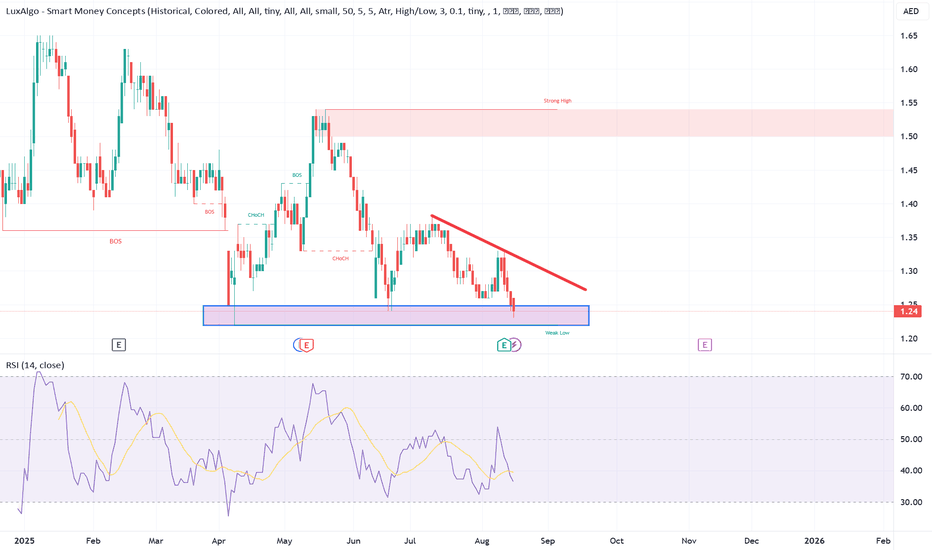
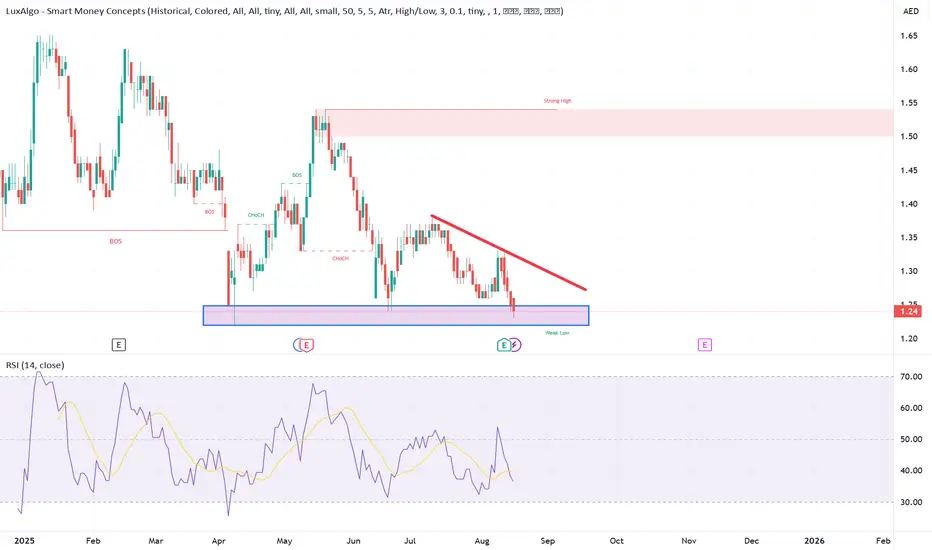
TALABAT waiting to react to support zone#TALABAT
if your are thinking to buy TALABAT at this strong support area it is a good idea.
personally i track the market depth for a purchase at 1.22~1.123 with a very short stoploss at 1.20.
RSI is almost near 30 and oversold.
downtrend is still visible. and if price react to this support zone maybe goes to 1.30 again.
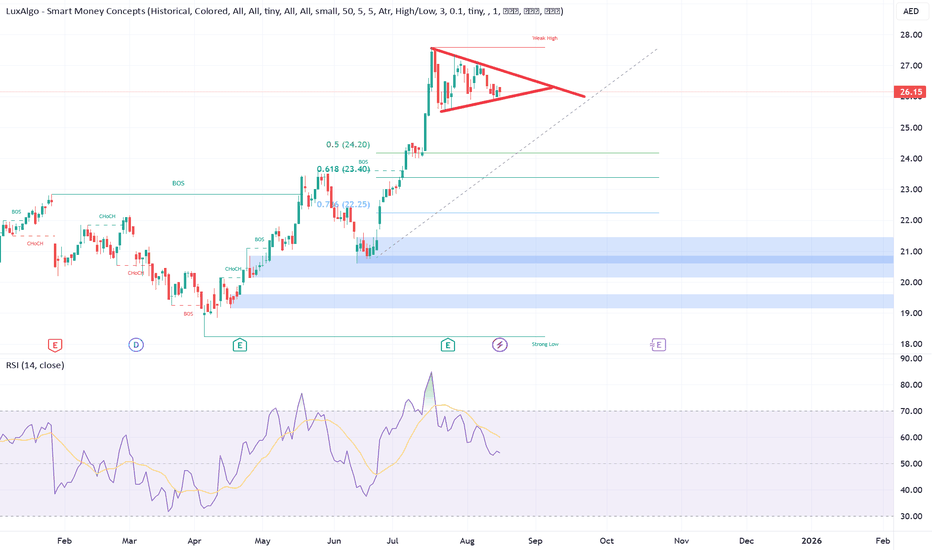
EMAAR will break triangle from bottom?#EMAAR
stock has a sharp up trend from 21 to 27.60 AED and now A symmetrical triangle is forming highlighted in red. this is the area that supply is more from pervious buyers
due to RSI downtrend, we are waiting to reach level 50 first and again change to above 50.
i belive if the triangle break from down the best purchase area will be at 23.40 to 24.20 ( zone 50% and 61.8% Fibonacci level of last up trend)
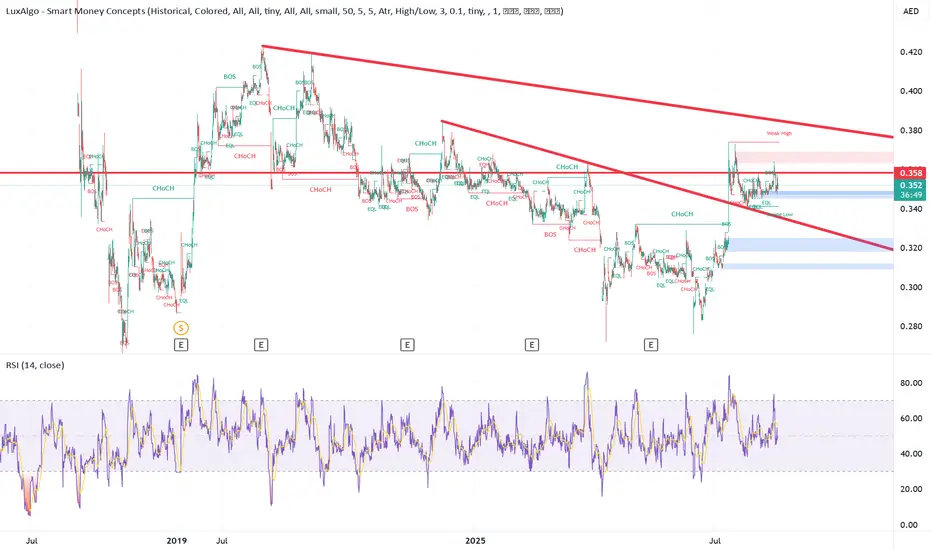
Drake & Scull International PJSC DSIThe price has broken the short-term downtrend.
The optimal buy zone is around 0.348–0.350 AED.
The next static resistance level is at 0.358 AED.
There is also a main downtrend line visible in the screenshot. If buying pressure remains strong, the price could advance toward the 0.380–0.385 AED zone, where it will test that trendline.
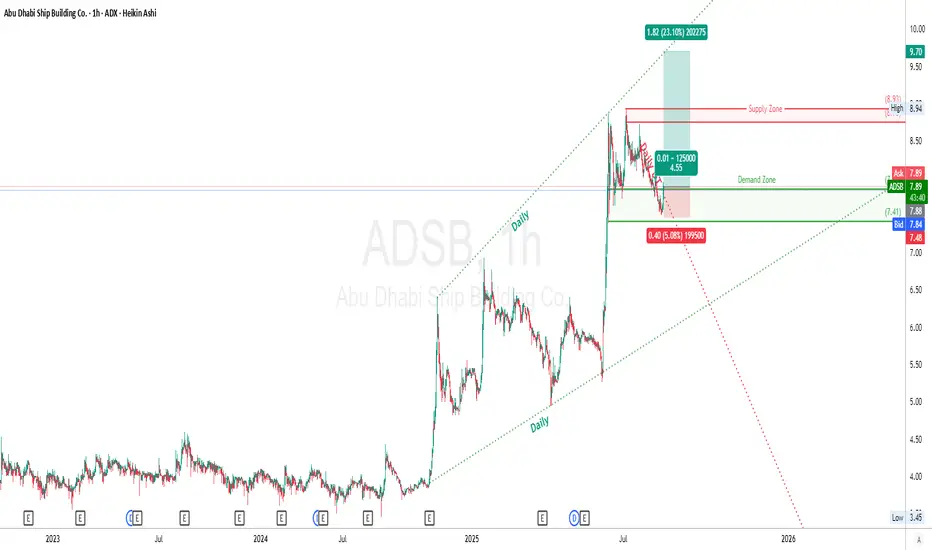
ADSB, ADX, 1H, Demand Zone Bounce into Supply Test* ADSB traded sideways through most of 2023 and early 2024, building a long-term base.
* In early 2025, price broke out aggressively from the **Daily ascending channel**, triggering a vertical rally into the 8.90–9.00 area before a sharp pullback.
* Current structure is consolidating inside a **local Demand Zone (7.88–8.00)**, sitting at both horizontal support and the lower bound of the recent breakout zone.
* This demand zone is also reinforced by the **Daily channel midline**, acting as a trend continuation pivot.
* Nearest overhead **Supply Zone** is at **8.91–8.94**, where prior rally stalled.
* Structure suggests that if buyers defend the current level, we could see a retest of the Supply Zone followed by a push toward **9.70**.
**Supply & Demand Zones:**
* **Demand Zone (Buy area):** 7.88–8.00
* **Supply Zone (Sell area):** 8.91–8.94
**Trade Idea:**
* **Entry:** 7.90 (Trendline Breakout)
* **Stop Loss:** 7.48 (below last high)
* **Take Profit:** 9.70 (Daily channel resistance & measured move target)
* **Risk/Reward:** ≈ 1:4.5
**Trade Management:**
* Move SL to BE once price clears 8.94 Supply Zone with conviction.
* Scale partials at 8.94 before holding runners toward 9.70.
**Risk Management:**
* Max \$ risk = 1–3% of account equity.
* Avoid oversized positions — sharp pullbacks are common in low-float ADX stocks.
> “Opportunities come infrequently. When it rains gold, put out the bucket, not the thimble.” – Warren Buffett
**Disclaimer:**
Not financial advice. For educational purposes only.
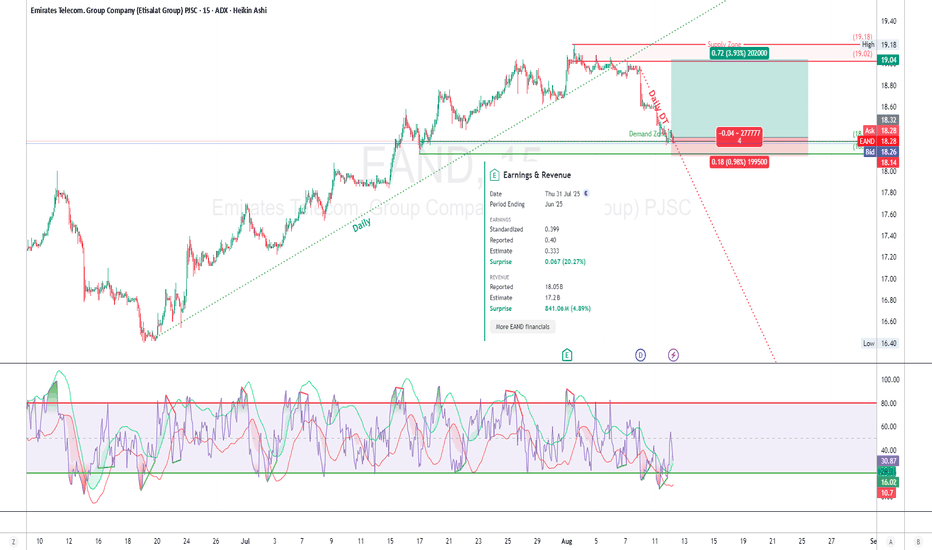
Emirates Telecom Group (EAND) ADX 15m Long Setup
EAND has been hugging the **daily uptrend** since mid-June, printing a clear bullish structure. The latest corrective drop has retested the **demand zone** at 18.14–18.28. The move down appears to be losing momentum, hinting at possible buyer re-entry.
**🟩 Key Supply/Demand Zones**
* **Demand Zone:** 18.14–18.28 (trendline + prior support + potential end of correction)
* **Supply Zone:** 19.04–19.18 (previous high and resistance cluster)
**📉 RSI Divergence**
* RSI is showing **bullish divergence** — price made equal or slightly lower lows, while RSI made higher lows. This signals that sellers are losing strength.
**🎯 Trade Setup**
* **Entry:** 18.28–18.32 (within demand)
* **Stop Loss:** 18.14 (just below demand)
* **Take Profit:** 19.04–19.18 (supply zone retest)
* **Risk/Reward:** \~3.9R
* **Trade Management:** Consider moving SL to BE at \~18.50 (1:1 RR) and trail stops along minor higher lows on the 15m chart.
**💰 Risk Management**
* Risk only 1–3% of your total equity.
* Avoid scaling in unless there’s a confirmed break above 18.50 with volume expansion.
*"In trading and investing, it's not about how much you make but rather how much you don’t lose."* – Bernard Baruch
**⚠️ Disclaimer**
This is not financial advice. Trading carries risk, and you should assess setups based on your own strategy and capital management rules.
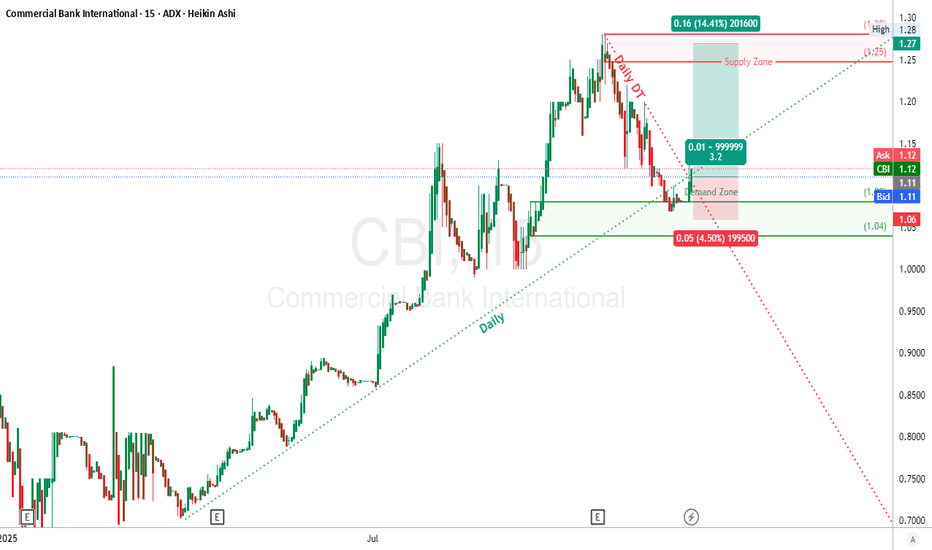
Commercial Bank International (CBI) ADX, 15m Buy Setup
CBI’s been on a strong bullish tear from early 2025, riding a clean daily uptrend. The recent peak saw heavy profit-taking, causing a corrective wave down that tapped into a fresh **demand zone** around 1.08–1.11. That zone overlaps nicely with the daily trendline, hinting at potential buyer defense.
**🟩 Key Supply/Demand Zones**
* **Demand Zone:** 1.08–1.11 (current support, confluence with trendline)
* **Supply Zone:** 1.25–1.28 (prior swing high resistance)
**🎯 Trade Setup**
* **Entry:** 1.11–1.12 (at Breakout)
* **Stop Loss:** 1.06 or 1.04 (below last low or demand zone)
* **Take Profit:** 1.27 (supply zone retest)
* **Risk/Reward:** \~3.2R
* **Trade Management:** Consider moving SL to BE at 1:1 RR (\~1.16) and trailing stops thereafter.
**💰 Risk Management**
* Max \ NGM:RISK = 1–3% of your total capital.
* Avoid over-leveraging — "trend is your friend until it bends."
*"The goal of a successful trader is to make the best trades. Money is secondary."* – Alexander Elder
**⚠️ Disclaimer**
This is not financial advice. Markets are risky; do your own research and trade at your own discretion.
Emaar Properties – Breakout With Fundamental SupportEMAAR has broken key resistance at AED with strong volume, confirming bullish momentum. Price is above the 20 & 50 EMA, with RSI in a healthy range (60–70) and MACD trending positive. Strong quarterly earnings and robust Dubai property demand support the move.
AIR ARABIAthe best buy price was 3.63~3.60 AED . a little below 61.8% last uptrend wave.
but not reach that point and start going up again.
but this up trend can be a correction for wave b of the main abc correction.
so 3.79 38.2 of wave a correction tested by the market today. next level is 3.84 at 50% and 3.89 at 61.8% if can goes up these levels we can say a sharp changing trend happen to up trend again. so we can expect 4.30 for the next target.
but i still looking for compelete c wave to complete abc correction and then enter to the game.
let see what happen by the market.
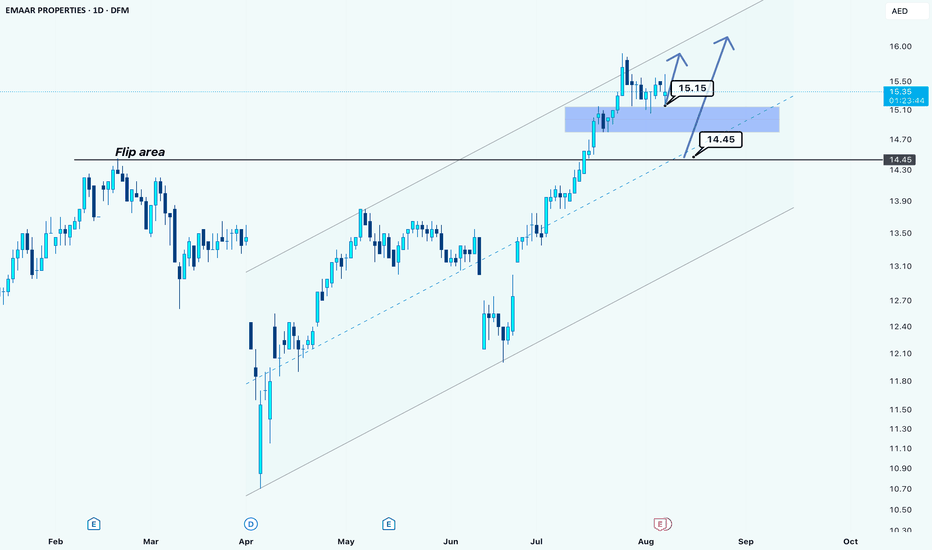
Emaar is Screaming Bullish – Daily Analysis Hello guys!
We're currently seeing strong bullish momentum on EMAAR, trading around the 15.35 zone.
🔎Key Zones to Watch:
✔Former Supply & Demand Area (15.15 - 15.00)
This zone is now acting as a strong support. Price dipped into it and showed clear signs of buyer pressure, a solid area to consider long entries if price revisits.
✔ Flip Area (14.45)
Previously a resistance, this level has now flipped into potential support. If the price breaks below the first zone, this becomes a second entry point to go long. Expect a strong buying reaction here if tested.
👉The bullish channel remains intact, and both zones are backed by structure and momentum. The buying pressure is clearly dominating.
🎯Target: Upside potential remains towards 16.00 + in the coming sessions if the bullish structure holds.
Based on the last P&L: Emaar posted strong 2025 results with revenue up 38% YoY to AED 19.83B!
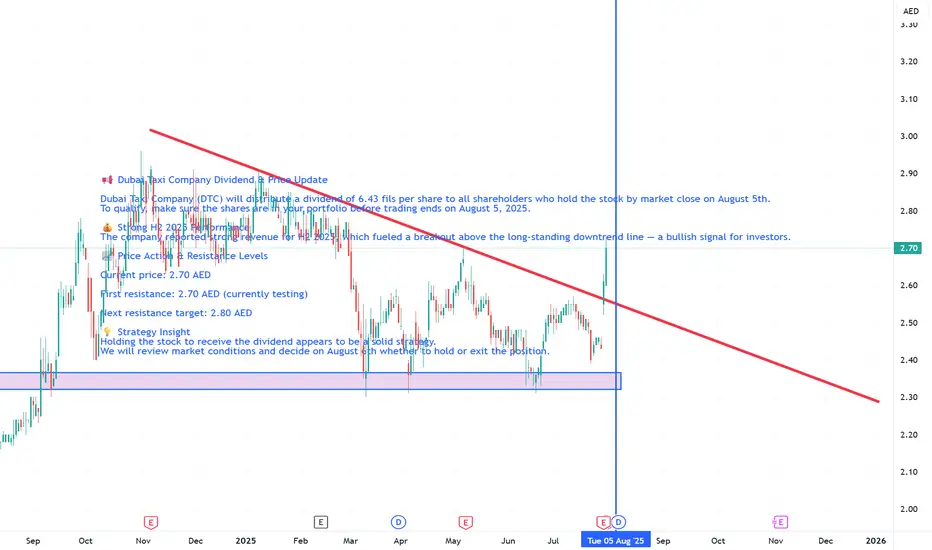
#DFM #DTC📢 Dubai Taxi Company Dividend & Price Update
Dubai Taxi Company (DTC) will distribute a dividend of 6.43 fils per share to all shareholders who hold the stock by market close on August 5th.
To qualify, make sure the shares are in your portfolio before trading ends on August 5, 2025.
💰 Strong H2 2025 Performance
The company reported strong revenue for H2 2025, which fueled a breakout above the long-standing downtrend line — a bullish signal for investors.
📈 Price Action & Resistance Levels
Current price: 2.70 AED
First resistance: 2.70 AED (currently testing)
Next resistance target: 2.80 AED
💡 Strategy Insight
Holding the stock to receive the dividend appears to be a solid strategy.
We will review market conditions and decide on August 6th whether to hold or exit the position.
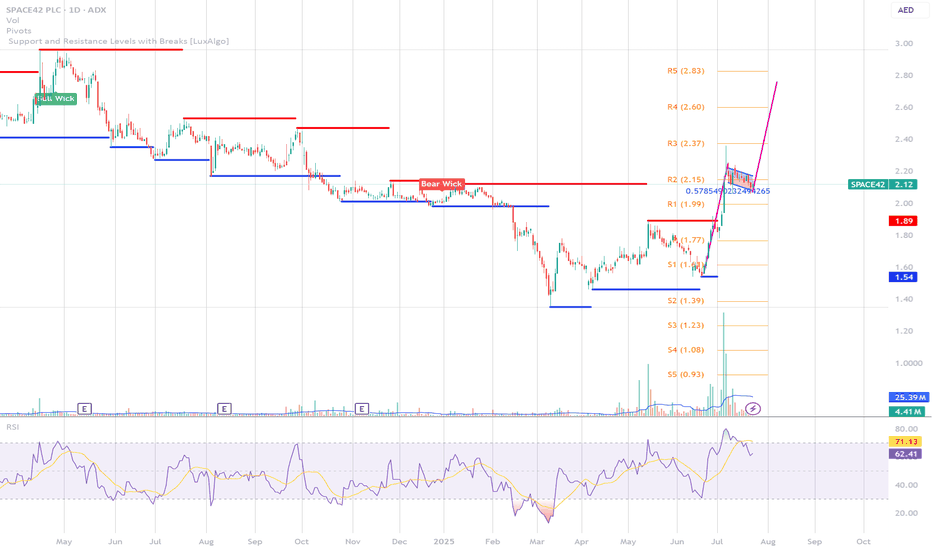
preparing for lift-off with Bullish flag formation on SPACE42? Traders, take a look at this beauty unfolding on SPACE42's daily chart 👀
After a powerful upward thrust — a textbook "flagpole" — price action has been gently coiling down within a tight parallel channel. This classic **bull flag** pattern suggests we might just be seeing a pause before the next big move. 🏁
Key Highlights:
* Sharp rally → momentum confirmed ✅
* Flag consolidation → decreasing volume 💤
* Breakout potential → waiting on the edge 🚀
What to watch:
* A strong close above the upper trendline with volume could ignite the next leg up 🔥
* Target projection? Classic bull flag logic says: measure the pole, add it to the breakout 💡
Not a recommendation — just a chart talking loud and clear! 🎯
Let’s see if SPACE42 honors the pattern... or fakes out. Stay nimble, stay sharp ⚡
#SPACE42 #BullFlag #ChartPatterns #TechnicalAnalysis #PriceAction
Abu Dhabi Ports at a Technical Crossroads: Breakout or Breakdown📈 Abu Dhabi Ports – Daily Technical Analysis
🗓️ Date: July 23, 2025
📍 ADX: ADPORTS | Price: AED 4.26
➤ Trend Structure:
Abu Dhabi Ports is still trading below a long-term **descending trendline**, keeping the broader bias cautious. Despite a recent bounce from the AED 3.49 lows, price has hit dynamic resistance near AED 4.45 and is showing hesitation.
➤ Candlestick Signals:
* Recent candles show Bearish Engulfing and Harami formations near resistance, indicating potential exhaustion of the bullish move.
* Previous reversal was preceded by a strong Bullish Engulfing near the base support (AED 3.42–3.49).
➤ Scenario Outlook:
🔵 Bullish Scenario (Breakout):
A confirmed breakout above the descending trendline (\~AED 4.45) with strong volume could trigger a trend reversal, opening the path to AED 5.00+ targets. Momentum indicators must turn sharply positive to confirm strength.
🔴 Bearish Scenario (Rejection):
* A rejection from current levels could lead to a pullback toward **AED 4.10**, and possibly retest **support zones** at AED 3.88, 3.73, or the prior swing low at **AED 3.49**.
* Breakdown below AED 4.07 would confirm short-term bearish pressure.
ADX:ADPORTS
📊 Momentum & Indicator Readings:
* **Commodity Trend Reactor** shows weakening bullish momentum, currently around neutral (41.44).
* Price is consolidating inside the Ichimoku cloud; bias remains undecided until breakout.
🧭 Conclusion:
Price is at a **critical inflection zone**.
* Wait for breakout above AED 4.45 (with strong follow-through) for long positions.
* A failure here may confirm a lower-high and favor downside continuation.
📌 Strategy:
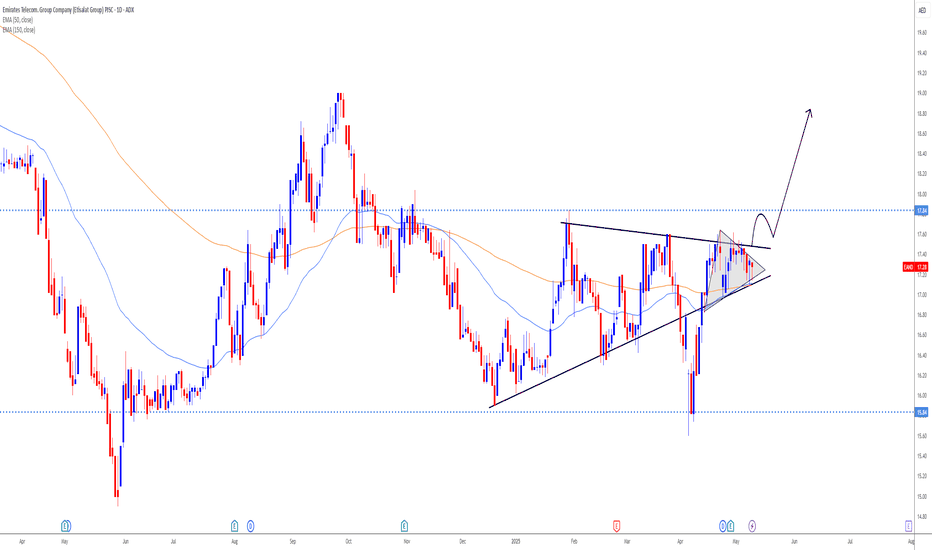
"Plan for both outcomes — react to confirmation, not prediction."
A possible trend change after a 3-year slideEAND has been in a downtrend since April 2022, but we could be witnessing the start of a reversal into an uptrend. Price has been consolidating since the beginning of 2025 and now shows signs of a breakout, supported by a strong recent earnings report.
Key Highlights
✔️ Robust earnings growth
✔️ Strong balance sheet
✔️ Technical setup showing breakout potential
✔️ Positive sentiment returning to the sector
This could be a turning point for EAND, a break above key resistance may signal further upside.
Do your own research and manage risk accordingly.
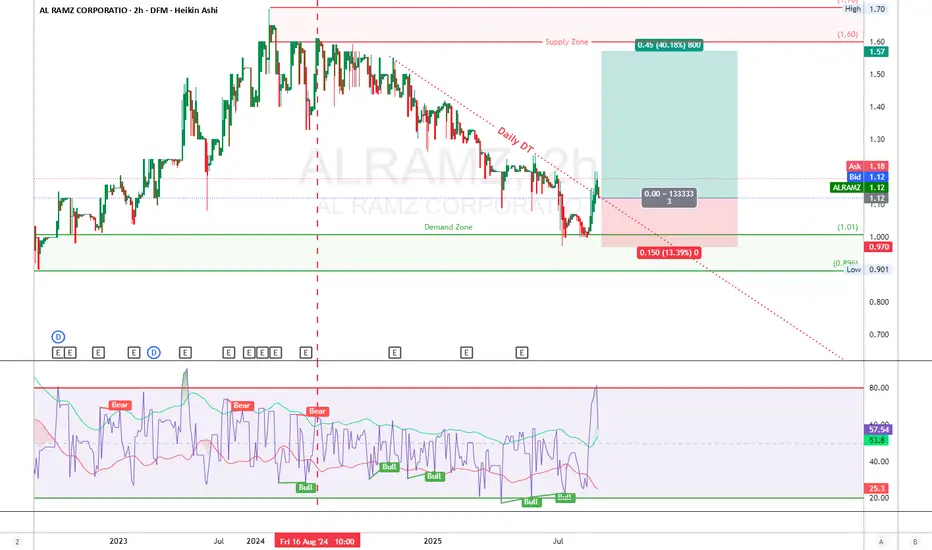
AL RAMZ CORPORATION -DFM-LongAL RAMZ CORPORATION (2H chart)
ALRAMZ just threw down a textbook bounce off the demand zone, broke the daily downtrend line, and momentum's lit. That 1.57 level? That’s the kill zone. Could be Wave A or 1 — either way, bulls are cookin'.
Looks like we’ve completed a **corrective structure** post-Wave 5 top near 1.70.
The impulsive drop into the **Demand Zone (0.97–1.01)** has been met with strong buying — potential by breaking the daily trendline and start of a new motive wave or large corrective rally.
* **Demand Zone:** 0.97–1.01 (key support that triggered this bounce)
* **Supply Zone (Target):** 1.57–1.60 (prior consolidation & resistance)
RSI Recently triggered a **Bullish Divergence**
RSI has spiked above 80, suggesting **strong bullish momentum**
🧠 **Trade Setup**
* **Entry:** 1.12 (post-breakout retest)
* **Stop Loss:** 0.97 (below Last Low)
* **Take Profit:** 1.57 (major supply resistance zone)
**Risk/Reward:**
* **R/R = 3:1**
"In trading, it's not about prediction, it's about preparation." – Mark Douglas
### ⚠️ **Disclaimer:**
This analysis is for educational purposes only and not financial advice. Trading involves risk, so manage position size accordingly and always use stops.