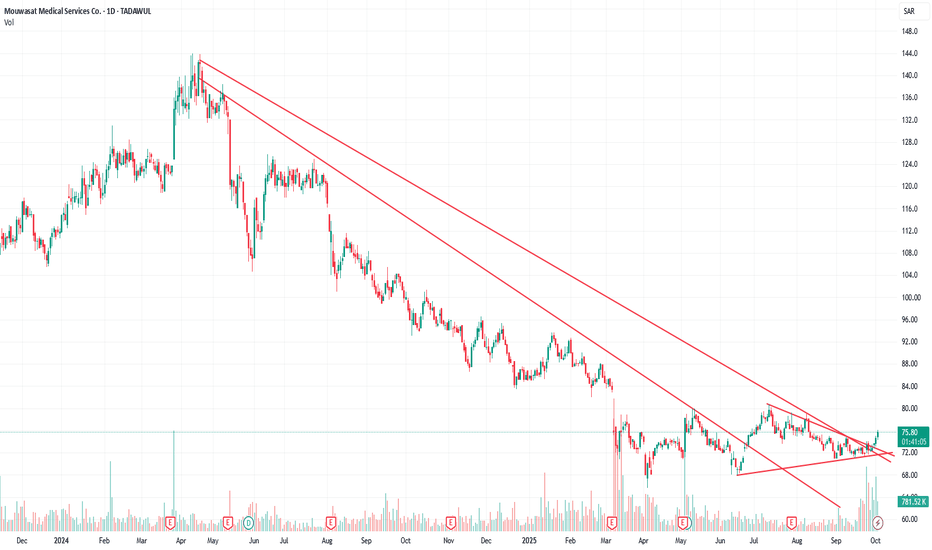
The Bullish Momentum will continue if..4030
Closed at 28 (07-10-2025)
Printed HH around 30.
Immediate Support seems to be around 26 - 27
Next Support is around 23 - 24. But it seems
that it will retest the breakout level around 26 - 26.50
and reverse.
The Bullish Momentum will continue if it will cross 30 again.
& Breaking 21 may invalidate the Uptrend.
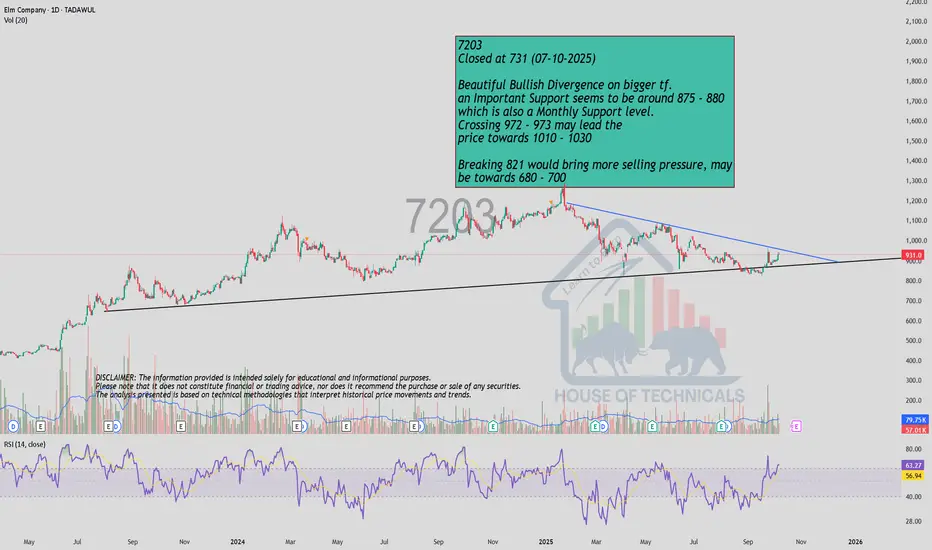
Beautiful Bullish Divergence on bigger tf.7203
Closed at 731 (07-10-2025)
Beautiful Bullish Divergence on bigger tf.
an Important Support seems to be around 875 - 880
which is also a Monthly Support level.
Crossing 972 - 973 may lead the
price towards 1010 - 1030
Breaking 821 would bring more selling pressure, may
be towards 680 - 700
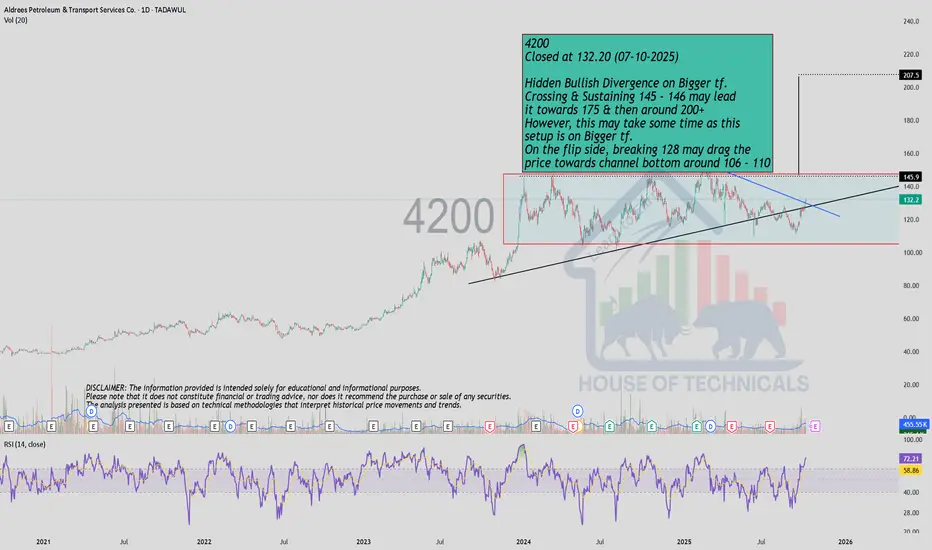
Hidden Bullish Divergence on Bigger tf.4200
Closed at 132.20 (07-10-2025)
Hidden Bullish Divergence on Bigger tf.
Crossing & Sustaining 145 - 146 may lead
it towards 175 & then around 200+
However, this may take some time as this
setup is on Bigger tf.
On the flip side, breaking 128 may drag the
price towards channel bottom around 106 - 110
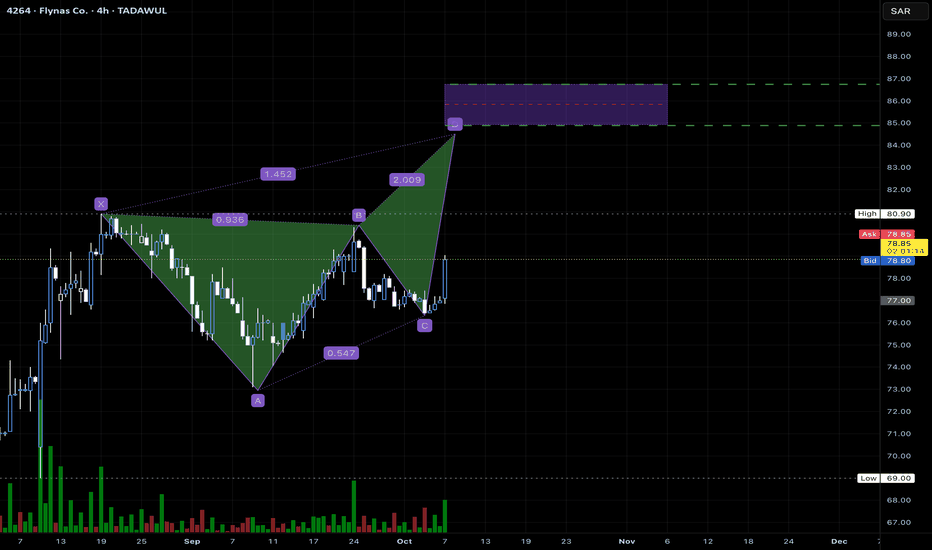
Bullish Harmonic Pattern on Flynas Co. (4264) Targeting 85–87 ZoOn the 4H chart of Flynas Co. (4264, TADAWUL), a potential bullish harmonic structure is forming, suggesting continuation to the upside. The pattern aligns with the classic ABCD completion, projecting towards the 85.0–87.0 range.
Pattern Formation:
The XA leg retracement shows a clean 0.936 retracement into point B.
The BC leg extends to 2.009, confirming harmonic alignment.
Point C sits around the 0.547 retracement of AB, creating symmetry.
Price Action Context:
Strong support is visible near 75.0, previously tested and held.
Ascending trendline from early September continues to guide price higher.
Break above 78.8 (current bid/ask zone) could act as a trigger for momentum.
Targets:
First target: 84.1 (local resistance / previous swing high).
Second target: 85.5–87.0 (completion of harmonic D and extended profit-taking zone).
Stop Loss:
Suggested below 75.0, as a clean break under this invalidates the structure and trendline support.
Summary:
If bullish momentum sustains above the current bid zone (78.7–78.8), the harmonic setup indicates upside potential into mid-80s. This trade idea remains valid as long as 75.0 support holds. Risk-to-reward remains favorable given the proximity to structure-based support and clear projected harmonic completion zone.
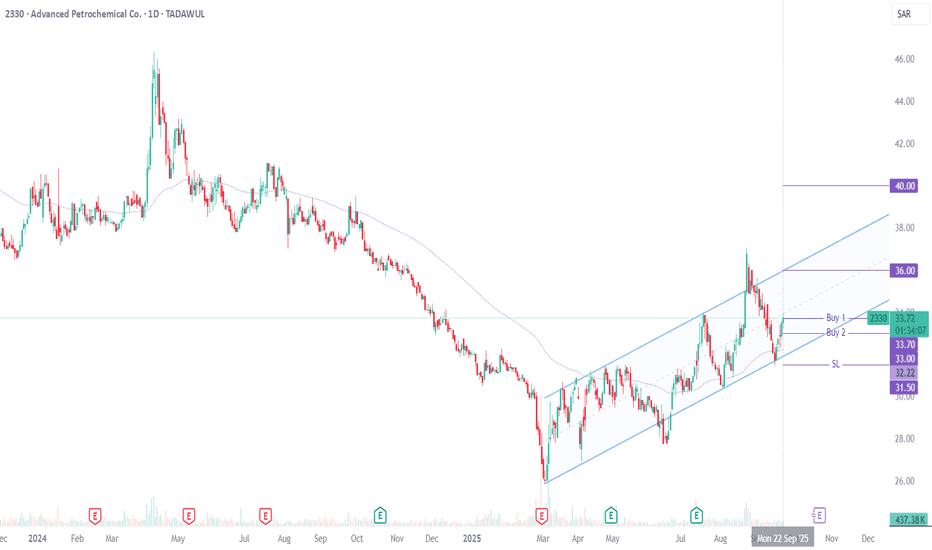
2330 Technical & Fundamental Analysis: Bullish Setup in Play2330 (Advanced Petrochemical Co.)
Technically, the stock is trading within an ascending channel and recently bounced from it support, offering an attractive risk-to-reward opportunity. The structure favors continuation toward the channel resistance at 36–37, which also aligns with the previous higher high. Price is also trading above the 89 EMA, a level it has historically respected, with RSI in sync to support the bullish momentum.
On the fundamental side, Advanced Petrochemical has delivered strong results over the past two quarters — showing growth in gross profit, operating income, and net margin, while maintaining a healthy free cash flow. This reinforces the bullish technical picture.
Recommended Levels:
Buy 1: 33.70 (CMP)
Buy 2: 33.00
Stop Loss: Closing below 31.50
Take Profit 1: 36.00–37.00 (channel resistance / previous HH)
Take Profit 2: 40.00
Take Profit 3: Ride the trend with a trailing stop
As long as price respects the ascending channel and fundamentals continue to support momentum, upside potential remains intact.
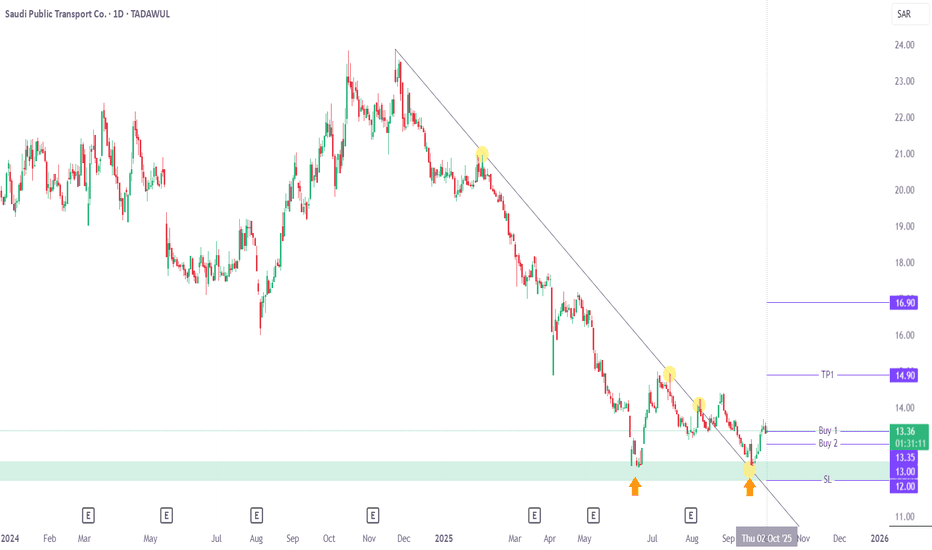
4040 Technical Analysis: Double Bottom + weekly divergence4040 (Saudi Public Transport Co.)
Price has bounced from a key weekly support zone, forming a double bottom with strong bullish divergence on the weekly timeframe. On the daily chart, it has broken out of a downward trendline and successfully retested it, reinforcing the bullish outlook.
The first buy is at CMP, with Buy 2 positioned lower to average in case of a pullback. TP1 and TP2 are aligned with near-term resistances, while sustained momentum beyond TP2 opens room to ride the trend with a trailing stop. Stop loss is placed below 12.00 on a closing basis to define risk.
Recommended Levels:
Buy 1: 13.35 (CMP)
Buy 2: 13.00
Stop Loss: Closing below 12.00
Take Profit 1: 14.90
Take Profit 2: 16.90
Take Profit 3: Ride the trend with a trailing stop
Potential upside remains as long as price sustains above the weekly support. Happy trading!
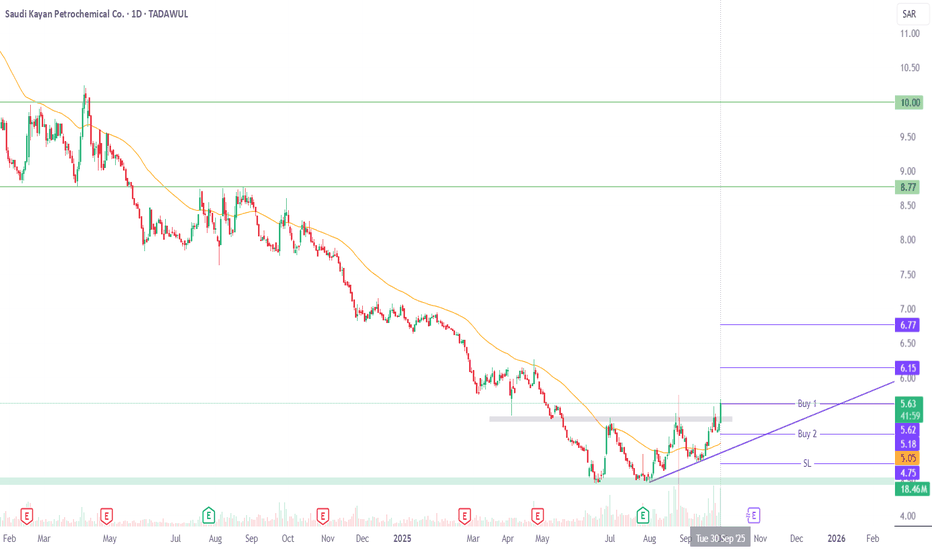
2350 Technical Analysis: Breakout with Weekly Bullish Signals2350 (Saudi Kayan Petrochemical Co.)
Price has broken out above the previous high, which had also been a major resistance level since May. It is trading above the 55 Fibonacci EMA, a level that has historically served as dynamic support.
On the weekly timeframe, price has broken out of a falling wedge, confirmed a double bottom, and printed bullish divergence — all of which strengthen the bullish outlook.
The first buy is at CMP, with Buy 2 positioned lower to average in on a pullback. TP1 and TP2 are aligned with near-term resistances, while sustained momentum beyond TP2 opens room for price to extend toward 8.77 and even 10. Stop loss is set below 4.75 on a closing basis to define risk.
Recommended Levels:
Buy 1: 5.62 (CMP)
Buy 2: 5.18
Stop Loss: Closing below 4.75
Take Profit 1: 6.15
Take Profit 2: 6.77
Take Profit 3: Ride the trend with a trailing stop
Potential upside remains as long as momentum sustains above the breakout zone and 55 EMA. Happy trading!
4090 Technical Analysis: Bullish Setup in Play4090 (Taiba Investment Company)
Price bounced from strong weekly support, followed by a breakout from the downward trendline. A bullish divergence on RSI, along with a classic “Three White Soldiers” pattern, reinforces the bullish outlook.
The first buy is positioned at CMP, with Buy 2 placed in case of a healthy dip to secure a stronger average. Risk is managed with a stop below weekly support at 35, while profit targets aim to capture the next leg of upside momentum.
Recommended Levels:
Buy 1: 38.64 (CMP)
Buy 2: 37.00
Stop Loss: Closing below 35
Take Profit 1: 42.00
Take Profit 2: 45.40
Potential upside remains as long as weekly support holds. Happy trading!
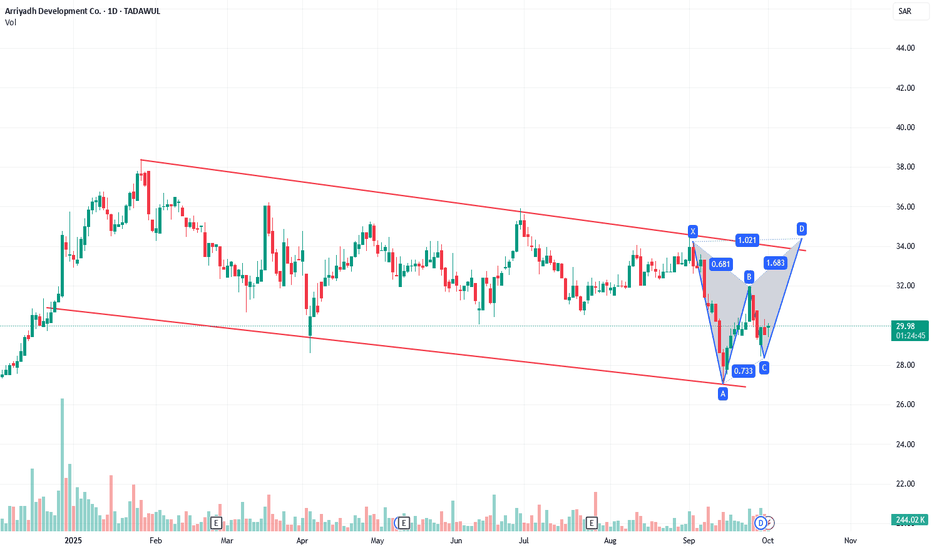
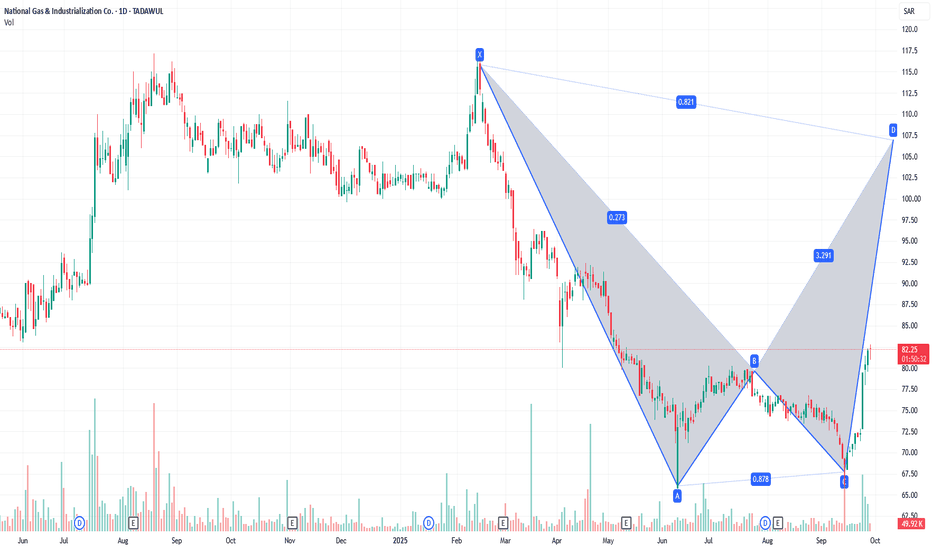
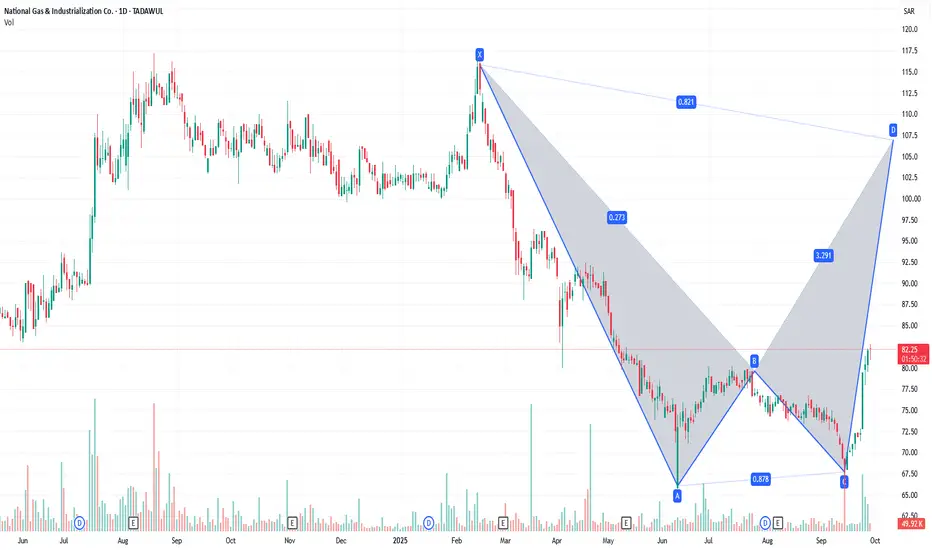
4150It’s a harmonic reversal pattern that signals a potential bearish trend reversal after a bullish move. It has five points (X, A, B, C, D) and four legs (XA, AB, BC, CD).
XA → First bullish impulse leg.
AB → Retracement of XA, typically 78.6% of XA.
BC → Extends AB, usually 38.2% – 88.6% of AB.
CD → Final leg, an extension of XA, reaching 127.2% – 161.8% of XA, completing the pattern.
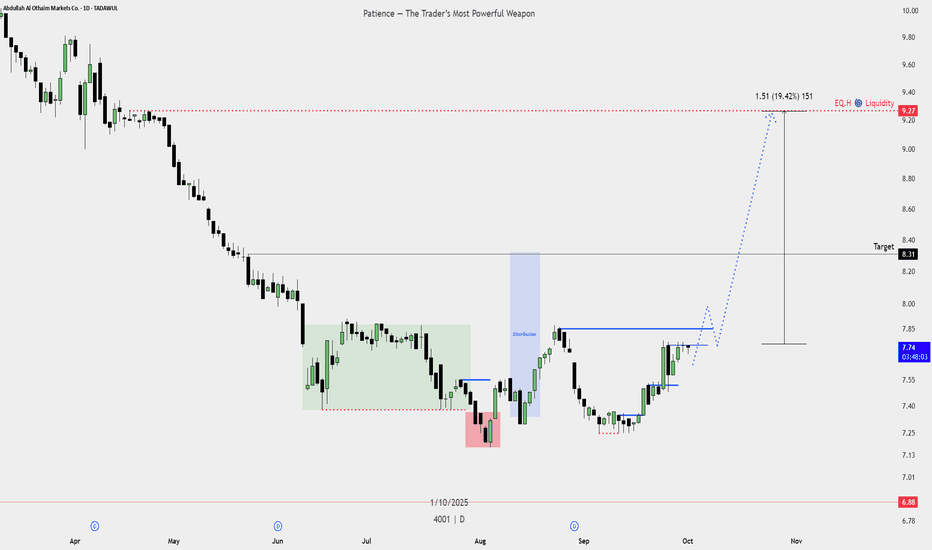
Buy Plan – Abdullah Al Othaim Markets Co.📈 Buy Plan – Abdullah Al Othaim Markets Co.
Entry:
Buy on continuation above the breakout zone (blue line).
Stop Loss (SL):
Place SL below the recent support area / consolidation base.
Targets:
First Target → Nearest resistance level
Second Target → Major resistance above
Final Target → Liquidity zone (red dotted line)
Plan Notes:
This is a breakout continuation setup.
Once the first target is reached, move SL to breakeven.
Take partial profits step by step and let remaining position run towards final liquidity zone.
Patience is required as this is a swing setup aiming for higher levels.
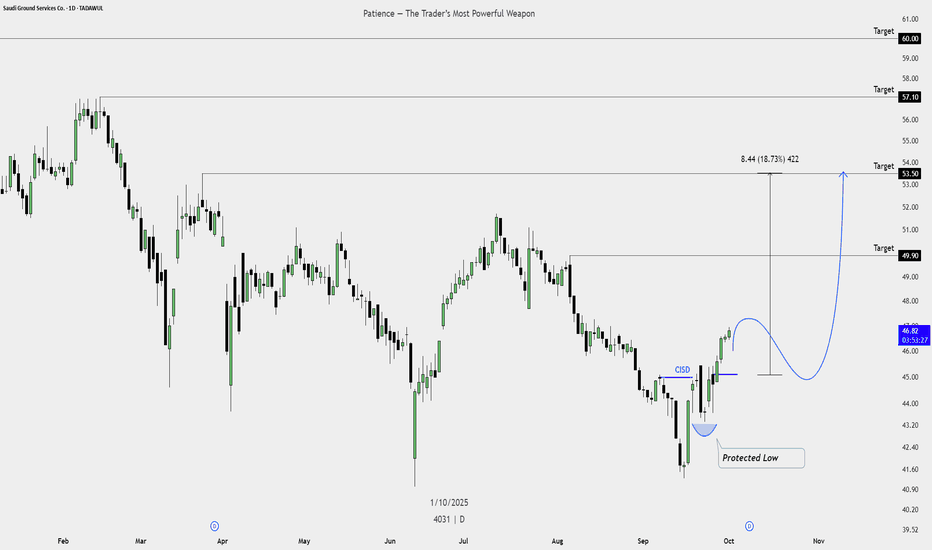
Buy Plan – Saudi Ground Services Co.📈 Buy Plan – Saudi Ground Services Co.
Entry:
Buy on continuation above the recent CISD zone confirmation.
Stop Loss (SL):
Place SL just below the CISD support zone.
Targets:
First Target → Previous resistance
Second Target → Major resistance level
Third Target → Higher resistance
Final Target → Long-term resistance
Plan Notes:
This is a swing buy setup; patience is required to hold for higher targets.
Move SL to breakeven once the first target is reached.
Take partial profits at each target and let the rest run.
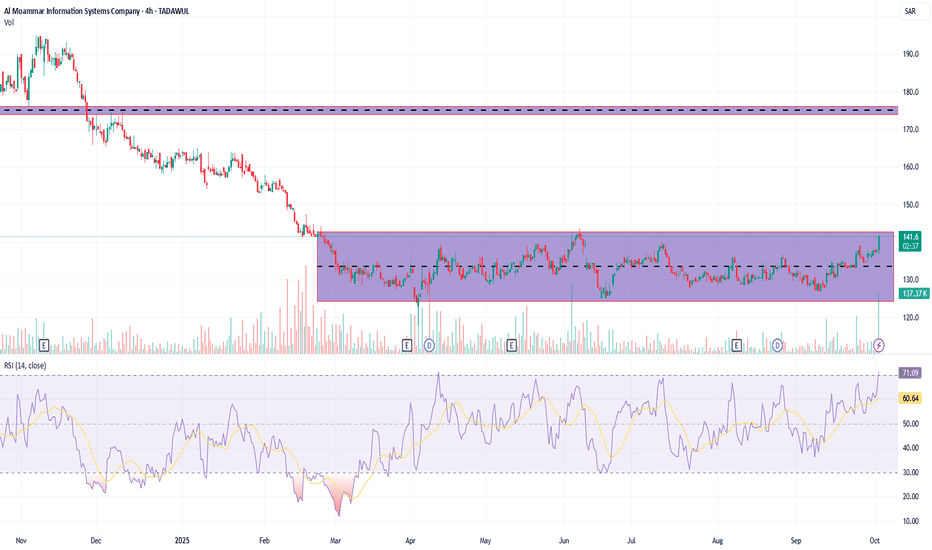
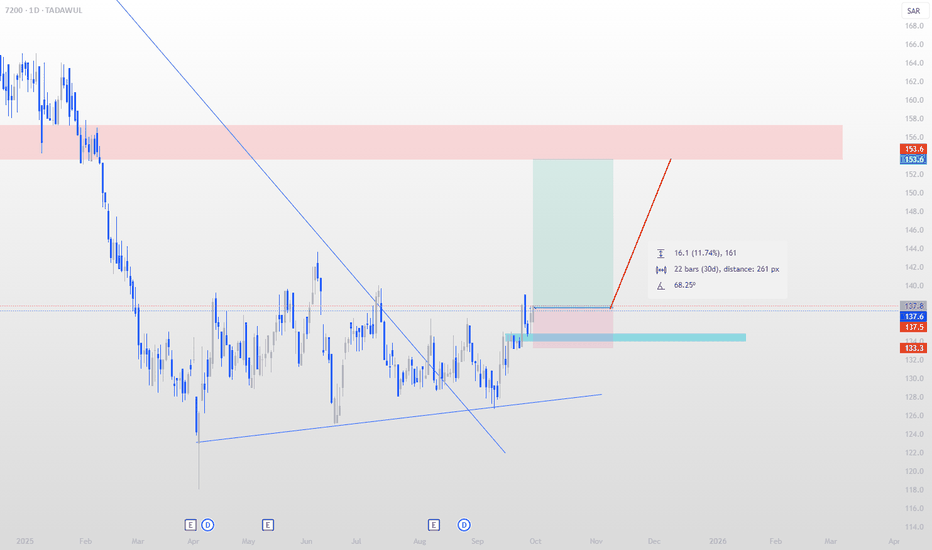
7200 | Al Moammar Information Systems CompanyThe weekly and monthly outlook has recently turned bullish, and we are targeting an 11% gain over the next 30 days in line with our Tadawul objectives — staying disciplined with high-quality entries, protecting downside risk, and keeping our eyes on steady, achievable growth milestones.
Every trade setup we share contributes to building consistent, measurable progress toward our long-term Tadawul goals.
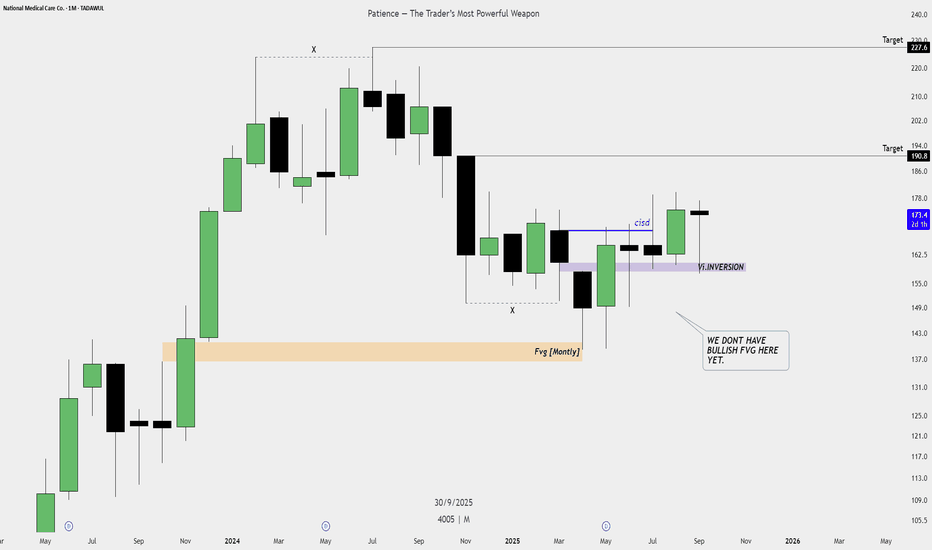
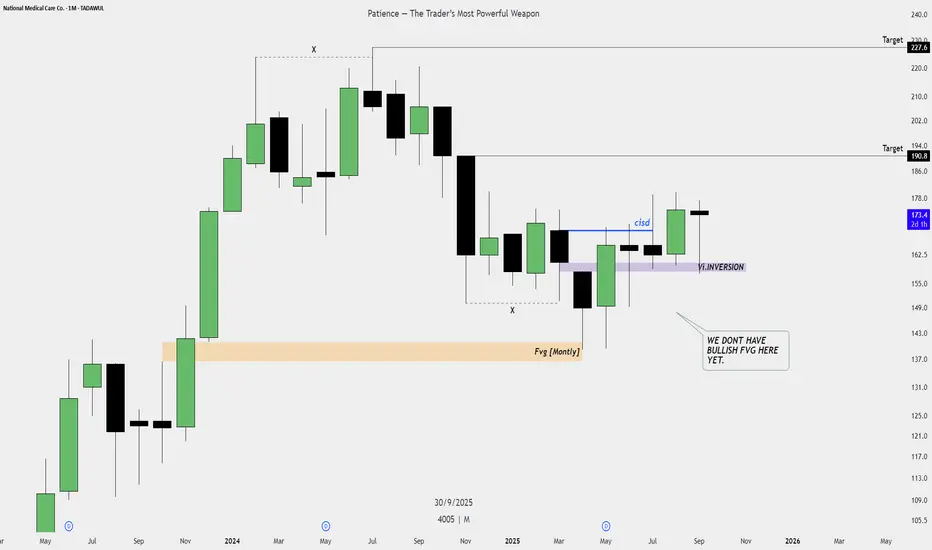
Concise Buy Plan: National Medical Care Co.
This plan aims to capitalize on the recent shift in market momentum to the upside.
1. **Market Context:** The asset has shown a clear **Change in State of Delivery (cISd)**, indicating a shift from sell-side control to buy-side momentum. The bias is now bullish.
2. **Entry Strategy (The Buy):** Wait for a **retracement** (pullback) to a key institutional support zone.
* **Primary Entry:** The **VI.INVERSION** level, a high-probability zone where previous resistance is expected to flip and act as strong support.
* **Deep Value Entry:** The unmitigated **Fvg \ ** zone lower on the chart offers a potential second entry, should the price reach that deeper discount.
3. **Risk Management (Stop Loss):** Place a protective stop-loss order below the structural low that immediately preceded the **cISd**. This protects the position if the bullish momentum fails.
4. **Profit Targets:**
* **Target 1:** The most recent swing high, clearing near-term liquidity.
* **Target 2:** The major structural high from the prior cycle, aiming for the top of the range.
Execute the long trade only upon confirmation that the price has entered and reacted to the selected support zone.
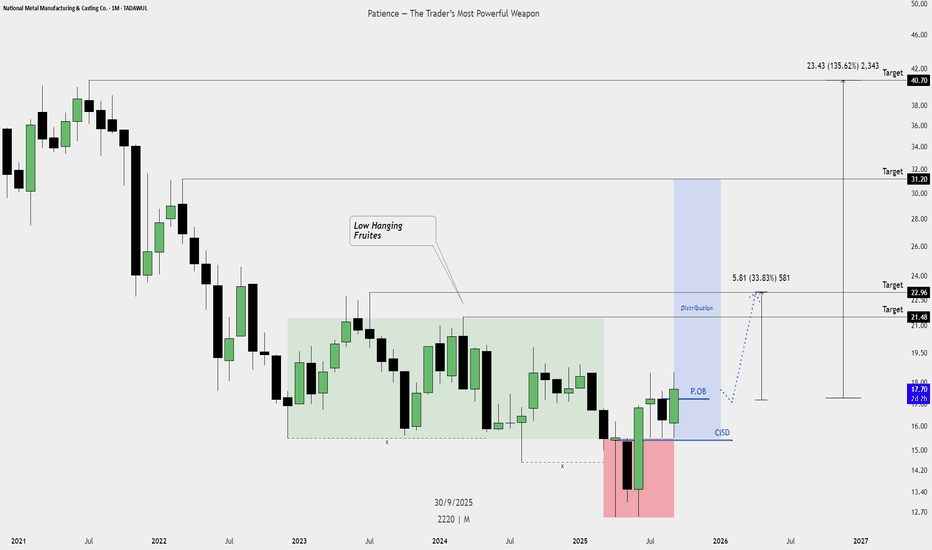
National Metal Manufacturing & Casting Co Monthly Buy PlanNational Metal Manufacturing & Casting Co (TASI) - Monthly Buy Plan
This plan is based on price action and institutional flow concepts, focusing on marked structural levels rather than specific numerical values.
I. Market Context
The stock is currently trading after a strong displacement from a previous low, indicating a potential shift in momentum from the long-term structural downtrend. The focus is on the current reaction at the perplotion block (P.OB) zone, which may serve as a launching pad for a corrective or reversal move. All analysis and confirmation levels are based on the Monthly chart structure.
II. Entry Strategy (Buy Zone)
Primary Entry: Seek a confirmation (such as a lower timeframe market structure shift or a strong bullish close on the Monthly chart) within the designated P.OB area. This zone represents an unmitigated institutional buying level.
Confirmation: Entry should be triggered only after the price shows clear rejection of the P.OB low, indicating that the institutional orders in this zone have been activated.
III. Risk Management (Stop Loss)
Invalidation Level: The stop-loss should be placed logically below the CISD (Change in Status Delivry) level.
Risk Condition: A confirmed close (especially a Monthly close) beneath the CISD (Change in Status Delivry) level invalidates the entire setup, as this would signal a continuation of the bearish structure and a sweep of the recent swing low.
IV. Profit Targets (Take Profit Levels)
The trade aims for successive structural highs:
Target 1 (T1): The initial short-term target is set at the low boundary of the previous Distribution zone, where liquidity likely resides.
Target 2 (T2): The next objective is the structural resistance marked as the swing high that preceded the latest downward move.
Target 3 (T3): The final, long-term target is the upper boundary of the historical "Low Hanging Fruites" accumulation area, representing a key psychological and structural resistance level.
V. Position Notes
Ensure your position size is calculated so that the risk taken is acceptable relative to the distance between your entry confirmation and the CISD (Change in Status Delivry) stop level.
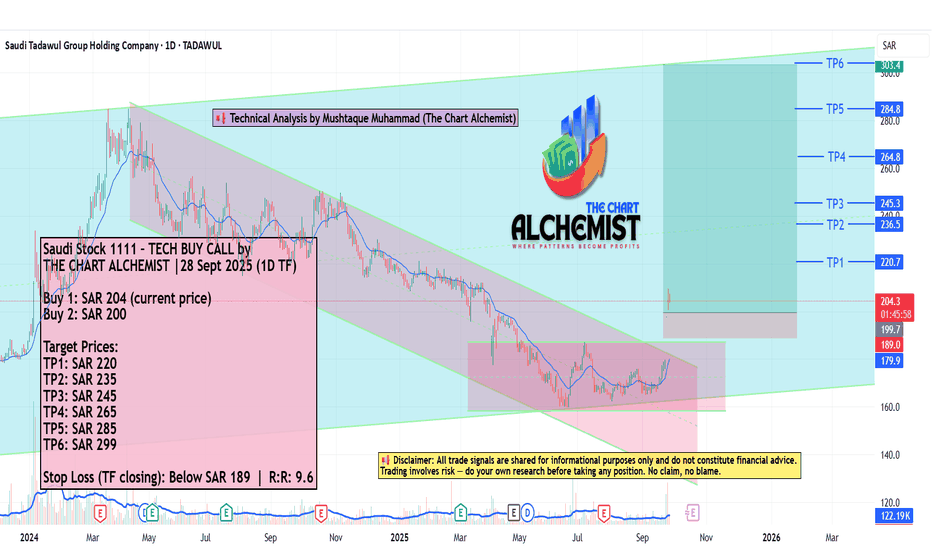
Saudi Stock 1111 – TECH BUY CALL by THE CHART ALCHEMIST 28 Sept Saudi Stock 1111 – TECH BUY CALL by THE CHART ALCHEMIST
28 Sept 2025 (1D TF)
The stock is moving in a bullish channel (marked in light blue) on a higher time frame. After making a high of SAR 285.6, it went into a bearish leg (marked in light pink) within the channel. The stock has recently broken out of this bearish leg and moved upwards. We expect it to continue moving upwards.
📢 Disclaimer: Technical analysis by Mushtaque Muhammad (The Chart Alchemist).
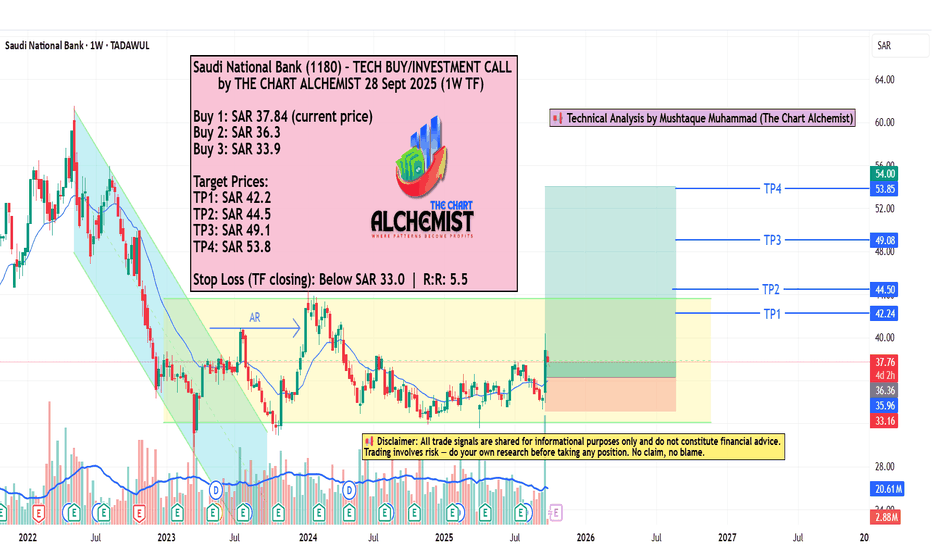
Saudi National Bank (1180) -28 Sept 2025 (1W TF)Saudi National Bank (1180) – TECH BUY/INVESTMENT CALL by THE CHART ALCHEMIST
28 Sept 2025 (1W TF)
After making a previous high of SAR 61.45, the stock went into a corrective mode in a tight channel (marked in light blue). It broke out and performed an automatic rally in a Wyckoff accumulation phase (marked in yellow). After touching the bottom support level around SAR 32, the stock reversed upwards and constructed multiple bullish structures.
📢 Disclaimer: Technical analysis by Mushtaque Muhammad (The Chart Alchemist).
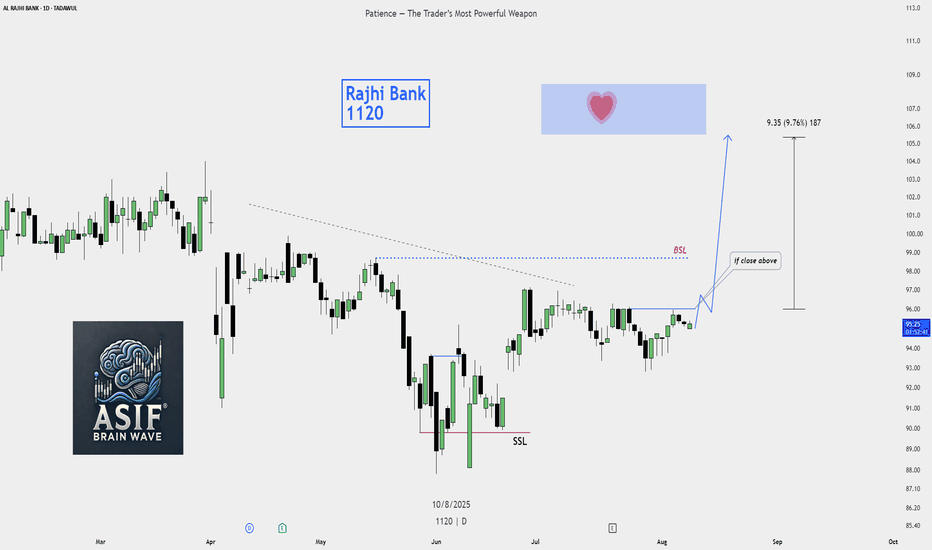
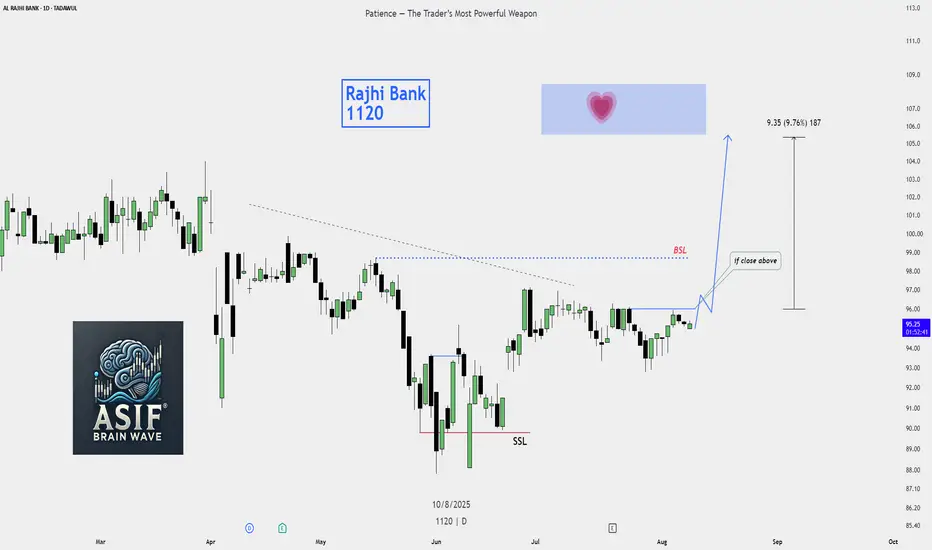
Buy Plan – Al Rajhi Bank (1120)Buy Plan – Al Rajhi Bank (1120)
Current Price: 95.20
Entry Trigger: Wait for a daily candle close above BSL (~96).
Target: 105–107 zone (approx. +9.76%).
Stop Loss: Below BSL or near 93.
Rationale:
SSL has already been taken, indicating potential shift to bullish momentum.
Break above BSL confirms buyer strength and opens the path toward the target zone.
The blue zone with the ❤️ mark is the main liquidity target area.