Southern Province Cement (1W) – Apr 14, 2026**Southern Province Cement (1W) – Apr 14, 2026**
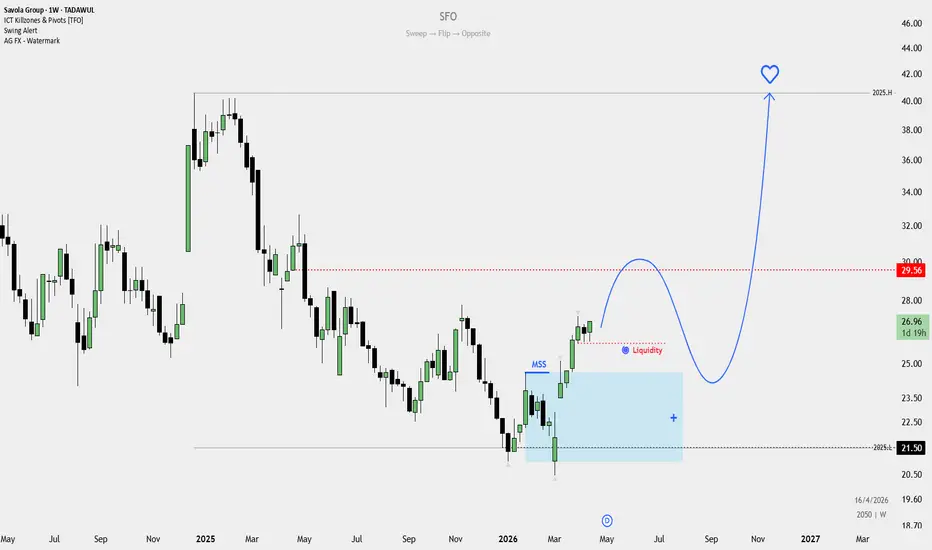
Price has swept sell-side liquidity and formed a short-term base, followed by a bullish push into internal range resistance. The structure suggests an early-stage **SFO (Sweep → Flip → Opposite)**.
Current reaction shows a pullback from resistance, indicating a possible continuation after rebalancing within the range.
Higher timeframe outlook remains **bullish**, with price likely aiming toward **upper liquidity levels above** if structure holds.
Jamjoom Pharmaceuticals (1W) – Apr 14, 2026**Jamjoom Pharmaceuticals (1W) – Apr 14, 2026**
Price has formed a base after clearing downside pressure and is now showing early bullish recovery. The structure suggests a developing **SFO (Sweep → Flip → Opposite)**.
Current move indicates strength, with potential for a short-term retracement before continuation.
Higher timeframe bias is shifting **bullish**, with price likely expanding toward **higher liquidity zones near prior highs**.
Al Taisseer Group (1W) – Apr 14, 2026**Al Taisseer Group (1W) – Apr 14, 2026**
Price has swept downside liquidity and is showing early signs of recovery from a key demand zone. The reaction suggests a potential **SFO (Sweep → Flip → Opposite)** developing.
Current structure indicates a gradual bullish shift, with room for minor pullbacks before continuation.
Higher timeframe outlook leans **bullish**, with price likely aiming toward **equal highs / buy-side liquidity above**.
First Milling Co. (1W) – Apr 14, 2026**First Milling Co. (1W) – Apr 14, 2026**
Price has swept sell-side liquidity and reacted strongly from a higher timeframe demand zone, indicating a potential **SFO (Sweep → Flip → Opposite)**.
The recent bullish momentum suggests continuation, though a short-term retracement into the internal range remains possible.
Overall bias stays **bullish**, with price likely expanding toward **buy-side liquidity above prior highs**.
4150 at Confluence Support Zone4150 has almost hit a double bottom near 17 where a trendline support also exists. currently it is resisting 19. it can take another dip below 18 which can be good low risk entry. it is safe as long as closes above 16.5.
It can rebound from here and go higher, with 21, 23 as immediate trading targets.
SPIMACO (1W) – Apr 14, 2026**SPIMACO (1W) – Apr 14, 2026**
Price has swept sell-side liquidity and formed a solid base, followed by a clear bullish shift in structure. The recent move suggests a developing **SFO (Sweep → Flip → Opposite)**.
Current price action shows strength, with potential for a short-term pullback into the internal range before continuation.
Higher timeframe bias remains **bullish**, with price likely expanding toward **2025 highs (buy-side liquidity)**.
Saudi Arabian Mining Co. (1W) – Apr 14, 2026**Saudi Arabian Mining Co. (1W) – Apr 14, 2026**
Price has taken liquidity from the downside and shown a strong bullish reaction, indicating a potential **SFO (Sweep → Flip → Opposite)** in progress.
The current structure suggests a short-term pullback into internal range before continuation higher. The overall flow remains **bullish**, with price likely expanding toward **higher timeframe liquidity above**.
As long as the structure holds, the expectation is **continuation toward the upside target zone**.
Emaar Economic City (3D) – Apr 14, 2026**Emaar Economic City (3D) – Apr 14, 2026**
Price has swept the downside liquidity and formed a strong reaction from a higher timeframe demand zone. The recent bullish shift suggests a potential **SFO (Sweep → Flip → Opposite)** in play.
Market is now likely transitioning toward the upside, with the next objective being **buy-side liquidity above prior highs**.
As long as the current structure holds, the bias remains **bullish toward higher liquidity**.
AFG International (4240) – 14 April 2026 AFG International (4240) – 14 April 2026
Fawaz abdul aziz al hokair
After a strong bearish leg, the market reacted from a monthly demand (+OB Monthly). Price is now forming a base with early signs of structure shift.
Recent price action shows higher lows and short-term accumulation, indicating weakening selling pressure.
If this strength continues, the next objective lies toward the upper liquidity / imbalance zone.
Expectation:
Market is likely to gradually develop bullish momentum, targeting higher liquidity.
4164 NahdiPrevious breakout attempt failed
Now again attempting breakout of Cup & Handle pattern above 108
Sustaining above this level will open targets 110.3, 113
Risk takers can plan entry at CMP with stoploss 104.6
Or
Any dip near 106.2 will be a good buying opportunity
Should not go below 102 this time
2060 – National Industrialization Company (TASI)📊 2060 – National Industrialization Company (TASI)
🟢 Technical Buy Set-up – 1D Timeframe
✍️ By The Chart Alchemist
🔍 Context & Market Structure
The stock was previously in a strong uptrend, making a high near SAR 27 📈
A double top formation 🔻 developed at the peak, triggering a trend reversal
Price action transitioned into a well-defined bearish trend with lower highs & lower lows
Currently, the bearish momentum is exhausting, and price has formed a TWD (Trend Weakening & Distribution) ⚠️
This indicates a potential accumulation phase and early signs of bullish reversal 🔄
🧠 Technical Insight
Selling pressure is drying up 🪫
Structure suggests a base formation near demand zone
Risk-reward profile is highly favorable ⚖️
Early positioning offers maximum upside capture
🟢 Buying Zone
🎯 SAR 9.40 – 10.00
Ideal for fresh entries and accumulation
📌 For existing holders:
👉 Best averaging zone: SAR 9.40 – 9.50
🎯 Target Levels (Scale-Out Strategy)
🚀 TP1: 10.50
🚀 TP2: 11.10
🚀 TP3: 11.50
🚀 TP4: 11.90
🚀 TP5: 12.40
🚀 TP6: 12.95
➡️ Strategy: Exit in partials at each target to lock in profits 💰 and reduce risk progressively
🛑 Stop Loss
❌ Below SAR 9.20
Strict invalidation of bullish setup
Protects capital in case of structural failure
⚖️ Risk-to-Reward Ratio
🔥 ~10.7 RRR
Exceptional asymmetric opportunity
Small downside vs significant upside potential
📌 Trade Summary
✔️ Trend: Bearish → Reversal Phase
✔️ Pattern: Double Top → TWD Base
✔️ Entry: Demand Zone Accumulation
✔️ Strategy: Scale-in & Scale-out
✔️ Ideal for: Swing Traders & Positional Traders
🚨 Final Note
This setup reflects a high-probability reversal trade backed by structure and price behavior. Patience in entries and discipline in exits will be key to maximizing returns.
Technical Analysis: Arabian Contracting Services (4071), Tadawul📊 Technical Analysis: Arabian Contracting Services (4071), Tadawul
By The Chart Alchemist ✨
---
🧭 Overview
A structural shift is underway — from a strong bearish phase into a range-bound accumulation. This phase demands patience, precision, and confirmation-based execution.
---
📉 Bearish Trend (Previous Structure)
🔻 Prolonged downtrend within a descending channel (light pink)
🔻 Strong selling pressure dominated
🎯 Final low formed near SAR 79
---
🚀 Breakout Phase
🟢 Price broke out of the bearish channel
🟢 Indicates seller exhaustion + early bullish intent
🔄 Transition from markdown ➝ accumulation
---
📦 Accumulation / Trading Range
🔵 Price now consolidating in a defined range:
🔻 Range Low: SAR 98
🔺 Range High: SAR 128
📌 Classic reaccumulation structure — smart money positioning zone
---
⚖️ Current Phase (Mid-Range + Demand Zone)
📍 Price hovering near SAR 114 (mid-range)
🔹 Minor demand zone present
⚠️ But technically:
❌ Mid-range = No edge zone
❌ Weak risk-to-reward
❌ Indecision area
---
🎯 Strategy & Trade Planning
🟢 Buy Scenario 1 (High Probability)
💰 Near SAR 98 (Range Bottom)
✅ Enter only after bullish reversal confirmation
🔥 Best risk-to-reward setup
---
🟡 Buy Scenario 2 (Secondary Setup)
📍 Around SAR 114 demand zone
⚠️ Only if strong confirmation appears
(e.g., structure shift, momentum spike)
---
🎯 Targets
🚀 Primary Target: SAR 127 – 128 (Range High)
---
🛑 Risk Management
🔻 Stop Loss: Below SAR 108
⚖️ Maintain disciplined execution — range markets are volatile
---
📌 Positioning Guidance
❌ New Entries: Avoid without confirmation
✅ Existing Holders: Can hold within SL/TP plan
---
🧠 Conclusion
📦 The stock is in a controlled accumulation phase
⏳ Patience is key — avoid mid-range traps
🎯 Focus on range extremes + confirmation entries for optimal trades
---
🔥 Trade smart. Execute with precision. Let the structure guide you.
ACWA Power (2082) – Weekly Timeframe Technical Investment Setup🚀 ACWA Power (2082) – Weekly Timeframe Technical Investment Setup 📊
By The Chart Alchemist_
---
✨✨ Context (Macro Structure)
After forming a major prior high at 485 SAR 🏔️📈, the stock developed a double top formation 🔄🔄 and transitioned into a bearish corrective phase 📉📉.
This bearish cycle is now approaching exhaustion, with a terminal wedge structure ⚠️🔺 indicating selling pressure is fading and a potential major bullish reversal 📈🚀 is building on the weekly timeframe.
---
💰💰 Buying Levels (Accumulation Zone)
🟢 Buy 1: 169 SAR 💹
🟢 Buy 2: 153 SAR 📉
🟢 Buy 3: 143 SAR 🔻
📌 Gradual accumulation suggested within weakness zones
---
🎯🎯 Target Projection (Upside Expansion Path)
🚀 TP1: 180 SAR
🚀 TP2: 196 SAR
🚀 TP3: 210 SAR
🚀 TP4: 230 SAR
🚀 TP5: 250 SAR
🚀 TP6: 270 SAR
🚀 TP7: 290 SAR
🚀 TP8: 315 SAR
🚀 TP9: 350 SAR
🚀 TP10: 370 SAR
🚀 TP11: 395 SAR
📈 Upside Structure: Multi-leg expansion potential under weekly breakout confirmation
---
🛑🛑 Stop Loss (Invalidation Level)
🔴 Below 119 SAR ⚠️
📉 Breakdown below this level invalidates the bullish reversal structure
---
⚖️⚖️ Risk-to-Reward Profile
📊 Estimated R:R = 8.0 🔥🔥
💎 Favorable asymmetric long-term investment setup
---
📌📌 FINAL NOTE
👉 This is a patient investor setup 🧘♂️📆
👉 Designed for long-term position building 🏗️📈
👉 ❌ NOT suitable for short-term trading or intraday speculation
---
🧭🧭 Weekly structural reversal setup with high-timeframe accumulation characteristics
Middle East Healthcare Company – Investment Set-up | Weekly TF📊 Middle East Healthcare Company – Investment Set-up | Weekly TF
✍️ By The Chart Alchemist
---
🧠 📖 Trade Context
🚀 After printing a major high at 135 SAR, the stock entered a
📉 structured pullback phase (healthy correction)
🔍 The pullback has now completed its downside targets
⚡ And the chart is showing strong signs of reversal
📈➡️📈 Next Leg Loading… (Bullish Continuation Setup)
💡 This is NOT a chase trade
👉 It is a Phased Accumulation Strategy on Pullbacks
---
🟢 💰 Accumulation Zone
🎯 Buy Range:
🟩 26 – 36 SAR
📌 Strategy:
🧩 Scale-in gradually
📉 Buy weakness, NOT strength
⚖️ Capital allocation in phases
---
🎯 🚀 Target Projection Ladder
🥇 TP1 → 43 SAR 🔥
🥈 TP2 → 50 SAR ⚡
🥉 TP3 → 55.7 SAR 📈
🏅 TP4 → 65 SAR 💎
🏆 TP5 → 77 SAR 🚀
👑 TP6 → 87 SAR 🌕
---
🛑 ⚠️ Risk Management
⛔ Stop Loss: Below 24 SAR
🧯 Capital protection is mandatory
---
⚖️ 📊 Trade Metrics
💎 Risk-to-Reward Ratio:
🔥 12 : 1 (High Conviction Setup)
---
🎯 🧪 Chart Alchemist Insight
🧬 Pattern Structure:
📉 Pullback → 🔄 Base Formation → 📈 Reversal
⚡ Key Signals:
🟢 Demand returning
📊 Structure holding above key zone
🔁 Momentum shift building
---
🧠 📌 Execution Playbook
✅ Accumulate in zones, not candles
✅ Hold with patience (Weekly TF setup)
✅ Let targets unfold progressively
❌ Avoid emotional entries on breakouts
---
🔥 📢 Final Take
💡 This is a position-building opportunity, not a quick trade
⏳ Time + Structure = 📈 Big Move Potential
🚀 Smart money accumulates quietly… before expansion
Saudi Chemical (2230) — Long-Term Investment Set-up (1M TF)🇸🇦📈 Saudi Chemical (2230) — Long-Term Investment Set-up (1M TF)
✨ By The Chart Alchemist ✨
---
🟦 📊 Accumulation Zone (Smart Money Area)
💰 Buy Range: 6.4 – 8.0 SAR
🔹 Gradual accumulation (DCA strategy)
🔹 Ideal zone where institutions quietly build positions 🏦
---
🚀 🎯 Target Ladder (Expansion Phase)
📍 TP1: 9.1 🔹
📍 TP2: 10.7 🔹🔹
📍 TP3: 12.2 🔹🔹🔹
📍 TP4: 14.2 🚀
📍 TP5: 16.1 🚀🚀
📍 TP6: 18.1 🔥
📍 TP7: 19.1 🔥🔥
➡️ Structured for multi-leg bullish trend, not just a quick move
---
🛑 ⚠️ Risk Control
❌ Stop Loss: 5.7
🔐 Protect capital — this is a wide SL due to HTF volatility
---
🧠 📈 Trade Context (Monthly Structure Insight)
🔸 Stock likely in Accumulation → Markup transition
🔸 Strong base formation suggests long-term breakout potential
🔸 Volume behavior typically aligns with smart money absorption
📊 Expect:
Shakeouts before moves ⚡
Slow grind → explosive breakout 💥
Trend development over months/years, not days
---
⏳ 💎 Investor Mindset
🧘♂️ Stay calm — patience is key
📉 Embrace pullbacks (they are opportunities)
📈 Book profits gradually at each TP
---
⚡ Summary Edge
✔️ High RR structure
✔️ Long-term wealth-building setup
✔️ Designed for disciplined investors, not emotional traders
---
💬 “Big money is made in big moves — and big moves take time.