Don’t Sleep on AQZ: Smart Money May Already Be PositionedAQZ — 4-Year Reaccumulation + Bullish Doji = Strategic Long Setup
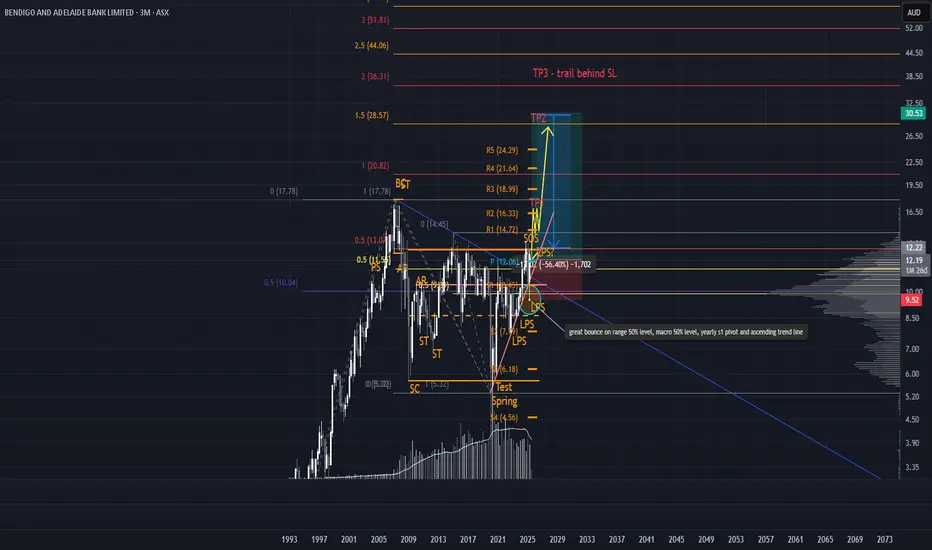
AQZ is looking primed for a long play. Price has been reaccumulating for ~4 years, and June printed a bullish monthly doji—a classic liquidity sweep. Price pierced the major fair value gap (FVG) from the May 2020 pump candle, tested the yearly S2 pivot, and found support right on the EQ of the range. That’s a trifecta of demand confluence.
Entry Scenarios Based on Risk Profile
Aggressive Entry Enter now with a tighter stop loss around $2.29, which aligns with two EQ zones: the June 2025 demand structure and the channel EQ. This setup suits high conviction traders looking to front-run the breakout.
Conservative Entry Use a wider stop beneath the Last Point of Support (LPS) for more breathing room. This protects against deeper retests while still respecting the bullish structure.
Preferred Entry (Low Risk, High Confluence) Wait for price to break and retest the channel, then consolidate above it. This would also confirm a break of the major 50% resistance projected from the all-time low to all-time high—a powerful signal of trend continuation.
Strategic Overlay
This setup blends long-term structural strength with tactical precision:
4-Year Base = Institutional accumulation
Doji Sweep = Smart money absorption
Multi-level confluence = High-probability AOI
If price rallies from this zone, expect momentum to build quickly. But as always—one step at a time. Let price confirm before scaling in.
*please note, arrows are not time analysis just pathing
Potential outside week and bullish potential for NOVEntry conditions:
(i) higher share price for ASX:NOV above the level of the potential outside week noted on 31st July (i.e.: above the level of $0.032).
Stop loss for the trade would be:
(i) below the low of the outside week on 31st July (i.e.: below $0.026), should the trade activate.
Potential outside week and bullish potential for ALQEntry conditions:
(i) higher share price for ASX:ALQ above the level of the potential outside week noted on 8th August (i.e.: above the level of $18.63).
Stop loss for the trade would be:
(i) below the low of the outside week on 4th August (i.e.: below $17.67), should the trade activate.
ORI Setup: Watching for Pullback into Accumulation ZonesOn the weekly timeframe, ORI has printed a 10-week rally straight into a key supply zone—aligning cleanly with Gann’s 7–10 bar exhaustion principle within a single swing. This move suggests we’re nearing a potential inflection point. There’s still room for a final extension toward the second major supply structure around $25, but any push into that zone would likely be met with selling pressure and a corrective phase.
On the monthly, price has been advancing aggressively—but notably on declining volume, hinting at underlying weakness and possible buyer fatigue. If price stalls or rejects around current levels, it sets the stage for a layered accumulation opportunity at the zones highlighted on the chart.
Should price consolidate and absorb supply in these areas, the setup opens the door for a breakout to all-time highs, offering a compelling Risk-to-Reward profile for strategic positioning.
Setup Invalidation: A decisive break and close below $14.89 would invalidate the thesis, confirming a macro higher low breakdown. However, wicks into this zone are acceptable as part of a liquidity sweep or shakeout.
ASX STOCKS SCAN: PLS - 27 AUG, 2025 - BULLISH POTENTIALConclusion: Wave v))green may be moving higher.
Key Points: Wave v))green is extended and subdivides into waves i,ii,iii)purple. Wave iii)purple may now be moving higher, targeting the nearest target at the high of 3.12. While price must remain above 2.07 to maintain this view.
Invalidation Point: 2.07
ASX STOCKS SCAN: S32 - 27 AUG, 2025 - BULLISH POTENTIALConclusion: Wave 3-red may be moving higher.
Key Points: Wave 2-red may have ended as a complex corrective wave, and since 2.84 wave 3-red may be unfolding to move higher. Target a high of 3.59 or higher. While price should remain above 2.84 to keep the weight and confidence for the bullish market view.
Invalidation Point: 2.47
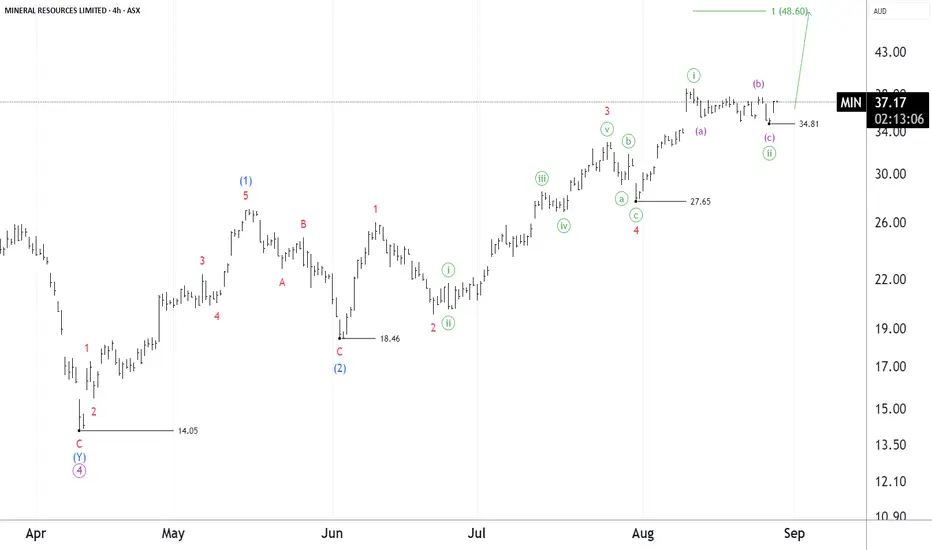
ASX STOCKS SCAN: MIN - 27 AUG, 2025 - BULLISH POTENTIALConclusion: Wave 5-red may be moving higher.
Key Points: Wave 5-red may be extending and subdividing into waves i,ii,iii))green. And its wave iii))green may be moving higher, targeting 48.60 or higher. While price should remain above 34.81 to maintain confidence, the weight of this bullish view.
Invalidation Point: 27.45.
SDR – Textbook Respect of PD Arrays Leading to Explosive UpsideExplanation
The move we anticipated on SDR has now unfolded exactly as outlined, with price reacting strongly from the higher-timeframe PD arrays.
Fair Value Gap (FVG): Price tapped perfectly into the monthly/weekly FVG and used it as a springboard for accumulation. This zone served as the rebalancing point for inefficient pricing.
Order Block (OB): The bullish OB inside the FVG held as expected, providing the structural base for buyers to step in and defend.
Liquidity Dynamics: Prior to the move, sell-side liquidity was swept, clearing weak longs and fuelling the drive higher. Once liquidity was taken, momentum shifted sharply to the upside.
Buyside Targets: Price has now begun its run into the weekly buyside liquidity levels at 6.90 and beyond, with the higher target around 7.78 still in play.
This reaction is a textbook ICT move: sweep → rebalance via FVG → respect of OB → expansion toward buyside.
✅ Key Takeaway: The predictive model played out exactly, proving once again that respecting PD arrays across HTFs provides a high-probability roadmap for price action.
Spring Setup with Asymmetric RewardDon’t be afraid of G8 — these are the setups that often deliver the highest returns with minimal risk. We may have just completed a classic spring, presenting a compelling entry opportunity.
Entry: Right now, with stop-loss tucked just below the wick of the spring.
Momentum: RSI is deeply oversold, and Stochastic RSI is also oversold with a bullish K-line cross, signaling a potential reversal.
Structure: Price has reclaimed key levels, aligning with spring mechanics and reclaim setups.
If the spring fails, keep an eye on the yearly S2 pivot at 0.840. A bullish hammer-style candle at that level would offer an even stronger setup — with enhanced reward-to-risk due to deeper liquidity and psychological support.
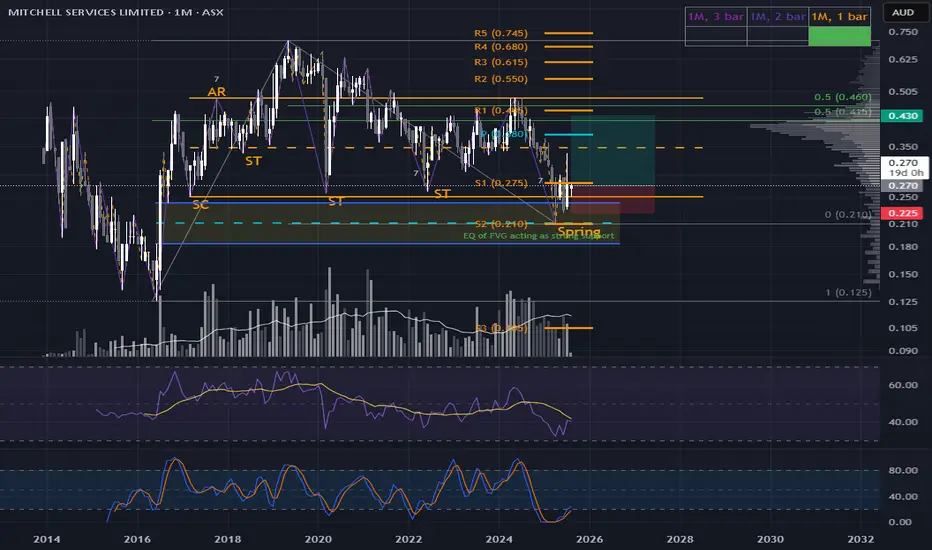
Microcap Coil: MSV Poised for a Spring UnwindMSV is shaping up beautifully — potential spring in play. Price action suggests a classic Wyckoff Phase C moment, with signs of absorption and a possible reclaim on deck. But let’s be clear: this is a microcap, and that means elevated risk.
High caution required — thin liquidity, fast moves, and headline sensitivity make this one a sniper’s game, not a swing-for-the-fences setup. If the spring confirms, it could offer a sharp asymmetric move — but only if you’re disciplined with size and execution.
NEM ASX - breakout weeklyNEM now breaking out hard.
target is $74 AUD.
gold miners have yet to move but spot price of gold has already
started accelerating higher.
Bonds yields are still negative in real terms.
equities are overvalued. BTC is in a bubble. Gold is stability.
US empire wants to initiate more Wars. China will be the next to be
invaded. They will instigate something in Taiwan as they did in Ukraine.
Prospect to ride copper train up to 0.35 (66% gain)?Prospect Resources (PSC) classic cup and handle, showing extension to around 0.35, coinciding with parallel channel.
Switching to the weekly and looking further back since the Arcadia lithium mine was sold in July 2022, there is also a double bottom / W.
Fundamentals pretty strong being a copper explorer with substantial Maiden Resource Estimate, extensive drilling programme and strong track history.
Dead Cat or Last Breath? RHC’s Pivot Trap LoomsRHC is sitting at a pivotal moment. For the bullish case to stay alive, we need to see price swiftly reclaim and close above ~$43 — that’s the line in the sand.
However, I’m leaning toward Scenario 1, which suggests a short-term push up to the yearly pivot and macro 50% retracement level, followed by a rejection and sharp move lower.
Bearish Pathway
Initial Bounce: Push toward ~$43 could trap late longs.
Rejection Zone: Yearly pivot and macro 50% level act as resistance.
Downside Targets:
First stop: $26 — previous structural support.
Then potentially: $18 — deeper liquidity zone and psychological level.
COL Bullish Blueprint: $20 or $18.93 — Which Launchpad Wins?Coles is setting up for a sustained move higher. The structure is clean, and two key scenarios are worth tracking:
Scenario 1:
Shallow Pullback to ~$20
LVN Zone: Low Volume Node suggests weak price acceptance — price may dip but not stay.
Fib Confluence:
50% retracement from the recent 1-month 2-bar swing low aligns with this zone.
Yearly R1 Pivot:
Adds structural weight to the $20 area.
Expectation: Quick dip, then bounce — ideal for aggressive entries with tight invalidation.
Scenario 2:
Deeper Pullback to ~$18.93 (Preferred)
Major Support Cluster: Previous swing tops now act as support.
Macro Fib Level: 50% retracement from ATH to the March 14.81 low lands here.
Wick Memory: March’s long wick suggests liquidity and buyer defense — midpoint could act as a springboard.
Expectation: Stronger base, better risk-reward, and potential for a more explosive leg higher.
Invalidation: if we have a monthly close below $18.31 then the chances was this breakout was a false move.
please note, no time analysis done arrows show pathing
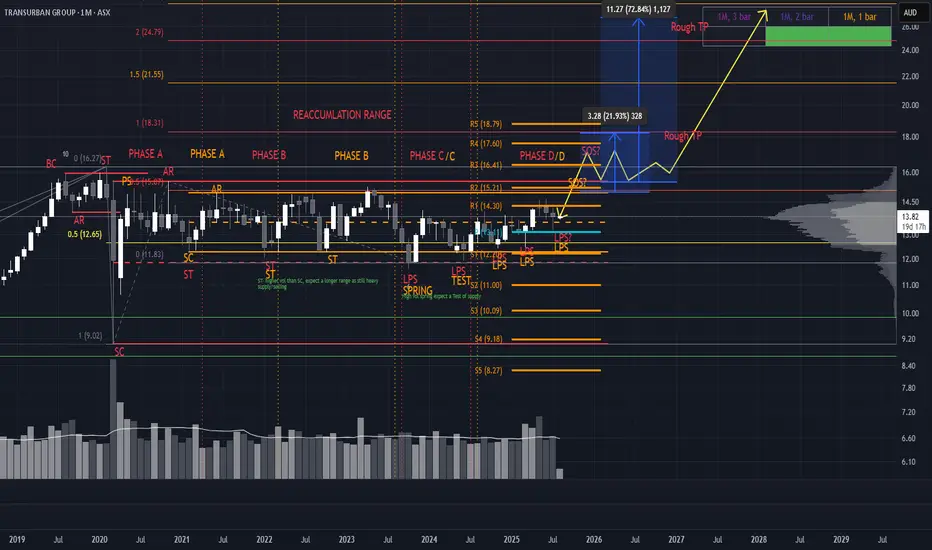
Two Ranges, One Breakout: TCL’s Wyckoff-Gann ConfluenceCurrently tracking two distinct Wyckoff ranges on TCL, each color-coded for clarity. The structure is clean despite a few lines—each range tells a story.
Accumulation Zones
Key buying opportunities are emerging at the LPS (Last Point of Support), marked by higher lows. These are classic signs of strength and absorption.
Resistance & Breakout Potential
Expect notable resistance around $15.55, but a breakout is likely. We’re approaching a Gann 4th-time breakout setup, which historically carries strong momentum. If price reaches this zone with expanding volume and wide candle spreads, it adds conviction for a Sign of Strength (SOS) and a potential pullback to retest.
Targets & Confluence For take-profit zones, I’m watching:
Yearly pivots
Range extensions from both Wyckoff structures (100%, 150%, 200%)
Gann extensions for harmonic targets
This setup blends structure, volume dynamics, and time-price symmetry. If the breakout confirms, TCL could offer a textbook Phase E markup.
*please note no time analysis is done, just looking at pathing
Another Microcap ready to pop? Overall liking the structure with current PA. Granted could see a bit more of a pullback as volume is quite high relative to up bars over the past 3 months. Would target the supply structure
*note arrows not indicating time analysis
BLong
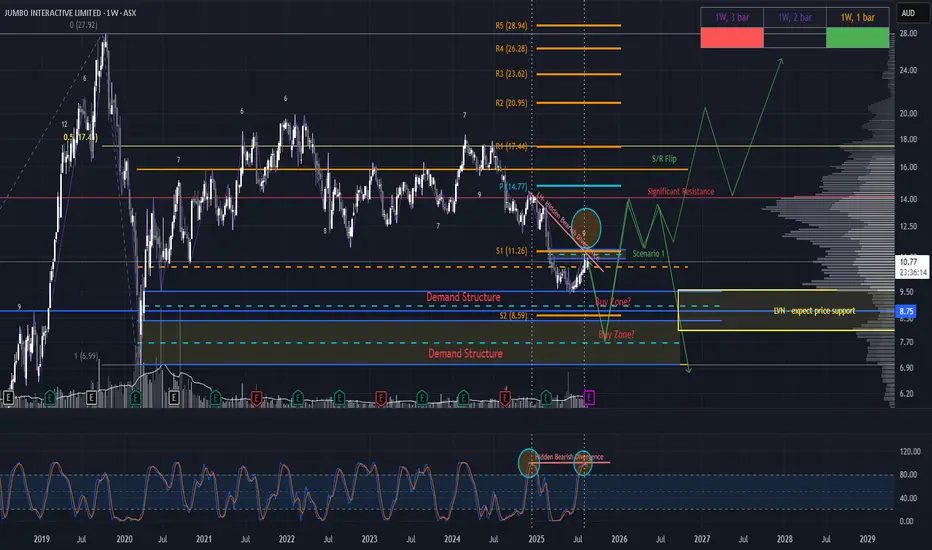
JIN Rallies into the Trap: Retail Shakeout or Reload?Jumbo Interactive (JIN) – Pre-Earnings Setup
JIN is primed for a classic retail shakeout, with the 26 August earnings release likely acting as a volatility catalyst. However, price action suggests the reaction could come ahead of the announcement, given the confluence of technical exhaustion signals.
Price Structure: Price has rallied for 9 consecutive bars, aligning with Gann’s reversal zone (7–10 bar swing rule). This rally is occurring on declining volume, into:
The yearly S1 pivot
A weekly fair value gap (FVG)
Hidden bearish divergence on the Stochastic RSI
Scenario Outlook: Expect a sharp reaction post-earnings (or sooner), targeting the Low Volume Node (LVN) or the Equilibrium of the monthly wick.
The ideal entry would be:
A closed daily dragonfly doji or bullish hammer candle in one of these two zones.
On elevated volume, signaling absorption and reversal
Profit Targets:
Initial TP: Macro 50% retracement ~$14 level or range high ~$16
Extended TP: Potential for a larger swing trade, contingent on a clean break above major resistance (S/R flip) with reaccumulation
Please note, arrows are not based on time analysis
Strategic Reaccumulation Zone – NXT’s Next Move Is CriticalNXT is at a pivotal level and shouldn’t be overlooked. Price has rallied strongly off a clean April hammer, which aligned with:
Yearly S1 pivot
Macro 50% level (projected from ATL to ATH)
High volume confirmation
This confluence marked a powerful reversal. Price has now reached the 50% resistance zone from the ATH and April low. What happens next will likely define the longer-term trajectory.
Scenario Modeling
Scenario 1 – Most Bullish
Price breaks and holds above $14.48
Reaccumulation above this level
Sets up a challenge of ATH and potential price discovery
Scenario 2 – Strategic Pullback
Missed the April low? This offers a second chance.
Pullback to the Yearly S1 pivot (dynamic tool—watch where the local top forms)
A higher low here = ideal entry with strong R:R
Scenario 3 – EQ Demand Zone Entry
Price dips into the EQ zone of the April wick
Bullish candle off this level = high-quality entry
Converges with macro 50% ATL–ATH projection
will take much longer for price to challenge ATHs
Scenario 4 – Breakdown Risk
April low breaks
Downside targets: $6.96 and $5.78
Takeaway: This is a step-by-step reaccumulation watch. Let price reveal intent—each scenario offers a unique R:R profile. Stay nimble, stay strategic. I will update the chart when price settles
*please note, arrows are not time analysis
LYNAS.ASX - Possible Bearish RetracementA possible return to the major MA's after a break of the bullish parabolic trend fan lines.
An acceptable Risk to Return ratio for a short position.
Await for a break of the previous sessions low before confirmation as Rare Earths are still very much a hot fundamentals buzzword.
Don’t Short It, But Don’t Chase It—TPW’s Setup Demands PatienceTemple & Webster is flashing short-term bearish signals. We've just seen a 7-week rally culminate in a bearish hammer on a volume spike—a textbook exhaustion move. According to the Gann rule, a trend reversal or pause is often expected after 7–10 consecutive bars in one swing, and this setup fits that criteria.
Adding fuel to the bearish thesis:
Bearish divergence on the Stoch RSI
Bearish cross on the RSI
Despite this, I’m not interested in shorting—price is still in a clear uptrend, and I don’t short rising markets. Discipline over impulse.
Area of Interest (AOI): $15.29 Zone
If price pulls back, the previous ATH zone around $15.29 becomes a high-probability support area. This zone is stacked with confluence:
Major 50% Fib level projected from swing low to ATH
Macro 50% level from July 2022 low to ATH
Large demand wick already printed in this zone
If price reaches this AOI and the broader market remains strong, I wouldn’t expect it to linger here long. But no need to front-run—keep it simple and take it one step at a time.
Potential Scenarios from AOI
If price finds support and rallies from the AOI zone, two paths could unfold:
Slight Higher High + Volume Spike → Significant Pullback This would suggest a final push before a deeper correction—watch volume and candle structure closely.
Bullish Continuation (Green Line Path) Price breaks out cleanly and continues the uptrend. If this plays out, we reassess and ride the momentum.
Either way, we cross that bridge when we get there. For now, eyes on the AOI and let price tell the story.
*please note arrows are not time analysis just expected pathing