Oil & GasSector View:
Energy engineering & pipe coating.
Benefits from offshore pipeline projects.
Fundamental:
Orderbook critical.
Earnings turnaround tied to execution.
Technical:
Recovery phase if higher lows forming.
Break above 200MA confirms trend reversal.
Catalysts:
Major pipeline contract
Middle East expansion
Bias: Reversal play
Entry:
Buy on higher low formation
Confirm 200MA reclaim
Stop:
Below structure low
Target:
Previous consolidation top
Risk: 7/10
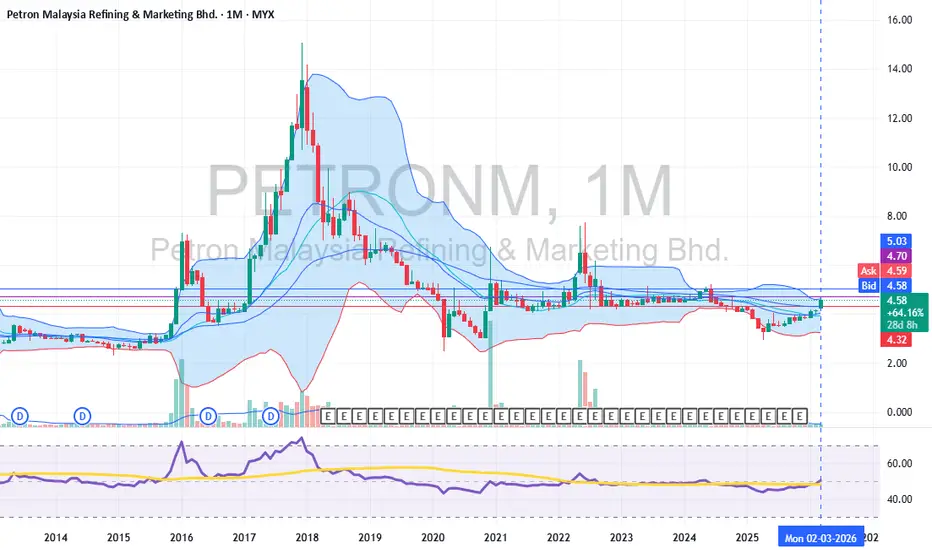
Oil & GasSector View:
Refining margin play (not crude producer).
Fundamental:
Sensitive to crack spreads.
Retail fuel demand stable domestically.
Margin compression risk if global refining capacity rises.
Technical:
Typically defensive vs upstream.
Consolidation pattern common during stable crude periods.
Catalysts:
Margin expansion
Domestic demand strength
Bias: Defensive oil play
Entry:
Range trading setup
Buy near lower channel
Stop:
6–8% below support
Target:
Channel resistance
Risk: 6/10
Oil & Gas WarSector View:
Direct crude price proxy.
Fundamental:
Strong leverage to oil prices.
Earnings highly cyclical.
Asset portfolio diversification improves risk profile.
Technical:
Volatile, momentum-driven.
Bullish continuation if crude rallies sharply.
Catalysts:
Brent > USD 90
Production upgrade
Acquisition of new producing assets
Risk:
Oil retracement below breakeven band
Bias: Bullish if Brent strong
Setup: Breakout + pullback continuation
Entry Plan:
Buy on breakout above recent swing high
OR
Buy on pullback to 20–50MA after breakout
Stop Loss:
Below previous higher low
Targets:
T1: +10–15% swing
T2: Prior major resistance zone
Risk Level: 8/10 (oil volatility driven)
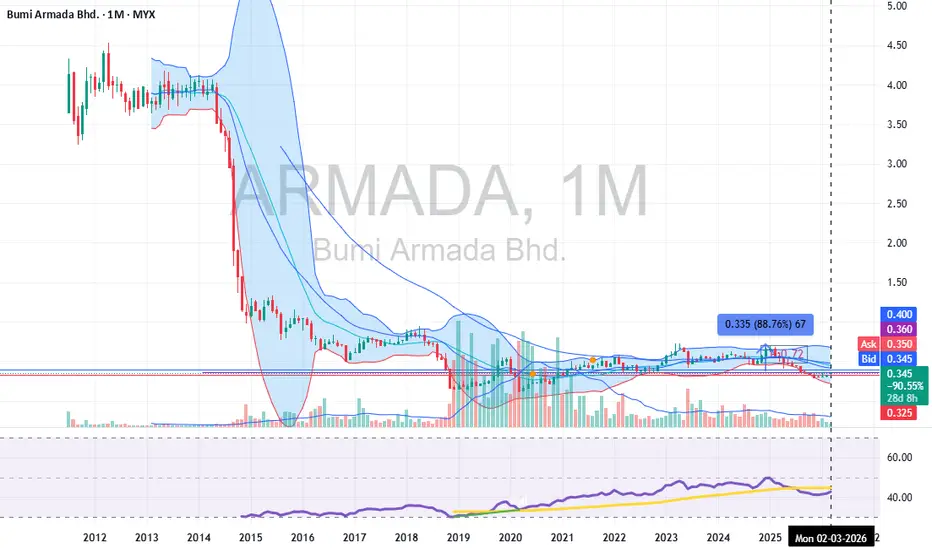
Oil & Gas Bumi Armada Berhad (ARMADA)
Sector View:
FPSO player → benefits from sustained offshore capex recovery.
Fundamental:
Revenue linked to long-term FPSO contracts (defensive vs pure drilling).
Leverage remains key monitoring variable.
Cash flow stability improving if oil stays above USD 70–80.
Technical:
Typically trades in cyclical waves aligned with oil price.
Watch breakout above previous swing high for continuation.
Catalysts:
New FPSO contract wins
Debt restructuring improvement
Oil price spike
Risk:
Oil crash
Contract non-renewal
Bias: Accumulation → breakout candidate
Entry Plan:
Accumulate near support range
Add on breakout confirmation
Stop:
5–8% below support
Target:
Range top
Extension: 20% if oil rally continues
Risk: 7/10
NATGATE - 8 RECORD SESSION LOWS ?NATGATE : CURRENT PRICE : RM1.00 - RM1.02
NATGATE has been in a corrective phase and recently printed an 8-session low, which often signals selling exhaustion and opens the door for a technical rebound. (The record session topic is discussed by STEVE NISON in his book - BEYOND CANDLESTICK , PAGE 121 - 127)
A bullish piercing line appeared in Friday’s session, where buyers pushed price well into the prior bearish candle’s body. Stochastic oscillator is currently in the oversold zone, signalling a potential technical rebound.
ENTRY PRICE : RM1.00 - RM1.02
FIRST TARGET : RM1.10
SECOND TARGET : RM1.22 (near EMA 200) - The EMA 200 has capped price twice, acting as strong dynamic resistance, look at the green highlighted area.
SUPPORT : RM0.935
Notes : For reference, I’ve attached the link to my previous write-up related to this setup.
Pullback deeper or can buy ady?*MAYBANK*
We are currently observing a sharp pullback for Maybank, but there is no cause for alarm as the overall trend remains *firmly bullish* . This movement is deemed as a healthy correction within an established uptrend, allowing the stock to digest recent gains.
Technically, the price is currently hovering around the Golden Ratio (50-61.8%) Fibonacci retracement level. While our banking analyst notes that Maybank’s results are in line with expectations, the current chart pattern suggests there may still be room for further minor correction at this juncture. For investors looking for a more attractive entry point, it may be prudent to wait for a deeper discount closer to the MYR11.50 mark, which aligns with our support zone.
Our key support levels are established at *MYR11.50 (S1)* , followed by *MYR11.10 (S2)* and *MYR10.70 (S3)* . On the upside, we have pegged immediate resistance at MYR12.20, with a secondary target at MYR12.70.
♦️Aiman Kamil, RHB Research
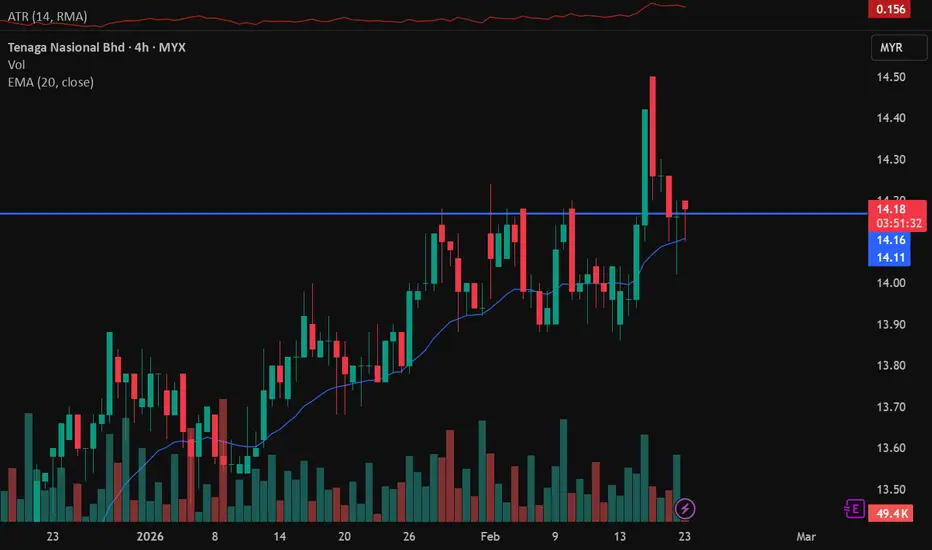
TENAGA (MYX)
On the daily chart, the 14.16 level has been a level that's been retested multiple times. We could see price recently broke the level with increasing volumes indicating a strong bullish momentum. On the 4hr chart, we could see theres a doji candle in the retracement towards the area. A green candle after the doji would signal our entry as a candlestick pattern. Stops would be 1 atr below the lows aiming for a 1.4:1 risk reward ratio.
ECOSHOP
On the daily chart here, you could see price broke the resistance at the 1.51 level. On the retracement towards the area, the volume is decreasing indicating that theres low bearish momentum to push the price lower. Dropping to the 4 hr chart, there's a double bottom pattern forming indicating a push to the upside. once we could see a green candle forming on the second bottom, there's our entry. stop loss is 1 atr below the lows and take profit is around 1.63 level right below the 1.65 resistance level for a 1.38:1 risk reward ratio.
Will THMY continue uptrend?As we can see, THMY is currently still in an uptrend position following the channel that has been created. It is good to counter and chip in while in an uptrend position, and the trend is newly seen. Let's see whether it can still be in a good position until it breaks the trend.
Will Exsim be ATH>Technically from the chart we can see that the counter has BO with volume momentum. From an all-time perspective, we can see that it is trying to create a new ATH. We just wait on how the counter will react in this short period of time. When will it create a new ATH is the real question here.
Trans stock - potential-predict price direction only-naked chart
Monitor
PVA
Chart pattern
bull candle stick
TFD
TFW
ALong
PESONA - Potential price movementY wave with (E) projection within stipulated time.
A Y-wave recovery from (D) toward (E) within a larger corrective pattern. Current price 0.385 sitting below the projected (E) zone (~0.410–0.420).
Price cleared the Tenkan/Kijun and is testing the Kumo’s lower boundary — bullish bias so long as price stays above the Kijun and Tenkan support.
Volume: moderate; needs pickup on impulsive moves toward (E) for conviction.
Blue shaded area indicates projected time window for (E) in late Feb–Mar 2026.
Setup: trade the run toward (E) after confirmation of momentum.
buy on a daily close above 0.395–0.400 with rising volume.
Aggressive: add on shallow pullback to Tenkan/Kijun (0.360–0.370) if price shows a clean rejection candle and volume support.
Concise plan
Wait for close >0.400 to enter full size → SL 0.345 → TP1 0.410, TP2 0.420 (trail thereafter).
Or buy pullback to 0.360–0.370 with SL 0.345 for higher reward/risk and smaller size.
Notes:
1. Analysis for education purposes only
2. Trade at your own risk
TECHSTORE - LOOKING for STRONG BULLISH SENTIMENTN wave with V, N & NT projection
Overall medium-term bias: mildly bullish. The chart shows a prior uptrend, a corrective ABC that found support in/near the cloud, and price has bounced back above Tenkan/Kijun.
Ichimoku structure:
- Price is currently around or slightly above Kijun/Tenkan; Tenkan and Kijun are close.
- Kumo is green and flat-to-rising — supportive for higher prices as long as price stays above the cloud.
-Chikou appears mostly above price (from earlier move) which supports a bullish view provided it remains unblocked.
Volume: the recent bullish bar has uptick in volume — supportive for continuation if follow-through appears.
Immediate support / invalidation: NT / Kijun area ~0.300–0.290. A daily close below the cloud (~0.275–0.285) would be a stronger invalidation of the bullish count.
Near resistance: prior swing high area ~0.340–0.350 (B peak zone).
Entry: on daily close above recent local resistance ~0.330–0.335 (confirmation of bullish continuation). Alternatively, enter on intraday breakout above 0.335 with volume confirmation.
Stop-loss: just below NT / Kijun area — e.g., 0.290 (or tighter at 0.300 depending on risk tolerance).
Rationale: breakout on volume with Ichimoku supportive; good risk-to-reward if you keep a tight stop under the kumo/kijun.
Invalidate bullish scenario if price closes decisively below the kumo (below ~0.275–0.285) on strong volume — that would suggest the ABC corrective structure failed and trend may be weakening.
Use position sizing so a stop hit does not exceed your planned percent risk.
Consider trailing the stop to Tenkan/Kijun as the price moves towards targets to lock in profit.
Confirm daily close above local resistance for momentum entry, or bullish confirmation on pullback for conservative entry.
Volume supportive on upward moves (better probability).
Chikou not heavily obstructed by price — clear bullish projection.
No major company announcements or market events that could cause unexpected gaps.
Notes:
1. Analysis for education purpose only.
2. Trade at your own risk.