Long
Long
Bearish Pullback Into Resistance – Sellers Target Lower DemandGold (XAUUSD) remains under bearish pressure on the H4 timeframe after breaking below the Ichimoku Cloud, confirming that sellers continue to control the broader trend. The recent sharp decline into the 3,960 demand area attracted buyers, resulting in a short-term recovery. However, this rebound appears to be a corrective move rather than a trend reversal.
The current price is approaching a key resistance zone around 4,045–4,055, where previous selling pressure emerged. Above this lies a stronger major resistance between 4,080–4,090, which is likely to attract fresh selling if price extends higher.
As long as price remains below these resistance zones, the bearish outlook remains valid. Traders should watch for bearish confirmation such as rejection candles, bearish engulfing patterns, or lower-timeframe market structure breaks before considering short positions.
Bearish Scenario
Entry Zone: 4,045–4,055 (Primary Resistance)
Extended Sell Zone: 4,080–4,090 (Major Resistance)
Target 1: 4,006
Target 2: 3,984
Target 3: 3,960
A rejection from resistance could trigger another bearish leg toward the highlighted support levels, with the demand zone near 3,960 acting as the final downside objective.
Bullish Invalidation
A sustained H4 close above the 4,090 major resistance would invalidate the current bearish setup and suggest buyers are regaining momentum for a deeper recovery. Short 
XAUUSD – Gold Is Recovering, But Sellers May Defend Higher XAUUSD – Gold Is Recovering, But Sellers May Defend Higher
Yesterday’s view followed the market structure well as gold continued lower before finding a reaction from the lower zone.
Today, gold is trying to recover from the recent low and is now trading around 4,029. The short-term structure has improved after price created a strong bounce and moved back above the nearby FVG area.
However, this is still a recovery move inside a broader bearish context. The key question now is simple: can buyers continue toward 4,070 – 4,080, or will sellers defend that area again?
FUNDAMENTAL ANALYSIS
Gold remains sensitive to USD movement, yields, and market sentiment. After the recent selloff, the current rebound may be supported by short-term profit-taking and technical buying from lower levels.
For today, price reaction around resistance is more important than prediction.
TECHNICAL ANALYSIS – SMC + MARKET STRUCTURE
From an SMC perspective, gold has created a short-term bullish reaction after sweeping the lower area. Price also formed a market structure shift around 4,020, showing that buyers are trying to take short-term control.
The FVG zone around 4,010 – 4,022 is now acting as intraday support. As long as gold holds above this area, the recovery can continue toward the upper resistance zone.
The main resistance sits around 4,070 – 4,080. This is the area where sellers may defend again. If price reaches this zone and rejects, the market may create another pullback.
KEY PRICE ZONES TO WATCH
Current price: 4,029
Intraday support: 4,010 – 4,022
MSS area: Around 4,020
Lower FVG support: 3,970 – 3,985
Recovery resistance: 4,050
Sellers may defend: 4,070 – 4,080
Invalidation for short-term recovery: Below 4,010
TRADING SCENARIOS
Buy Scenario – Short-Term Recovery
Buy Zone: 4,010 – 4,022
Entry: Bullish reaction, FVG retest, or lower-timeframe CHoCH
SL: Below 4,010
TP1: 4,050
TP2: 4,070 – 4,080
Sell Scenario – Reaction From Resistance
Sell Zone: 4,070 – 4,080
Entry: Bearish rejection, failed breakout, or lower-timeframe bearish CHoCH
TP1: 4,050
TP2: 4,020
TP3: 4,010
Alternative Sell Scenario
If gold breaks below 4,010, the recovery structure becomes weaker.
Sell Condition: Clean break and retest below 4,010
Target: 3,970 – 3,985
MY VIEW ON GOLD
Gold is recovering today, but I do not want to chase the move too late.
The cleaner plan is to watch how price reacts around 4,010 – 4,022 for support, and 4,070 – 4,080 for resistance. If buyers defend the FVG, gold may continue higher. But if price reaches the upper zone and sellers reject it, the pullback setup becomes more attractive.
For now, gold is bouncing — but 4,070 – 4,080 will decide whether this recovery can continue.
Do you think gold will reach 4,080 today, or will sellers return before that zone?
Long 
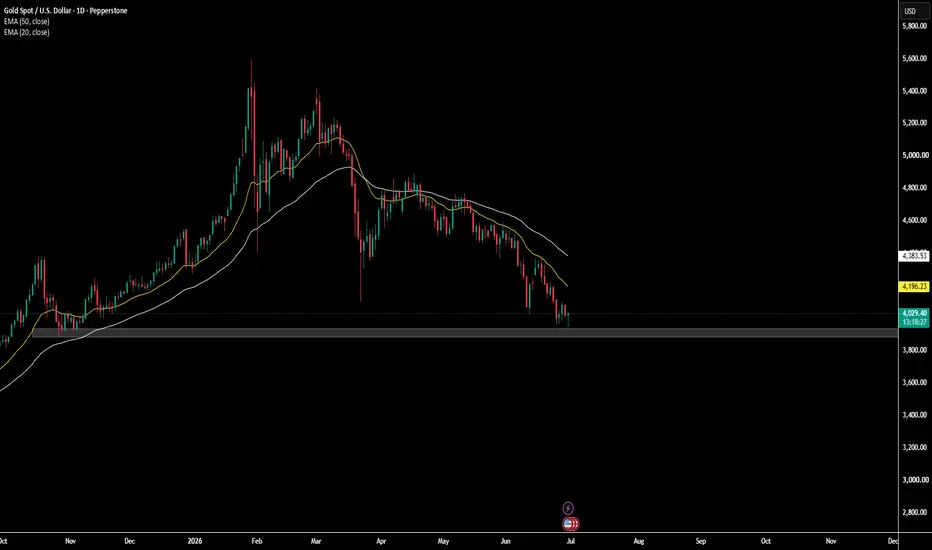
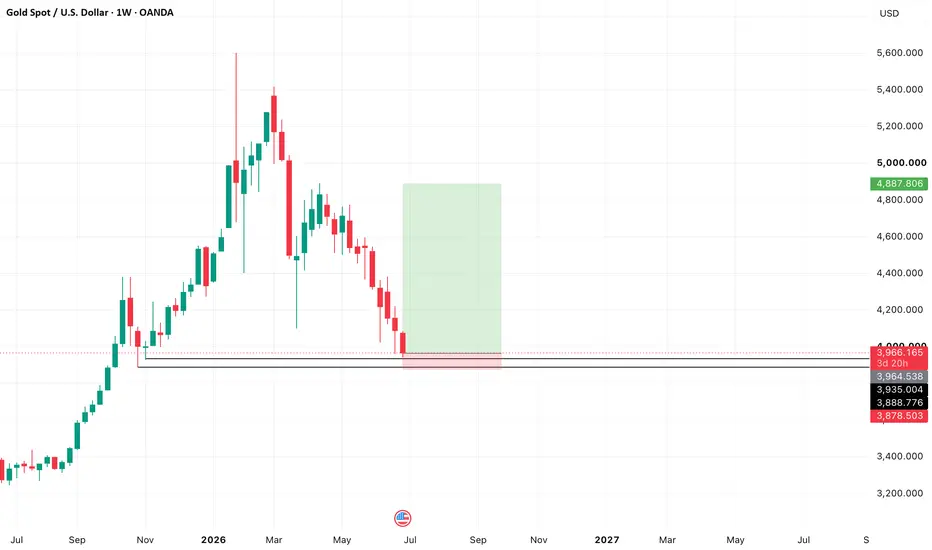
XAUUSD (Gold) — Daily | At Major Support After Record Quarterly Price: ~$4,030 | ATH: $5,602 (Jan 29, 2026) | Down ~14% this quarter — steepest on record.
Gold is sitting right at a key zone: the bottom of a falling channel + a horizontal demand area ($3,900–$3,950). This is the first real test of that zone since price broke above it last year.
Bullish case
Strong support confluence at $3,900–3,950 (channel + demand zone)
Big drop = oversold, bounce is likely even in a downtrend
Central banks + physical buyers still accumulating gold
US-Iran tension is paused, not resolved — safe-haven bid can return fast
Close above $4,350–4,400 = trend shift signal
Bearish case
Trend is still down — lower highs, lower lows since Jan
Fed may hike rates (not cut) → stronger dollar → bad for gold
Every bounce so far has failed lower
Close below $3,900 = support broken, next leg down likely
Iran-US deal could kill the safe-haven premium
Key levels
ZonePriceResistance 2$5,400–5,605Resistance 1$4,350–4,400Support$3,900–3,950InvalidationBelow $3,900
Bias: Neutral at this level. Watch how price reacts at $3,900–3,950 — bounce favors longs toward $4,350+, breakdown confirms more downside.
Not financial advice — educational view only.
Long 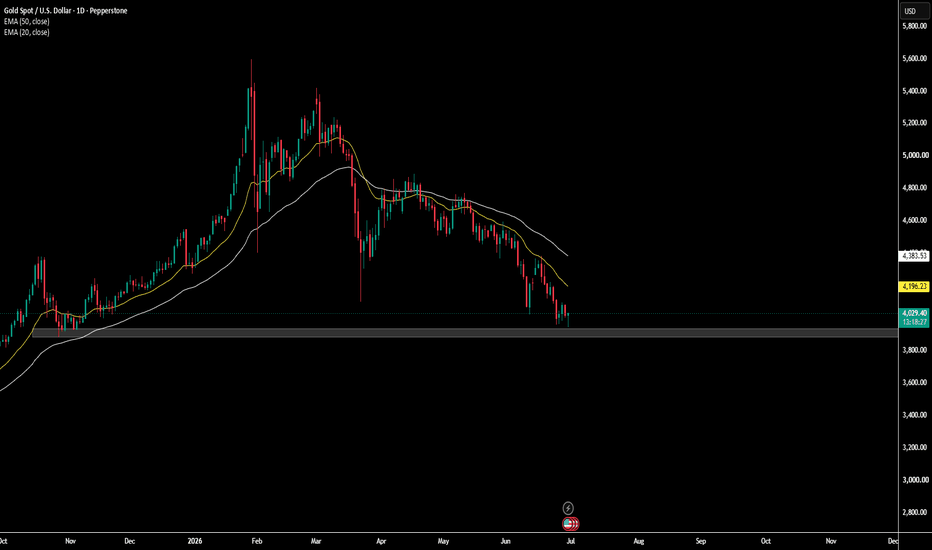
Gold Faces a Key Test Near $4,040Gold has bounced strongly from the $3,960 area, but the recovery is now approaching a critical resistance around $4,040–4,045. Unless buyers break above this zone, the move may remain a short-term relief rally.
The broader macro environment still depends on upcoming US economic data and Fed expectations, both of which could influence the US Dollar and gold's next move.
Trade Setup:
Buy Zone: $4,000 – $4,010 (on a successful pullback hold)
Stop Loss: $3,980
Take Profit 1: $4,040
Take Profit 2: $4,080 Short 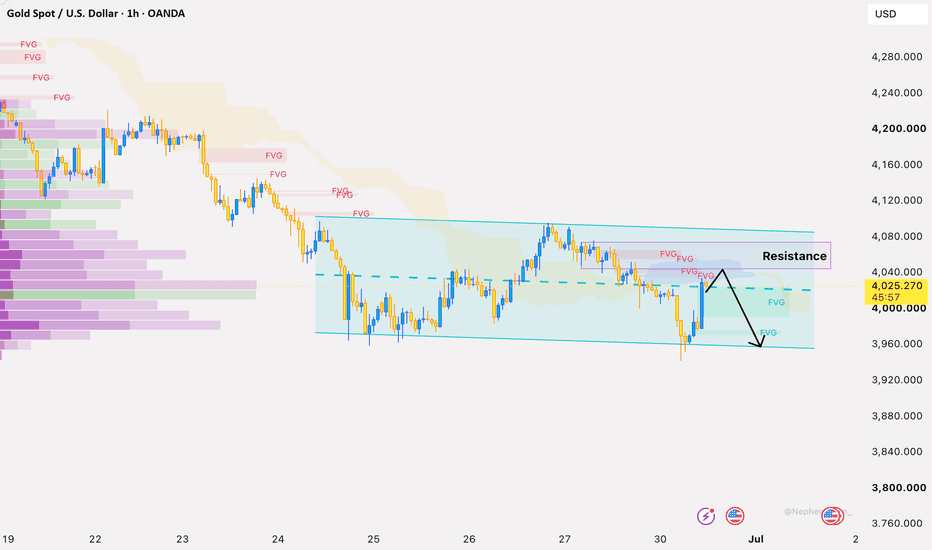
Long 
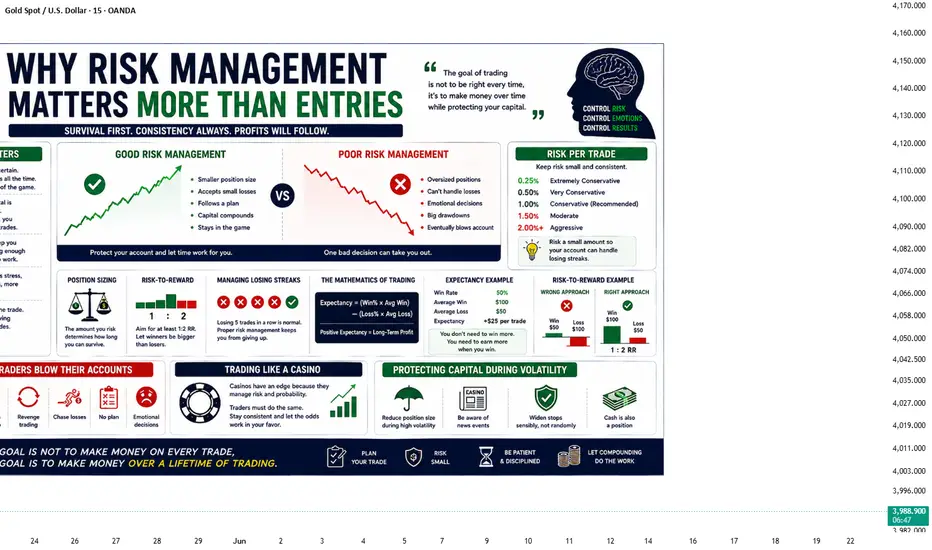
Risk Management Ask a group of traders what separates successful traders from unsuccessful ones, and many will mention strategy.
Some believe the answer is finding the perfect indicator.
Others search endlessly for the best chart pattern or the highest win-rate trading system.
While these things have value, they are not what determines long-term success.
The truth is much simpler.
A great entry cannot save poor risk management, but good risk management can survive imperfect entries.
This is one of the most important lessons every trader eventually learns.
Trading Is a Probability Game
No trader wins every trade.
Even the world's most experienced professionals experience losses.
Financial markets are uncertain by nature, which means every trade is simply a probability—not a guarantee.
The goal is not to avoid losing trades.
The goal is to ensure that no single trade has the power to seriously damage your account.
Professional traders understand this.
Instead of trying to predict every move correctly, they focus on managing uncertainty.
Why Great Entries Still Fail
Imagine identifying what appears to be the perfect setup.
The trend is strong.
Support is holding.
The candlestick confirmation looks ideal.
Everything points toward a winning trade.
Then, unexpected news is released.
The market reverses sharply.
Your analysis wasn't necessarily wrong.
The market simply changed.
This is why successful traders never assume that any setup is certain.
Every trade must include a plan for what happens if the market proves them wrong.
Protecting Capital Comes First
Your trading account is your most valuable asset.
Without capital, you cannot participate in future opportunities.
Many beginners become obsessed with making money quickly.
Professional traders think differently.
Their first priority is protecting what they already have.
Because opportunities appear every day.
Capital lost through poor risk management can take months—or even years—to recover.
Small Losses Are Part of the Business
Many new traders view losses as failure.
Experienced traders view them as business expenses.
Every profession has costs.
A restaurant pays rent.
A manufacturer buys raw materials.
A trader accepts occasional losses.
The difference is that professional traders keep those losses small.
A controlled loss is simply the cost of staying in the game.
The Power of Position Sizing
Risk management is not only about placing stop losses.
It also involves deciding how much capital to risk on each trade.
A trader risking 1% of their account on a losing trade remains financially and emotionally stable.
A trader risking 20% may struggle to recover after only a few losses.
Position sizing ensures that one mistake never becomes a disaster.
Consistency matters far more than aggression.
Risk-to-Reward Is More Important Than Win Rate
Many traders chase strategies with the highest possible win rate.
But a high win rate does not always produce consistent profits.
Imagine two traders.
The first wins 80% of the time but loses far more on losing trades than they gain on winners.
The second wins only 45% of the time but allows winning trades to be much larger than losing ones.
Over time, the second trader may outperform the first.
This is why professional traders pay close attention to risk-to-reward ratios instead of focusing only on how often they win.
Emotional Control Begins With Risk
Many trading mistakes begin before the trade even starts.
When too much money is at risk, emotions become stronger.
Fear causes traders to exit too early.
Greed encourages them to hold too long.
Hope prevents them from accepting small losses.
Proper risk management reduces emotional pressure.
When each trade risks only a small portion of your account, it becomes much easier to follow your trading plan objectively.
Long-Term Thinking Wins
Successful trading is not about one trade.
It is not about one week.
It is not even about one month.
It is about surviving long enough for your edge to play out over hundreds of trades.
The traders who stay in the market for years are rarely the ones taking the biggest risks.
They are the ones managing risk with discipline and consistency.
Final words:
Every trader wants better entries.
But better entries alone are never enough.
Markets are unpredictable, and losses are unavoidable.
Risk management is what allows traders to survive those losses and continue growing over time.
The most successful traders are not those who predict the market perfectly.
They are the ones who protect their capital, control their emotions, and remain consistent through both winning and losing periods.
Because in trading, survival comes first.
Profit is simply the reward for surviving long enough.
Education 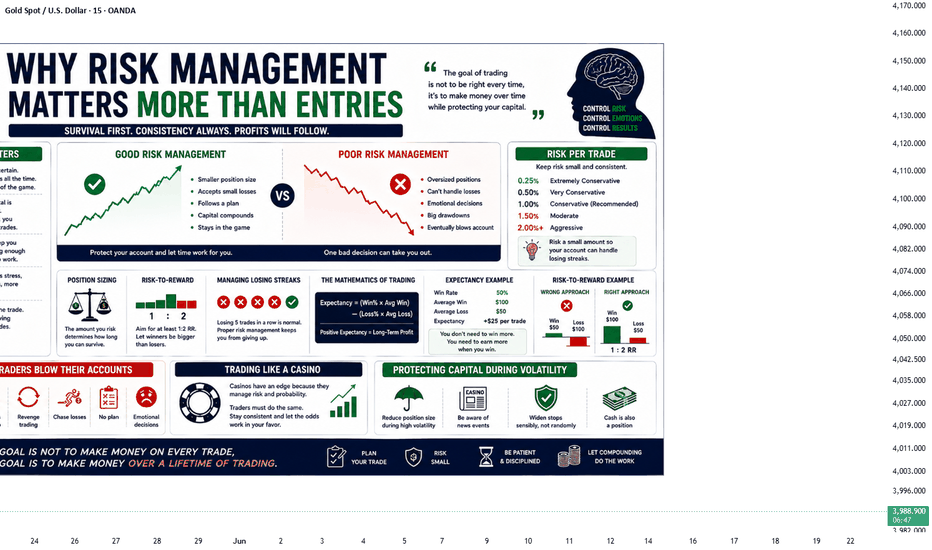
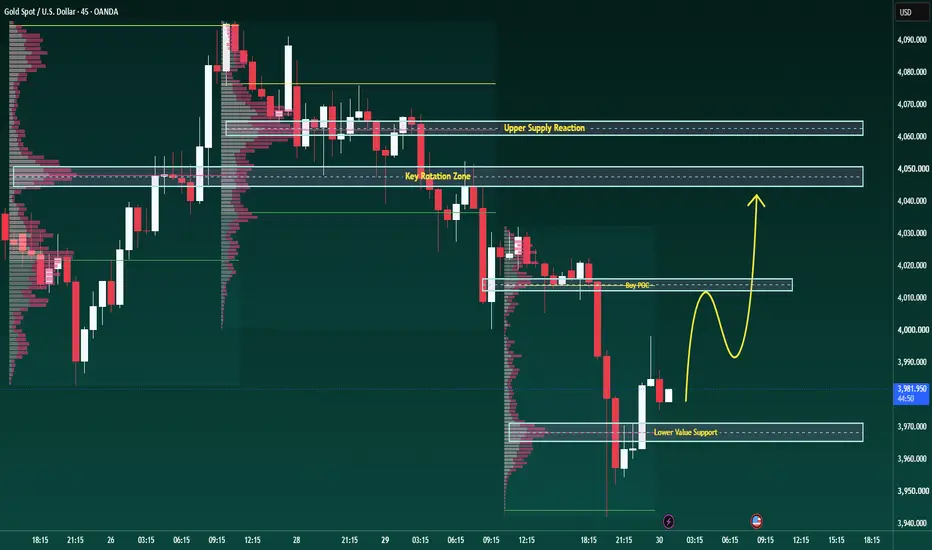
GOLD HIT LOWER VALUE, NOW THEBRIAN XAUUSD – GOLD HIT THE LOWER VALUE, NOW THE REAL TEST BEGINS
Yesterday’s structure played out cleanly. Gold rejected from the upper value area, broke lower, and moved directly into the lower value support zone.
Now the market is no longer in the same position.
Gold is trading near the lower value area around 3,965 - 3,970 after a strong bearish rotation. This is where late sellers can get trapped if price starts to build acceptance above the low. But it is also where weak buyers can fail if price cannot reclaim the next value zone.
Technical structure
On the short-term chart, gold is trying to stabilize after the sell-off.
The key message from Volume Profile is simple: price has left the upper value area and is now testing whether the lower value support can attract buyers.
The Buy POC around 4,010 - 4,015 is the first important level above current price. If gold reclaims this zone, the rebound can extend towards the Key Rotation Zone around 4,045 - 4,050.
Above that, the Upper Supply Reaction zone around 4,060 - 4,065 remains the area where sellers may defend again.
Important zones
Lower Value Support: 3,965 - 3,970
Current reaction base after the drop.
Buy POC: 4,010 - 4,015
First value level gold needs to reclaim.
Key Rotation Zone: 4,045 - 4,050
Main decision area if the rebound continues.
Upper Supply Reaction: 4,060 - 4,065
Stronger resistance where sellers may return.
Trading scenario
Buy reaction from Lower Value Support 3,965 - 3,970
Entry:
Look for buy positions only if price holds above 3,965 - 3,970 and shows clear bullish rejection.
Stop Loss:
Below the lower value support or below the recent sweep low.
Take Profit:
TP1: 4,010 - 4,015
TP2: 4,045 - 4,050
TP3: 4,060 - 4,065 if momentum expands
This is a reaction trade from lower value, not a confirmed trend reversal.
Final view
Gold followed yesterday’s bearish path well. But after reaching lower value, the market now enters a new decision phase.
If buyers defend 3,965 - 3,970, gold can build a corrective rebound back into 4,010 and possibly 4,045.
If this lower value support fails, the bearish auction continues and sellers remain in control.
The question now is simple:
Is this the start of a real rebound, or just another pause before the next sell wave? Long 
Technical AnalysisAsk two traders why they trust technical analysis, and you'll probably hear two different answers.
One might say it's because support and resistance work.
Another may point to moving averages, RSI, or chart patterns.
But beneath every indicator and every pattern lies one simple truth:
Technical analysis works because people behave in predictable ways.
Charts don't move because of lines, indicators, or mathematical formulas.
They move because millions of traders make decisions based on fear, greed, hope, confidence, and uncertainty.
Technical analysis is simply a way of studying those decisions.
Every Chart Is a Record of Human Behavior
A price chart is much more than candles moving up and down.
It is a visual history of every buying and selling decision made by market participants.
Every bullish candle reflects confidence.
Every bearish candle reflects caution or fear.
Every breakout shows increasing demand.
Every rejection reveals strong opposition from buyers or sellers.
Instead of thinking of charts as numbers, think of them as a record of crowd psychology.
Why History Often Repeats Itself
One of the basic ideas behind technical analysis is that history tends to repeat.
Not because markets are identical, but because human emotions rarely change.
Greed creates buying pressure.
Fear creates panic selling.
Hope encourages traders to hold losing positions.
Confidence attracts new buyers.
These emotional cycles have existed for decades, and they continue to shape today's markets just as they did years ago.
That is why similar price patterns continue to appear across different markets and timeframes.
Why Support and Resistance Matter
Support and resistance are not magical lines.
They are areas where traders previously made important decisions.
When price returns to those levels, many participants remember what happened before.
Some traders buy because price bounced there previously.
Others sell because they expect another rejection.
As more traders focus on the same levels, those areas naturally become zones of increased activity.
The chart reflects collective memory.
Chart Patterns Reflect Crowd Decisions
Patterns such as triangles, flags, double tops, and head and shoulders are not random formations.
Each one represents changing emotions among buyers and sellers.
A breakout often shows growing confidence.
A failed breakout may reveal hesitation.
A reversal pattern can signal that one side is losing control while the other is gaining strength.
Understanding the psychology behind a pattern is often more valuable than simply memorizing its shape.
Indicators Measure Behavior, Not the Future
Many beginners believe indicators predict market direction.
In reality, indicators measure what price has already done.
RSI measures momentum.
Moving averages smooth price trends.
MACD compares momentum over different periods.
Volume shows participation.
These tools do not create market movement.
They help traders understand the behavior already reflected in price.
Using them with market context is far more effective than relying on any single indicator.
Why No Tool Works All the Time
One of the biggest misconceptions in trading is the search for a perfect indicator.
No strategy wins every trade.
Markets constantly change because human behavior constantly changes.
News events, economic data, market sentiment, and liquidity all influence price.
Technical analysis provides probabilities, not certainty.
Successful traders understand this and focus on managing risk rather than predicting every move correctly.
The Importance of Confluence
Professional traders rarely base decisions on a single signal.
Instead, they look for confluence.
For example, imagine price reaches a major support level while:
RSI shows oversold conditions.
A bullish candlestick pattern appears.
Volume increases.
The trend remains intact.
Each piece of evidence supports the others.
This combination often creates stronger trading opportunities than relying on one indicator alone.
Final words:
Technical analysis is often misunderstood as a collection of lines, indicators, and patterns.
In reality, it is the study of human behavior displayed through price.
Every chart reflects emotion.
Every trend reflects changing confidence.
Every reversal reflects shifting expectations.
The traders who achieve long-term success are not those who memorize the most indicators.
They are the ones who understand the people behind every candle.
Because markets may evolve with technology, but human psychology remains remarkably consistent.
And that is why technical analysis continues to work generation after generation.
Ask two traders why they trust technical analysis, and you'll probably hear two different answers.
One might say it's because support and resistance work.
Another may point to moving averages, RSI, or chart patterns.
But beneath every indicator and every pattern lies one simple truth:
Technical analysis works because people behave in predictable ways.
Charts don't move because of lines, indicators, or mathematical formulas.
They move because millions of traders make decisions based on fear, greed, hope, confidence, and uncertainty.
Technical analysis is simply a way of studying those decisions.
Every Chart Is a Record of Human Behavior
A price chart is much more than candles moving up and down.
It is a visual history of every buying and selling decision made by market participants.
Every bullish candle reflects confidence.
Every bearish candle reflects caution or fear.
Every breakout shows increasing demand.
Every rejection reveals strong opposition from buyers or sellers.
Instead of thinking of charts as numbers, think of them as a record of crowd psychology.
Why History Often Repeats Itself
One of the basic ideas behind technical analysis is that history tends to repeat.
Not because markets are identical, but because human emotions rarely change.
Greed creates buying pressure.
Fear creates panic selling.
Hope encourages traders to hold losing positions.
Confidence attracts new buyers.
These emotional cycles have existed for decades, and they continue to shape today's markets just as they did years ago.
That is why similar price patterns continue to appear across different markets and timeframes.
Why Support and Resistance Matter
Support and resistance are not magical lines.
They are areas where traders previously made important decisions.
When price returns to those levels, many participants remember what happened before.
Some traders buy because price bounced there previously.
Others sell because they expect another rejection.
As more traders focus on the same levels, those areas naturally become zones of increased activity.
The chart reflects collective memory.
Chart Patterns Reflect Crowd Decisions
Patterns such as triangles, flags, double tops, and head and shoulders are not random formations.
Each one represents changing emotions among buyers and sellers.
A breakout often shows growing confidence.
A failed breakout may reveal hesitation.
A reversal pattern can signal that one side is losing control while the other is gaining strength.
Understanding the psychology behind a pattern is often more valuable than simply memorizing its shape.
Indicators Measure Behavior, Not the Future
Many beginners believe indicators predict market direction.
In reality, indicators measure what price has already done.
RSI measures momentum.
Moving averages smooth price trends.
MACD compares momentum over different periods.
Volume shows participation.
These tools do not create market movement.
They help traders understand the behavior already reflected in price.
Using them with market context is far more effective than relying on any single indicator.
Why No Tool Works All the Time
One of the biggest misconceptions in trading is the search for a perfect indicator.
No strategy wins every trade.
Markets constantly change because human behavior constantly changes.
News events, economic data, market sentiment, and liquidity all influence price.
Technical analysis provides probabilities, not certainty.
Successful traders understand this and focus on managing risk rather than predicting every move correctly.
The Importance of Confluence
Professional traders rarely base decisions on a single signal.
Instead, they look for confluence.
For example, imagine price reaches a major support level while:
RSI shows oversold conditions.
A bullish candlestick pattern appears.
Volume increases.
The trend remains intact.
Each piece of evidence supports the others.
This combination often creates stronger trading opportunities than relying on one indicator alone.
Final words:
Technical analysis is often misunderstood as a collection of lines, indicators, and patterns.
In reality, it is the study of human behavior displayed through price.
Every chart reflects emotion.
Every trend reflects changing confidence.
Every reversal reflects shifting expectations.
The traders who achieve long-term success are not those who memorize the most indicators.
They are the ones who understand the people behind every candle.
Because markets may evolve with technology, but human psychology remains remarkably consistent.
And that is why technical analysis continues to work generation after generation.
Education 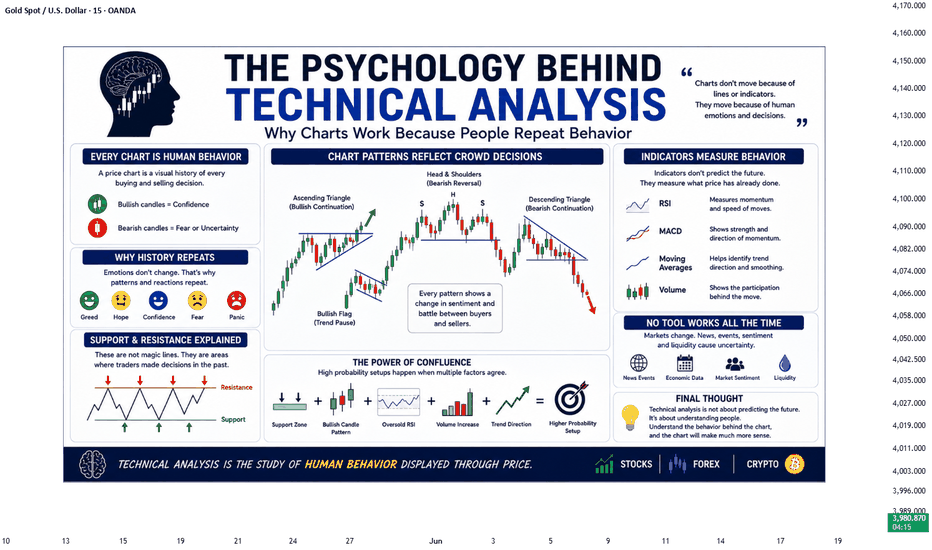
XAUUSD: The Quarterly Close Trap Is LIVE — Do NOT Fall For It!Market Condition : Extreme Institutional Volatility / Execution Requires Extreme Patience
Bias: Neutral-Bullish Trigger (Stay Sidelined for the Pullback)
We have a massive technical convergence playing out right now. Today, June 30th, we are witnessing a simultaneous Monthly and Quarterly candle close.
Days like today do not follow normal retail patterns. Large hedge funds, central banks, and institutional algorithms are actively engaged in "Window Dressing"—rebalancing their books and chasing liquidity to pin specific closing prices before the new quarter opens tomorrow.
Looking at the 4-hour chart uploaded here, let's break down the macro structure and how we plan to execute on the lower timeframes.
The Technical Picture:
On this 4H frame, Gold cleanly executed a major liquidity raid, aggressively flushing below the consolidation floor down to the $3,958.61 region to clean out retail stops. Immediately after catching those sell-stops, the market printed a sharp, aggressive V-shape recovery back up to $3,989.97.
While we are viewing the 4-hour layout here, dropping down to the 15-minute lower timeframe shows that this sudden upward displacement has given us an early Market Structure Shift (MSS). While this structurally opens the door for the highly anticipated higher-timeframe retracement toward our Daily POI (~$4,150–$4,200), we cannot blindly buy the top of this green leg.
The London & New York Game Plan:
Because of the heavy quarterly settlement manipulation, algorithms love to print massive fakeouts and volatile whipsaws. If the market builds genuine bullish momentum, the first draw on liquidity will be the minor internal high marked at $4,096—but chasing it right now is a major trap.
🚫 Do NOT Chase: If London continues to pump vertically without a rest, we stay completely sidelined. Chasing a premium on a quarterly close day is a fast track to getting stopped out.
📉 The Pullback Entry : We will keep our execution bias entirely neutral until London or New York provides a deep, corrective pullback. On our lower timeframes, we are looking for the price to mitigate a 15-minute Fair Value Gap (FVG) or demand zone around $3,960–$3,970.
⚡ The Confirmation: If that demand zone holds and prints clean lower-timeframe rejection candles, only then do we execute a low-risk buy targeting the higher-timeframe structural pullback.
Let the big funds fight it out during the session transitions and print their closing wicks today. Protect your capital, wait for the mitigation, and trade only with confirmed displacement!
How are you playing this 4-hour liquidity sweep? Letting it pull back to demand, or sitting today out entirely? Drop your plan below!
Manage your risk and protect your profits.
Disclaimer: Educational purposes only. No tips or financial advice. XAU/USD (Gold) 45-Minute Technical Analysis### **Market Structure Overview**
On the 45-minute timeframe, XAU/USD continues to trade within a well-defined bearish market structure. After failing to sustain the previous recovery, price has resumed its downward momentum, producing a sequence of **lower highs and lower lows**, which confirms that sellers remain in control.
The latest sharp decline below the dynamic trend ribbon reinforces the prevailing bearish sentiment. Although a minor rebound is currently underway, the overall trend remains negative unless buyers can reclaim higher resistance levels.
---
### **Trend Analysis**
The dynamic trend ribbon has flipped firmly bearish and is acting as **dynamic resistance**. Every recent recovery has been rejected near this resistance zone, indicating that sellers continue defending higher prices aggressively.
Price is currently trading beneath all major dynamic resistance levels, suggesting that rallies are likely to attract fresh selling pressure rather than signal a trend reversal.
---
### **Momentum Analysis (RSI)**
The Relative Strength Index (RSI) recently bounced from oversold territory and is attempting to recover toward the mid-range.
This indicates:
* Selling pressure has temporarily slowed.
* A short-term corrective rebound is possible.
* Momentum remains weak while RSI stays below the bullish zone.
* Unless RSI establishes strength above the 50 level, the broader bearish outlook remains unchanged.
---
### **Key Resistance Zones**
* **3,995–4,010** – Initial recovery resistance.
* **4,025–4,050** – Strong dynamic resistance aligned with the bearish trend ribbon.
* **4,075–4,100** – Major resistance where sellers previously regained control.
---
### **Key Support Zones**
* **3,965–3,950** – Immediate support currently being tested.
* **3,930–3,920** – Short-term bearish target.
* **Below 3,920** could expose additional downside if bearish momentum accelerates.
---
### **Trading Outlook**
The projected price path suggests that XAU/USD may experience a limited corrective bounce before encountering renewed selling pressure beneath resistance. As long as price remains below the bearish trend ribbon, sellers continue to hold the technical advantage.
A rejection from the **3,995–4,025** resistance area could trigger another wave of selling toward the **3,950** region, with further downside possible if support fails.
However, a sustained breakout above **4,050** would weaken the current bearish structure and increase the probability of a broader bullish recovery.
---
## **Conclusion**
The 45-minute chart continues to favor the bears despite the ongoing oversold rebound. Market structure, dynamic resistance, and trend alignment all indicate that the current recovery is corrective rather than a confirmed reversal. Traders should monitor price behavior around nearby resistance, as failure to break higher could provide opportunities for the bearish trend to resume Short 
 Long
Long
XAUUSD: The Bounce Is Not the Reversal XAUUSD: The Bounce Is Not the Reversal
Market Context
Gold is trying to recover from the lower area, but the bigger picture is still controlled by sellers. The recent drop broke the short-term support structure, and the rebound so far looks more like a reaction from oversold conditions than a true bullish reversal.
The main story is simple: buyers are trying to breathe, but sellers are still waiting above. Unless gold can reclaim the intraday rejection zone with strength, every bounce remains vulnerable.
Technical Structure
Gold is trading around 3,974 after a sharp breakdown below the previous support area. The main trend is still downward, and the chart continues to show lower highs with bearish BOS signals.
The nearest area to watch is 3,979 - 3,993. If price reclaims this zone, a short-term bounce may develop toward the intraday rejection zone around 4,010 - 4,020.
But this is where the real test begins. If gold reaches 4,010 - 4,020 and fails to break higher, sellers may react early and push price back down.
The stronger sell area remains higher around 4,058 - 4,068, while the major sell zone is still 4,070 - 4,095. As long as price remains below these zones, the bearish structure stays valid.
Key Levels
Current Price: 3,974
Near Reclaim Zone: 3,979 - 3,993
Intraday Rejection Zone: 4,010 - 4,020
Seller Defense Zone: 4,058 - 4,068
Major Sell Zone: 4,070 - 4,095
Current Low Area: 3,940 - 3,950
Bearish Continuation: Below 3,940
Trading Plan
Buy Scenario: Short-Term Corrective Bounce
Entry: Above 3,993 after bullish confirmation
Stop Loss: Below 3,960
TP1: 4,010
TP2: 4,020
TP3: 4,058
Conditions: Price must reclaim 3,979 - 3,993 with strength, hold the retest, and show clear bullish reaction on the lower timeframe. This is only a corrective bounce setup, not a full reversal, so avoid chasing if price already reaches the rejection zone too quickly.
Sell Scenario: Rejection From Intraday Zone
Entry: 4,010 - 4,020 after bearish confirmation
Stop Loss: Above 4,040
TP1: 3,993
TP2: 3,979
TP3: 3,950
Conditions: Price pushes into the intraday rejection zone but fails to hold above it. Bearish rejection appears, buyers lose momentum, and price starts forming lower highs again. This is the first area where sellers may return early.
Alternative Sell Scenario: Sell From Major Zone
Entry: 4,058 - 4,095 after bearish confirmation
Stop Loss: Above 4,120
TP1: 4,020
TP2: 3,993
TP3: 3,950
Conditions: Price recovers into the higher sell zone but fails to break structure. Strong rejection appears from 4,058 - 4,095, confirming that sellers are still defending the main bearish trend.
Breakdown Sell
Entry: Below 3,940 after confirmed breakdown and retest
Stop Loss: Above 3,979
TP1: 3,920
TP2: 3,900
TP3: 3,880
Conditions: Price breaks the current bottom, retest fails, and bearish momentum continues. This would confirm that the short-term bounce has failed and sellers are ready to extend the next downside leg.
Overall Bias
The main trend is still bearish. Gold may create a short-term rebound from the current low area, but the bounce is not enough to confirm a reversal.
The key area is 4,010 - 4,020. If gold fails there, sellers may return quickly. Only a clean reclaim above 4,058 - 4,095 would weaken the bearish view.
For now, the better plan is to wait for reaction at resistance instead of chasing the bounce from the middle.
Will gold reclaim 4,020 and extend the recovery, or will sellers use this bounce to push price lower again?
Long 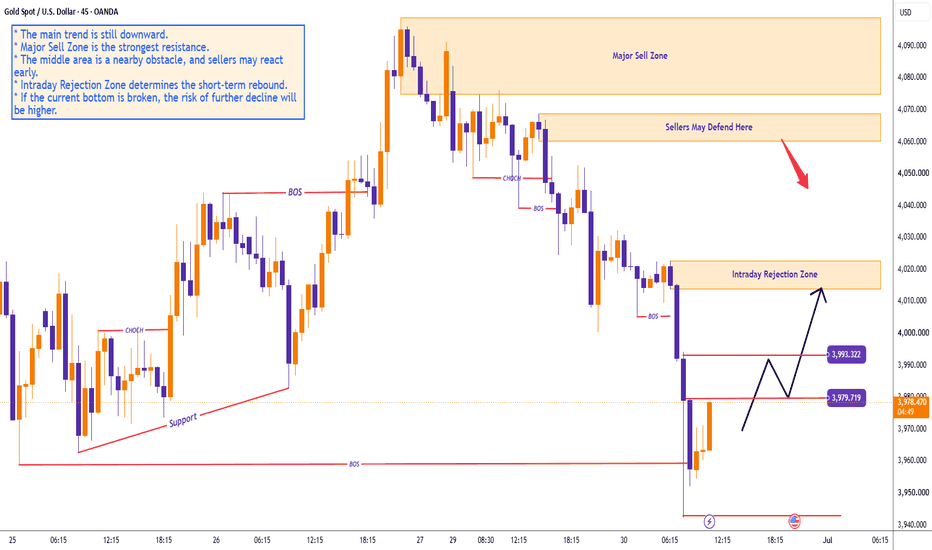
Gold Rejected the Wall and Is Breaking LowerGold Rejected the Wall and Is Breaking Lower, But This Is Not the Place to Chase It
The 4,097 gate held, exactly as the suggested. Gold tested the H4 supply, failed to sustain above it, rolled over, and is now breaking the low printed on June 24, trading down into the 3,970s. The structure did its job and the bears took back control. But here is the part that separates discipline from greed: this is not where you press shorts, and it is not yet where you buy. It is where you wait.
Let me walk through why.
THE REJECTION THAT CONFIRMED THE BOUNCE WAS A BOUNCE
Price pushed into the H4 supply at 4,060 to 4,097, could not hold above it, and reversed. That rejection answered the question the whole market was asking. The bounce off weekly demand was a bounce, not a reversal, and the supply zone overhead proved it on the first real test. Every timeframe has snapped back to Full Bear, 15m, 1H, 4H, 1D and 1W all bearish again, and price is now taking out the June 24 low. On structure alone, the path of least resistance is still down.
So the trend read has not changed. It is bearish, and it remains bearish until something above breaks.
WHY THIS IS NOT A SELLING ZONE
Here is where experience overrules the obvious. Yes, the structure is bearish. No, that does not make this a good place to sell. Price is already deep inside the weekly demand at 4,059 to 3,884, sitting right on the round 4,000 level and breaking recent lows. Selling into the bottom of a major demand zone, after a multi week decline, with funds already heavily net long and the market this stretched, is chasing. The easy money on the short side was made far higher, up at the supply. Down here, you are selling to the people who are supposed to be buying.
Add the calendar. Today is the monthly close. That alone guarantees elevated volatility and the kind of whippy, two sided price action that punishes anyone forcing a position into the close. Liquidity games around a monthly candle are not where you want size on.
NEAR A BOTTOM, BUT NOT A CONFIRMED ONE
The honest read is that we are likely closer to a bottom than a top here. Price is in the demand zone the bigger picture has been pointing to, the weekly demand at 4,059 to 3,884, with the monthly demand far below at 3,453 as the deeper backstop. A test of the demand low, even a sweep beneath it, is entirely on the table and would be a textbook place for a reversal to begin. But likely is not confirmed. There is no buy signal yet. The structure has not turned, and a knife catch into a falling market is not a setup, it is a hope.
So the plan from here is simple and it is a plan of patience. No new shorts, the risk to reward on selling the bottom of demand is poor and the trend is old. No longs either, not until price shows a real reaction in the zone and the structure gives a confirmation, a shift in character to the upside that tells you buyers have actually stepped in. Until one of those arrives, the correct position is no position.
THE BOTTOM LINE
Gold rejected the H4 supply at 4,097, confirmed the bounce was only a bounce, and is breaking the June 24 low into the 3,970s on a monthly close. Structure is still bearish, but price is deep in the weekly demand at 4,059 to 3,884 and likely near a bottom, which makes this a poor place to sell and too early to buy. The demand low can still be tested or swept before any turn. This is a watching and waiting area, not a trading one. I am not selling here, I am not buying here(for swing buyer without leverage this is good opportunity however), and neither should be done on hope. Wait for the confirmation, then act.
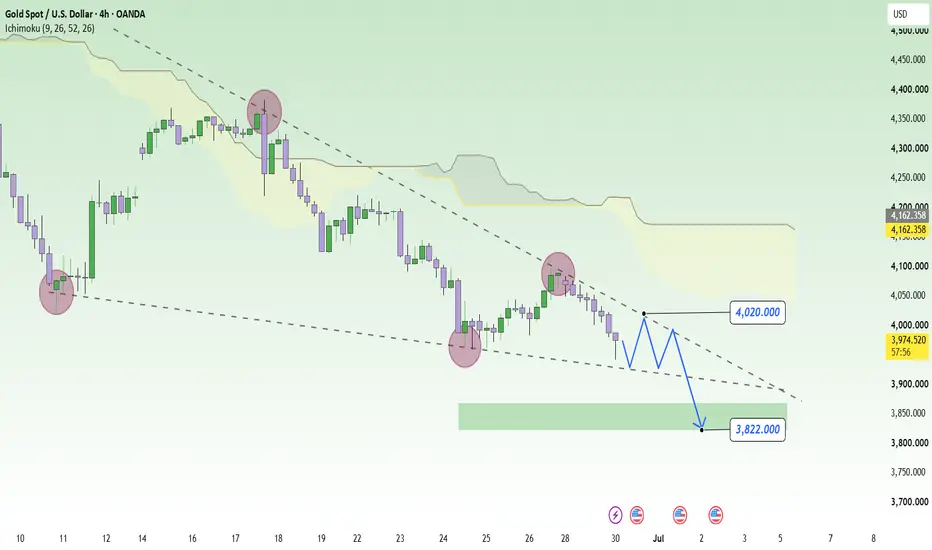
XAUUSD: Breaking below 4,000; sellers paving the way to 3,822XAUUSD is trading around 3,968, positioned entirely below the Ichimoku cloud and remaining locked in a clear bearish structure. Notably, the price has not only lost the psychological 4,000 level but continues to be pressured below the downtrend line extending from previous highs.
The 4,020 area now serves as the immediate resistance. Should gold stage a pullback to this zone but fail to break through, it could mark a point where sellers regain control. Given the current structure, the next downside target on the chart is 3,822, situated within a lower support zone.
Entry Focus: Prioritize SELL positions if the price retraces to the 4,000–4,020 range and a rejection candle appears.
Target: 3,822
Invalidation: The bearish scenario weakens if the H4 timeframe closes decisively above 4,035. Short 
THE BIGGEST GOLD TRAP IS ABOUT TO BEGINAfter conducting extensive market research, I've finally completed my analysis based on the current market structure and price action.
Over the past several weeks, gold has remained under consistent selling pressure. Throughout almost the entire month of June, sellers have controlled the market with aggressive downside momentum. Instead of trying to predict reversals, I believe our focus should remain on trading what the market is actually showing us.
Yes, we've seen a few short-term buying moves, but in my opinion those rallies were nothing more than liquidity grabs engineered by the market makers. They created enough optimism to attract buyers before continuing the larger bearish trend. That's exactly why getting emotionally attached to every bounce can become expensive.
Now let's talk about today's plan.
As I've been mentioning for the past few weeks, the $4084 level was the most important confirmation level for buyers. Unless gold managed to close above that area, there was no reason to become aggressively bullish.
The market failed to reclaim $4084, and on top of that it also broke below the major support at $4025.
That gives us a very clear roadmap.
Until gold starts closing back above these key levels, my primary focus remains on selling rather than buying. The trend is bearish, momentum is bearish, and respecting momentum is usually a much safer approach than trying to catch a bottom.
The selling pressure after today's Asian session was extremely strong. Looking at the current order flow, I don't expect a meaningful recovery unless the market decides to manipulate both buyers and sellers through a liquidity sweep.
In my view, the market has already completed a one-sided move during the Asian session. Because of that, I expect the next few hours to be more range-bound, where both buyers and sellers could get trapped before the next impulsive move begins.
As long as gold remains below $3980, I believe sellers continue to hold the advantage.
The red zone marked on my chart will remain my preferred selling area.
My downside targets are:
$3952 → $3933 → $3922 → $3891
Once gold approaches the $3900-$3890 region, I believe traders should become much more cautious.
If you study the historical structure, this was the exact zone where last year's major bullish expansion began. Because of that, I wouldn't be surprised to see the market temporarily respect this area before creating a sharp liquidation rally.
That rally could easily trap traders who become aggressively bearish below $4000. A strong short squeeze during this week would not surprise me at all before the larger trend eventually resumes.
Interestingly, the current market psychology reminds me of last year's environment.
Last year, gold continued rallying for weeks until almost everyone became convinced that buying was the only direction. Once the majority committed to longs, the market reversed.
Today we're seeing the opposite.
Bearish sentiment is increasing every single day. Whenever everyone starts thinking in the same direction, the market often creates a move that hurts the majority before continuing with the higher-timeframe trend.
That's why staying objective is far more important than becoming emotionally attached to a bias.
For now, the strategy remains simple.
Trade with the current trend, respect resistance more than support, avoid chasing emotional moves, and let the market confirm every setup before entering.
Good luck to everyone this week.
Also, don't forget that NFP is scheduled for Thursday. News events like this often become the perfect opportunity for the market to generate liquidity before revealing its true direction.
Stay focused, stay patient, and keep your eyes on the price action.
What's your market plan for today?
Let me know in the comments. I'm interested to see how everyone is reading the current market.
XAUUSD 1H AnalysisThe overall market direction is still bearish, and I’m continuing to follow the main trend. However, the current structure is showing a temporary move against the trend, which looks like a retesting phase before the next bearish continuation.
I have identified a reversal zone where price is likely to react. The supply zone was formed after a CRAV Line break, followed by a 1.5X liquidity move, giving additional confirmation that this area can act as a strong resistance.
Before the market continues lower, I expect a short-term demand (pullback) from the marked demand zone. Once price reaches the reversal zone, I’ll be watching for a negative CCP, bearish engulfing, rejection, or any strong bearish confirmation candle. If that confirmation appears, the market can resume its downside move with the main trend.
As of now, I have already mapped the expected structure. This is only a directional expectation, and I’ll let the price action confirm the setup before entering.
Note: This analysis is based on the MMC Concept by Candle King. Always wait for proper confirmation before taking any trade. Short 
Long 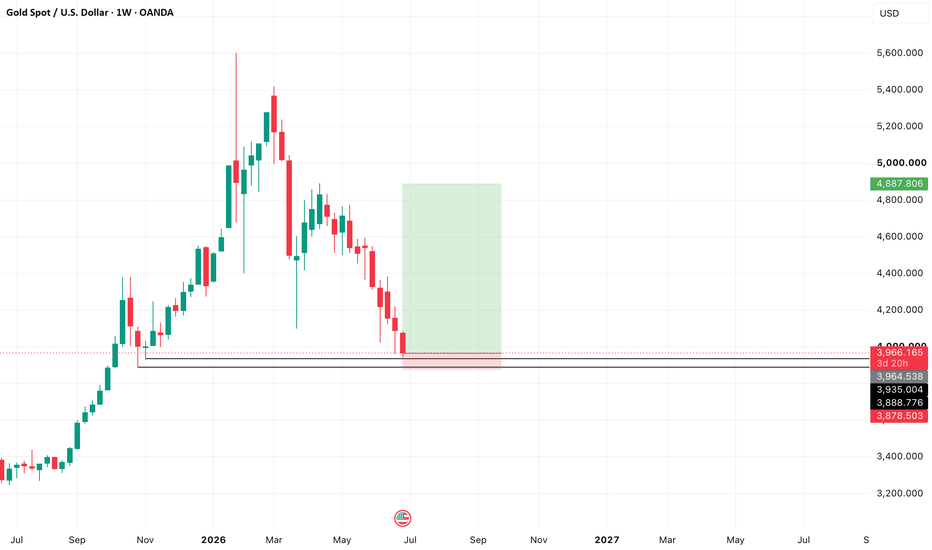
Short 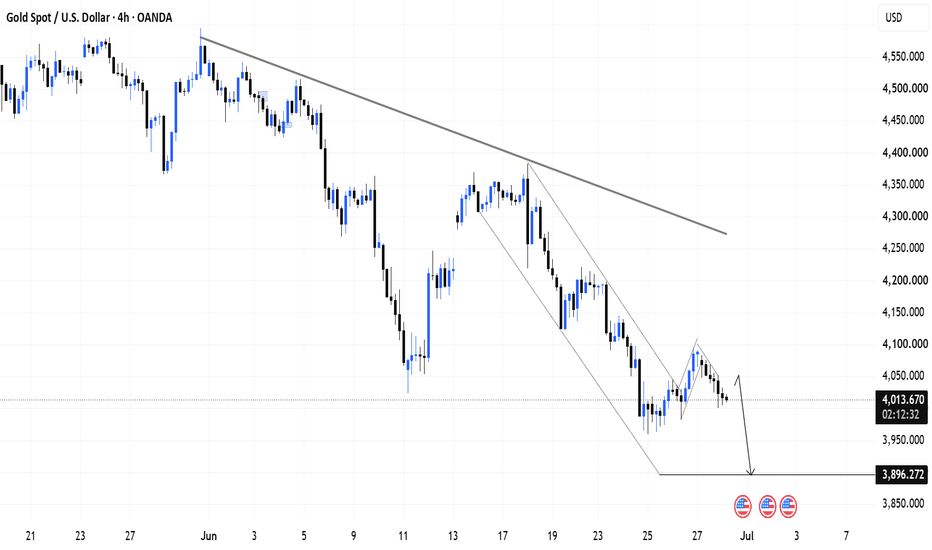
Gold Analysis & Trading Strategy | June 29-30🌐Hello traders! I’m Jack Blackwell, with 15 years of experience in analysis and trading in the futures and forex markets. Below are my technical analysis views based on the current XAUUSD (4H and 1H timeframes) chart structure.
✅ 4-Hour Trend Analysis
From the 4-hour timeframe, the current price has fallen back below MA5 (4032) and is also clearly below MA10 (4050). It is now testing the Bollinger Band midline / MA20 (4025) area. This level is very important: if the 4-hour candle continues to close below 4025, it means the previous corrective rebound has clearly weakened. The 4053–4060 area above has now become an important short-term resistance zone. If price cannot reclaim this area, it may continue to pull back toward 4010 → 3998 → 3959.
✅ 1-Hour Trend Analysis
From the 1-hour chart, gold has continued to decline after rallying near 4096, forming a clear structure of lower highs and lower lows. Short-term bears currently have the upper hand.
The current price is consolidating around 4025, but it is still trading below MA10 (4030) and MA20 / Bollinger Band midline (4045), indicating that the 1-hour rebound remains weak. In particular, the 4045–4053 area is a confluence resistance zone where the 1-hour Bollinger Band midline, moving average resistance, and previous pivot level overlap.
🔴 Key Resistance Levels
● 4030–4035: First short-term resistance zone
● 4045–4053: Key 1-hour resistance zone
● 4060–4070: Confirmation zone for a stronger rebound
● 4090–4096: Strong overhead resistance zone
🟢 Key Support Levels
● 4010–4011: Current first support
● 3998–3990: Support zone after a short-term breakdown
● 3960–3959: Key previous-low defensive area
● 3940: Important lower support on the 4-hour timeframe
✅ Trading Strategy Reference
🔰 Short Position Strategy: Mainly Sell on Rebounds
👉 Sell Zone : 4035–4050
🎯 Targets: 4011 → 3998 → 3960
📍 Rationale:
● The 1-hour chart has already formed a short-term bearish structure.
● Price is trading below the 1-hour MA10 and MA20.
● After the 4-hour rebound was rejected, price has returned to the Bollinger Band midline area. If it breaks below this level, the bearish momentum may accelerate.
🔰 Long Position Strategy: Only Look for Short-Term Rebounds Near Support
👉 Aggressive long zone: Watch for stabilization around 4010–4011
👉 Conservative long zone: Wait for a clear bottoming signal around 3960–3959
🎯 Targets: 4030 → 4045 → 4053
📍 Rationale:
● 4010 is the current first support, where a technical rebound may appear in the short term.
● However, the 1-hour trend remains bearish, so long positions should only be treated as short-term trades and should not be held too long.
● Only if price reclaims 4053–4060 can short-term bulls show signs of strengthening again.
⚠️ Trend Outlook
👉 If gold breaks below 4010 and fails to recover above it, short-term bears may continue to gain momentum, with downside targets at 3998 → 3960 → 3940.
👉 If price rebounds and holds above 4053–4060, it would indicate that the short-term bearish rhythm has been disrupted, and price may then have a chance to retest 4070 → 4090.
🙌 If you find my analysis helpful, please like, share, and stay tuned for future updates. Your support is my motivation to continue sharing professional insights. Wishing everyone smooth trading and steady profits!